Introduction
This project will allow the user to use a vector graphics interface to draw and edit shapes. Those shapes can then be converted into GDI+ code that you can drag into your application project.
Background
Over the years, there have been a number of applications that have required more graphics functionality than what the standard MS controls have provided. I always had to revert to coding all of the graphics by hand, or creating an image from a third-party app and painting it on my control. However, there is a problem with both these methods. The first method requires a considerable amount of time. The second method doesn't allow for any theme changes in the program, unless you draw and load multiple variations of the same image. This C# project is the solution to many frustrating hours of using the previous methods. I trust that many of you will find the code as useful as it has been to me.
Using the code
I have defined the following shapes that function as vector graphics shapes. All inherit from the base class, Shape.
ShapeRectangleShapeTriangleShapeCircleShapeLineShapePolygonShapeText
To avoid any confusion about the code structure, let me explain some things. We'll start in the Shape.cs file and touch on some of the highlights.
The Mouse events
There are three mouse methods that are created and bear the same name as MS control mouse event handlers. However, to reduce the size and complexity of the code, the Shape.cs mouse code behaves slightly different from MS's code. The MouseDown, MouseMove, and MouseUp events are passed to every control, and the control determines what to do with the information. For example, when a shape receives a MouseDown message, it performs validation to determine if it needs to update itself. Let's take a look at the MouseDown handler in the Shape.cs class.
public virtual EventData MouseDown(MouseEventArgs e)
{
     eventData.WasHit = HitTest(e);
     if (eventData.WasHit)
     {
          isSelected = true;
          painter.State.IsSelected = true;

          ...(additional code)

     }
     else if(isSelected)
     {
          isSelected = false
          painter.State.IsSelected = false;
          eventData.NeedsPainted = true;
     }
     eventData;
}
A few things are worth noting about the code above. Notice that the method is marked virtual. That is so any shape that inherits from Shape can override the MouseDown method and perform custom validation. This is necessary for a shape like ShapePolygon. The return type, EventData, bears some important responsibilities. As you can see at the top of the code example, one property of the EventData is set by calling the HitTest() function which returns a boolean value. If the EventData says the mouse clicked over the shape, some internal shape variables are set. If the mouse did not hit the area and the shape was previously selected, we set EventData.NeedsPainted to true. The "NeedsPainted" variable will determine whether the parent control will invalidate itself. Once we've reached the bottom of the method, the EventData is passed to the caller, which in our case is the "ShapeManager.cs" file, which manages the collection of shape objects. One of the main methods that the shape revolves around is the abstract method, GeneratePath(). Every inherited shape must override and provide the drawing logic for the shape. For example, the drawing logic for ShapeTriangle is:
protected override void GeneratePath()
{
_Path = new System.Drawing.Drawing2D.GraphicsPath();
_Path.AddLine(Location.X + (Size.Width/2), Location.Y,
Location.X + Size.Width, Location.Y+Size.Height);
_Path.AddLine(Location.X + Size.Width, Location.Y+Size.Height,
Location.X, Location.Y+Size.Height);
_Path.AddLine(Location.X, Location.Y+Size.Height,
Location.X + (Size.Width});
}
Another important item is the Painter object. While creating this project, I noticed that when you step away from conventional solid colors and into gradients, the code can get pretty messy. With that in mind, I created a Painter object that hooks up to the shape. The beauty of this design is that the shape's rendering can be as complex as you write the Painter object to be. If a paint algorithm needs to be modified, the shape won't have to be altered. Along with the Painter, I have created a Windows Form that provides an interface for setting the Painter's properties. You are given two choices for painting: Solid or Gradient. Let's look at the most complex property, the Gradient. The Painter class has been commented to explain most of the code sections, but let me touch on two objects that have been created to aid in setting the Blend property: BlendSmoothness and Coverage. In case you are not familiar with the Blend property of a LinearGradientBrush, the Blend property allows the programmer to specify the positions and the amount that two colors blend together. The topic is out of scope for this article, but I encourage you to read a good article on the subject. Please note that the following two properties do not belong to the Blend property!

As its name implies, BlendSmoothness is a byte property that determines how smooth the two colors will blend together. It accepts values between 0 and 100, representing 0% to 100%. The Coverage property also accepts values between 0 and 100. It determines how much space the first color will occupy of the entire shape. A value of 100 will completely fill the shape with the first color. A good blend is usually obtained by setting both properties to 50.
Drawing vector shapes
While I could have created a massive library of complex shapes and conversion methods, I wanted to keep the project size down for this article. This framework should provide a foundation for you to expand or create additional shapes and drawing capabilities. The polygon is by far the most complex shape in the project. Other code examples that I have seen did not allow the user to convert the lines to Bezier curves. In my opinion, Beziers improve the look of an image far greater than short straight lines. I will also note that this is my first polygon object to create. If anyone has suggestions on improving the polygon or any other code section, I welcome your input. When creating a polygon, the shape will keep adding nodes with the MouseDown event until you hit the Enter key or switch tools. Once the shape has finalized, you can add additional nodes by double clicking on the outline of the polygon. When an image is composed of multiple shapes, it's easy to get confused on which shape is what after the code generation. For example, if you have fifteen shapes, the generated code would look something like: "Rectangle1, Rectangle2, Polygon1, etc..". A far greater approach would be: "CarBody, RightWheel, LeftFender, etc..". To edit the shape's name, navigate to: Shape -> Properties.
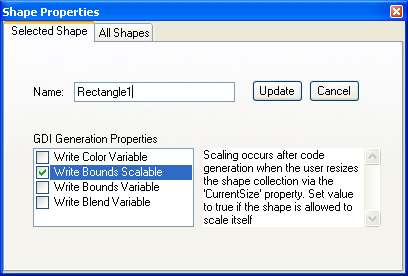
As you can see, you can change the shape's name and set some other important properties in regards to code generation. When you select each of the properties, a description of the property will appear on the right. Read each of these carefully to understand how they will affect the code output! It's important to note that the GDI Generation Properties will be updated as you select them. However, when editing the "Name" property, you must click the Update button.
Tracing an image
There is a cool feature I added in tracing out a third-party image. While trying to draw a complex shape from a JPEG, I got frustrated from having to guess the exact coordinates of the shape area. From that frustration, I inserted a feature where you can import an image: BMP, JPG, GIF, or PNG into the background of the drawing area. To access this feature, navigate to: File -> Set Background Image.
Generating GDI+ code
Once all the shapes have been drawn and the desired values are set, it's time to let the code generation begin! As the code is being generated, there is an important property that affects the output of all the shapes: the "Clipping" property. By default, the clipping rectangle is off and the GDI+ generation tool will make sure that all the shapes are included in the final bounds. However, there may be situations where you may want to clip the output. To turn the clipping rectangle on, navigate to File -> Show Clipping.
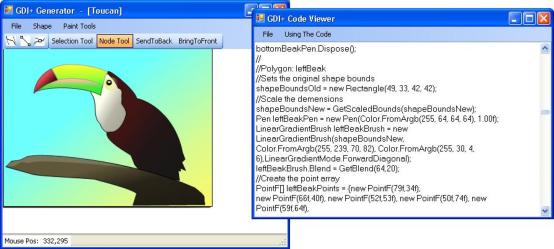
Step 1. To generate the shape code, navigate to: File -> View GDI+ Code. This will generate the code for a C# class file and load it into the code viewer, which is simply a multi-line textbox. Why do we generating code that defines a class file? Simply put, any GDI+ image that is moderately complex can be pretty lengthy. For example, the "Toucan.cs" file that you saw at the beginning is roughly 600 lines of code! This is not loosely generated code either. With one or two minor exceptions, I wouldn't write it any differently than if I was having to code the class by hand. If you are generating the project for the first time, you will receive a message informing you to create a name for the output class. Make sure to follow the naming conventions set forth by Microsoft to avoid an illegal class name. The code viewer will now open, and all appropriate shape and paint code will be loaded into it.
Step 2. Copy all contents, then paste the code into an empty C# class file. Be sure to name the class file the same as your generated class name to avoid confusion.
Step 3. To begin using the new class, create a Windows Form, and create a new instance of the generated GDI+ class at the top. A default namespace, "MyCustomGraphics", has been written to separate your classes from other code. The syntax for initiating a "Toucan.cs" class would be: wrap the form's OnPaint event and insert the code for painting your class. The code for painting the "Toucan.cs" class would be:
MyCustomGraphics.Toucan toucan = new MyCustomGraphics.Toucan();
Step 4. Next, trap the form's OnPaint event and insert the code for painting your class. The code for painting the "Toucan.cs" class would be:
protected override void OnPaint(PaintEventArgs e)
{
base.OnPaint(e);
e.Graphics.DrawImageUnscaled(toucan.Image, 0, 0);
}
Any shape that has been written to accept changes (color, bounds, etc.) has an enumerated value assigned to it. For example, if the "LeftBeak" polygon of the "Toucan" class has its property set to accept changes to its fill color, the enumerated value, "eShapeColor.LeftBeakFillColor" will be generated. A helper method called SetColor is also written, that accepts an "eShapeColor" enumeration and the new color. This cool feature ensures that no typos will occur. The only way to set a property wrong is to pass an incorrect enumeration.
toucan.SetColor(MyCustomGraphics.Toucan.eShapeColor.LeftBeak, Color.Brown);
toucan.RefreshImage();
this.Invalidate();
Let's look at the code example above. It's important to note that no rendering updates will be done until you call the RefreshImage() method. The reason should be obvious, but if you are about to update 20 shapes, you don't want the image to refresh itself 20 times! You want to do all your edits, then tell the image to refresh itself with the updates. After we refresh the image, we now tell the parent control to invalidate its surface area. If you are not familiar with invalidation, I encourage you to get a healthy knowledge of what it involves. This topic is crucial to graphics programs that perform complex paint jobs.
That's all folks! I trust this article has been helpful and informative. The topics discussed would each take a whole article to cover every bit of information thoroughly. Hopefully, this condensed article answered some of the main questions that will arise. Keep your eyes open, because I may write a future article on efficient ways to implement the generated class files.

