Introduction
Microsoft has reported that a frequent request from WPF developers is for more information on how to customize the NON-CLIENT area of a Window, to create custom Window frames. Published demos are often limited to supporting only rectangular windows, require Win32 Interop, or pollute client-side markup with frame-related details...
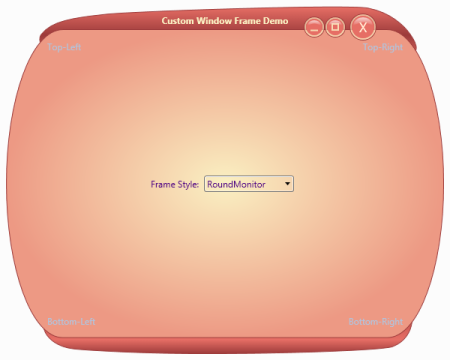
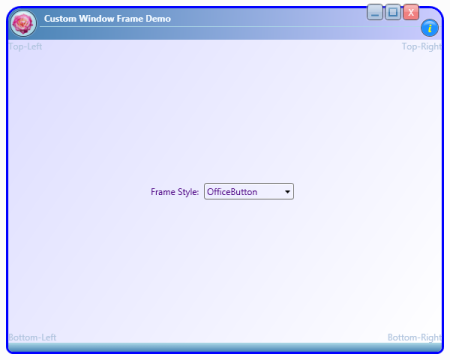
This article demonstrates a 100% WPF solution to support frames of any shape, with expected min/max/close button behaviors, mouse detection of irregular sizing borders with standard six-directional sizing, and information on how to maintain compatibility with Expression Blend (which is essential for designing complex "wrapping" and other non-trivial visual effects).


Customization is supported through a "CustomWindow" base class, fully encapsulated in a WPF Custom Control Library, insulating the client (below) from all frame-related details.

The attached "CustomFrameStyle" project features a minimal set of code, which might serve as an appropriate base for real world projects that require customization of the non-client area. The more complex "DynamicFrameSkinning" project is primarily a platform to demonstrate some useful related techniques that we leverage to dynamically switch "skins" based on selections made in the client.
The Basic Architecture
To apply a custom frame, simply derive your standard WPF client Window from the CustomWindow base class using the syntax below. Everything else happens inside the custom control library.
<custom:CustomWindow x:Class="ClientUI.MainWindow"
   xmlns="http://schemas.microsoft.com/winfx/2006/xaml/presentation"
   xmlns:x="http://schemas.microsoft.com/winfx/2006/xaml"
   xmlns:custom="clr-namespace:CustomControls;assembly=CustomControls"

   etc...

<custom:CustomWindow />
The main template for our custom control (in Themes\resCustomWindow.xaml) simply sets properties to remove the default frame appearance, and defines an embedded ContentControl which is styled to provide the desired custom look.
<Style TargetType="{x:Type local:CustomWindow}">
-->
<Setter Property="WindowStyle" Value="None" />
<Setter Property="AllowsTransparency" Value="True" />
<Setter Property="Template" />
<Setter.Value />
<ControlTemplate TargetType="{x:Type local:CustomWindow" />
<ContentControl x:Name="PART_CustomFrame" />
<ContentPresenter x:name="ClientArea" />
</ContentControl />
</ControlTemplate />
</Setter.Value />
</Setter />
</Style>
If your frame is nearly rectangular, you may want to define it entirely inside this template, but custom frames are often specifically intended NOT to be rectangular, and our demo switches between two styles, identified by ComponentResourceKeys "Norm" and "Max", to support normal and maximized Window states. Here is a view of the "Max" style (resCustomWindowMaximized.xaml), opened for editing in Expression Blend.

Switching Styles
Performing a style switch involves three steps, carried out in CustomWindow.cs.
First, we store a reference to the element we intend to style.
_customFrame = (Control)Template.FindName( "PART_CustomFrame", this );
Next, we apply the appropriate "Norm" or "Max" style...
Style style = (Style)TryFindResource
	( new ComponentResourceKey( typeof(CustomWindow), strStyleId ) );

if( style != null )
    _customFrame.Style = style;
Finally, if the Window state is NOT maximized, we must re-attach event handlers in the new template, to restore support for standard behaviors, such as dragging the TitleBar, mouse interaction with sizing borders, etc. Note that attempts to detect template "PART"s immediately after setting the style will fail, and we must hook up our handlers in a separate method that we call asynchronously.
if( WindowState == WindowState.Normal )
    new Thread( () => { UpdateFrameBehavior(); } ).Start();
Inside UpdateFrameBehavior, we marshall processing back to the UI thread, specifying DispatcherPriority.ContextIdle to ensure all background processing has completed.
Dispatcher.BeginInvoke( DispatcherPriority.ContextIdle, (ThreadStart)delegate
{
});
To reference the active TitleBar and sizing borders, we must call FindName on the current frame's template (not on CustomWindow's own template).
FrameworkElement titleBar =
    (FrameworkElement)_customFrame.Template.FindName
	( "PART_TitleBar", _customFrame );
The Role of Expression Blend
It's unlikely you'd resort to creating custom Window frames unless you intended to make significant changes, possibly involving Paths and non-rectangular regions, that are almost impossible to design without a tool like Expression Blend.
To edit an existing frame style in our "CustomFrameStyle" project, open the top level *.sln file, or CustomControls.csproj in Blend (I'm currently using the June 2.5 preview version). Under the Project tab, double-click on any XAML file in the Themes folder, click on the Resources tab, expand the section for the style you want to edit (for example, resCustomWindowNormal.xaml), and double-click on the ComponentResourceKey reference for the associated style. Because the client area is empty at design time, you will see something like this:

Click on the XAML tab and edit the top-level grid to provide some temporary dimensions (don't forget to delete these before running, or the frame will lose its ability to auto-size).
<Grid Margin="8" Width="500" Height="400" >
Switching back to the Design tab and double-clicking on the ComponentResourceKey style reference once again, will generate a more useful design surface.

Finally, under the "Objects and Timelines" section, right-click on "Style", and select "Edit Template".

Some published non-client area customization demos place invisible rectangles over the left, top, right, and bottom sides of a Window to create sizing borders, but this won't work for Frames with rounded or irregularly-shaped borders. Ideally, we'd like to be able to trace a Path around the entire frame, but such unbroken outline paths become distorted as the frame is resized (You can verify this by creating two identical overlapping rectangles with rounded corners in an empty project in Blend, converting one of the rectangles to a path, and watching the edges grow out-of-synch as the Window is resized).

To address this, we trace six SEPARATE overlapping paths in Blend, providing each Path segment with the appropriate sizing cursor, with no fill, and a transparent stroke 10 pixels wide. Mouse over detection will not be pixel perfect, but some experimentation with Blend's pen tool can get us very close. Note that we define sizing border segments in a separate grid, to avoid accidentally corrupting row or column dimensions auto-sized on contained design elements.
To edit existing border segments, expand the resource resColorsCustomWindow.xaml, and temporarily set brushSizingRectangleOutline to any bright color (remembering to set the value back to Transparent when editing is complete).


If you draw a NEW path segment, select the segment, go to the Properties tab, expand the Miscellaneous section, and set the path Style to ResizePathSegmentStyle:

You'll need to click on the XAML tab and manually edit the generated XAML to eliminate conflicts with default Path properties, using existing border path definitions as a guide. Be sure to change the XAML style reference on your new path from DynamicResource to StaticResource, or it will remain invisible. It's usually much easier just to copy an existing path segment and edit its values with Blend tools.
Managing Source Volume and Complexity
In addition to our custom frame control, our custom control library also defines a custom button class, "XSButton", featuring glass and diffuse highlights, inner glow, and other effects (detailed in my other project, "WPF Custom Controls - Without the Pain" ). Because most custom control libraries can eventually be expected to contain MANY different controls, we've taken explicit steps to manage growing code complexity by encapsulating control-specific markup in separate ResourceDictionaries rather than dumping everything in Generic.xaml, and even grouping all button-related value converters in a single file.
Similarly, we've tried to keep markup defining actual layout separate from styles APPLIED to that layout -- although its not always clear where to draw that line. It is especially important to define colors separately from layouts and styles, since colors tend to change frequently over the course of a project, must often be changed together as a group (as designers adjust the "palette"), and individual color values are very difficult to pick out of large volumes of XAML.
Finally, some people have been mislead to believe that designers can make indiscriminate changes in Blend, while developers make indiscriminate changes to the shared project source in Visual Studio, and that as long as everything works in one environment, it will work in the other... and that designers and developers can work in harmony while remaining largely ignorant of each other's area of concern. Many teams, including some inside Microsoft, are finding that this is simply not true.
MCS User Experience Team UK - Lessons learned in teaming devs and designers on actual WPF projects
At the very least, developers need to be aware that Blend's simple point-and-click interface encourages generation of massive amounts of convoluted XAML, which must be refactored early and often if you expect to have any hope of maintaining the source.
Dynamic Skinning Project
There is another common technique for "skinning" a WPF UI, which we use in our second demo, consisting of switching out the currently-loaded ResourceDictionary.
The client UI in the "DynamicFrameSkinning" project contains a ComboBox which is data bound to "Layout" enum values defined in our custom control library, retrieved through an ObjectDataProvider.
<ObjectDataProvider MethodName="GetValues"
	ObjectType="{x:Type sys:Enum}" x:Key="LayoutOptions" >
    <ObjectDataProvider.MethodParameters>
        <x:Type TypeName="custom:Layout" />
    </ObjectDataProvider.MethodParameters>
</ObjectDataProvider>
When our CustomWindow-derived client sets the current "Layout" property, instead of setting a style, we load the appropriate ResourceDictionary before carrying out the same steps as in our original demo.
private void UpdateFrameAppearance( string strResourceFile )
{
    ResourceDictionary currentResources = new ResourceDictionary();

    foreach( DictionaryEntry entry in Resources )
    {
        currentResources[entry.Key] = entry.Value;
    }

    Uri uri = new Uri( strResourceFile, UriKind.Relative );
    ResourceDictionary fromFile =
	Application.LoadComponent( uri ) as ResourceDictionary;
    currentResources.MergedDictionaries.Add( fromFile );

    Resources = currentResources;
}
Notice that the main CustomWindow template now assigns a single specific style as a DynamicResource, and we no longer need to identify our styles using ComponentResourceKeys.
<ContentControl x:Name="PART_CustomFrame" Style="{DynamicResource FrameLayout}" >
Notice also that the "OfficeButton" frame style is nearly rectangular, so there is no need to define a separate style to support the maximized Window state.
Limitations and Enhancements
Any design constructed from irregular Paths will suffer some amount of distortion as the Window is resized, and the caption and status areas of our RoundMonitor frame style were purposely intended to represent extreme examples of this issue. A production-quality implementation would want to add some additional refinement to offset this, and possible strategies to mitigate the effects include maintaining the design-time aspect ratio during sizing, placing the entire view in a ViewBox (which causes contained controls and their displayed text to grow and shrink), and relying on more regular shapes such as ellipses and rounded rectangles. Another approach involves converting the entire assembled set of paths and shapes into a single background image, but this makes it more difficult to position the client area, and makes accurate detection of TitleBar boundaries impossible.
The code we use to handle sizing border mouse events in our demos is also a little crude, and lacks error-checking for situations like dragging a frame past the point of zero size.
Even with these limitations, the examples and techniques shown here should enable any developer who really needs to deliver a highly-polished custom Window frame solution, using a minimum of clean, maintainable, extensible WPF code and mark up.
Other Projects by Andy L.
History
- 10th October, 2008: Initial post
