
Table of Contents
This article reviews a WPF application that contains a Wizard-style user interface. It explains how the application was globalized, so that it can run in various cultures and show its display text in any language. The application uses the Model-View-ViewModel (MVVM) design pattern as its core architecture. It was written twice: in C# and VB.NET. Both of those Visual Studio solutions are available for download at the top of this article. Note, the application was built and tested in Visual Studio 2008 with Service Pack 1.
A “Wizard” is a user interface that presents the user with a set of steps that must be completed in a sequential order. For example, Wizards are commonly seen in application installers where the user must complete a series of steps and press a “Next” button to proceed from step to step. It is a useful UI design pattern for areas of an application that are not frequently used, or if you need to conserve screen real estate by revealing one piece of the UI at a time.
The Wizard reviewed in this article is fully internationalized. Internationalization of software applications consists of two separate tasks: globalization and localization. The process of ensuring that an application’s user interface can be displayed in various cultures using various languages (natural languages, not programming languages) is referred to as “globalization”. Translating the resources used by the UI (such as display text, images, etc.) is called “localization”. This article reviews a simple, yet effective, technique for internationalizing a WPF user interface.
Part of the globalization strategy employed in the application relies on the use of the Model-View-ViewModel (MVVM) design pattern. MVVM is a pattern that leverages the fundamental platform features of WPF to enable simple, loosely coupled, and highly testable client application architectures. This article does not attempt to explain the MVVM pattern, but simply shows it in use. If you are not already familiar with MVVM, don’t worry. The simplicity of the pattern should prevent it from obfuscating the core focus of what we examine.
For more information about any of these topics, be sure to visit the web pages listed in the “References” section towards the end of this article.
This article’s demo application was created by Karl Shifflett and Josh Smith. Karl flew from Seattle to New York to visit Josh so that they could get together and share ideas about WPF, software architecture, internationalization, MVVM, and software development in general. When they were not enjoying the culinary excellence offered by New York City, they were sitting side-by-side working on the program reviewed in this article.
The app was originally written in VB.NET, Karl’s language of choice, and later on, Josh translated it to C#, his language of choice. Following that weekend, Josh was on vacation, so he took the burden of writing this article upon himself.
We realized that an article about creating internationalized software would not be very convincing unless it was accompanied by translated resources that actually appear in the UI at run time. Since neither of us knows any language other than American English, we turned to our fellow WPF Disciples and a Microsoft developer for some help. Big thanks go to Corrado Cavalli for translating the display text to Italian, Laurent Bugnion for translating it to French, and Marco Goertz, Microsoft Cider Team Senior Development Lead, for translating it to German.
This article discusses an application that allows the user to order a cup of coffee by stepping through a set of Wizard pages. When the application first loads up, the user sees a simple window that allows him/her to launch the Wizard, as seen below:

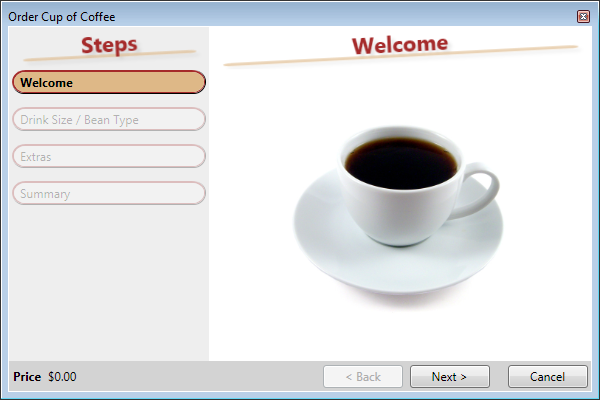
After clicking on the button in that window, the Wizard opens up and shows the Welcome page.
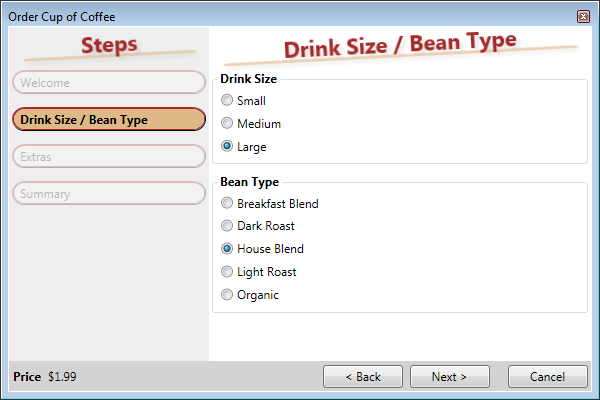
Clicking on the Next button navigates to the first page in which the user must select options for his or her cup of coffee. After the drink size is selected, the price of the order appears in the lower left corner.
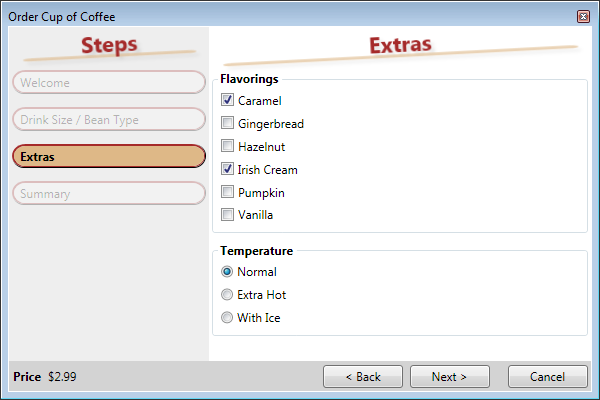
After clicking the Next button again, the user is allowed to pick some “extras” for the cup of coffee being ordered. Since none of the options on this page are required for the order to be processed, the Next button is enabled at all times. If the user selects any extra flavorings, the price increases by fifty cents per shot of flavoring.
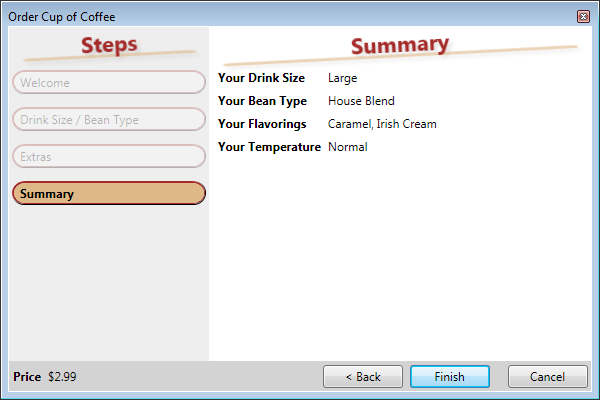
Clicking the Next button again brings you to the Summary page, which is a read-only listing of all the selected options made in the previous pages. Since this is the final step in the workflow, the Next button text changes to “Finish” (or the equivalent word in another language).
Once the Finish button is clicked, the Wizard closes and the user returns to the initial window. The cost of the user’s cup of coffee is displayed in this window. If the user cancelled out of the order, instead of clicking the Finish button, the window would indicate so.

The Wizard design is based on the Model-View-ViewModel (MVVM) design pattern. Each step in the workflow is represented by a separate ViewModel class, all of which derive from the CoffeeWizardPageViewModelBase class. All of these “Page ViewModels” are managed by the CoffeeWizardViewModel class, which exposes them via the Pages property, as seen below:
C#
public ReadOnlyCollection<CoffeeWizardPageViewModelBase> Pages
{
    get
    {
        if (_pages == null)
            this.CreatePages();
        return _pages;
    }
}

void CreatePages()
{
    var typeSizeVM = new CoffeeTypeSizePageViewModel(this.CupOfCoffee);
    var extrasVM = new CoffeeExtrasPageViewModel(this.CupOfCoffee);
    var pages = new List<CoffeeWizardPageViewModelBase>();
    pages.Add(new WelcomePageViewModel());
    pages.Add(typeSizeVM);
    pages.Add(extrasVM);
    pages.Add(new CoffeeSummaryPageViewModel(
         typeSizeVM.AvailableBeanTypes,
         typeSizeVM.AvailableDrinkSizes,
         extrasVM.AvailableFlavorings,
         extrasVM.AvailableTemperatures));
    _pages = new ReadOnlyCollection<CoffeeWizardPageViewModelBase>(pages);
}
VB.NET
Public ReadOnly Property Pages() As ReadOnlyCollection(Of CoffeeWizardPageViewModelBase)
    Get
        If _objPages Is Nothing Then
            Me.CreatePages()
        End If
        Return _objPages
    End Get
End Property

Private Sub CreatePages()
    Dim objTypeSizePageViewModel As New CoffeeTypeSizePageViewModel(Me.CupOfCoffee)
    Dim objExtrasPageViewModel As New CoffeeExtrasPageViewModel(Me.CupOfCoffee)
    Dim obj As New List(Of CoffeeWizardPageViewModelBase)
    With obj
        .Add(New WelcomePageViewModel)
        .Add(objTypeSizePageViewModel)
        .Add(objExtrasPageViewModel)
        .Add(New CoffeeSummaryPageViewModel( _
             objTypeSizePageViewModel.AvailableBeanTypes, _
             objTypeSizePageViewModel.AvailableDrinkSizes, _
             objExtrasPageViewModel.AvailableFlavorings, _
             objExtrasPageViewModel.AvailableTemperatures))
    End With
    _objPages = New ReadOnlyCollection(Of CoffeeWizardPageViewModelBase)(obj)
End Sub
The read-only list of steps on the left side of the Wizard displays an item for each page in the workflow. That list is implemented as an ItemsControl whose ItemsSource property is bound to the Pages property of CoffeeWizardViewModel. The ItemsControl has an ItemTemplate assigned to it, which renders each item and highlights the item that corresponds to the current page in view. When running the application in German, it looks something like this:
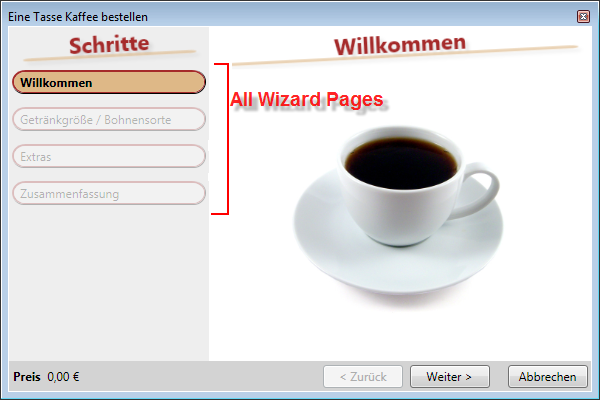
An abridged version of the markup for that list of pages, contained in CoffeeWizardView.xaml, is seen below:
<DataTemplate x:Key="wizardStepTemplate">
  <Border x:Name="bdOuter" Opacity="0.25">
    <Border x:Name="bdInner" Background="#FFFEFEFE">
      <TextBlock x:Name="txt" Text="{Binding Path=DisplayName}" />
    </Border>
  </Border>
  <DataTemplate.Triggers>
    <DataTrigger Binding="{Binding Path=IsCurrentPage}" Value="True">
      <Setter
        TargetName="txt"
        Property="FontWeight"
        Value="Bold"
        />
      <Setter
        TargetName="bdInner"
        Property="Background"
        Value="BurlyWood"
        />
      <Setter
        TargetName="bdOuter"
        Property="Opacity"
        Value="1"
        />
    </DataTrigger>
  </DataTemplate.Triggers>
</DataTemplate>

<ItemsControl
  ItemsSource="{Binding Path=Pages}"
  ItemTemplate="{StaticResource wizardStepTemplate}"
  />
The relationships between the ViewModel classes seen thus far are shown in the following diagram:
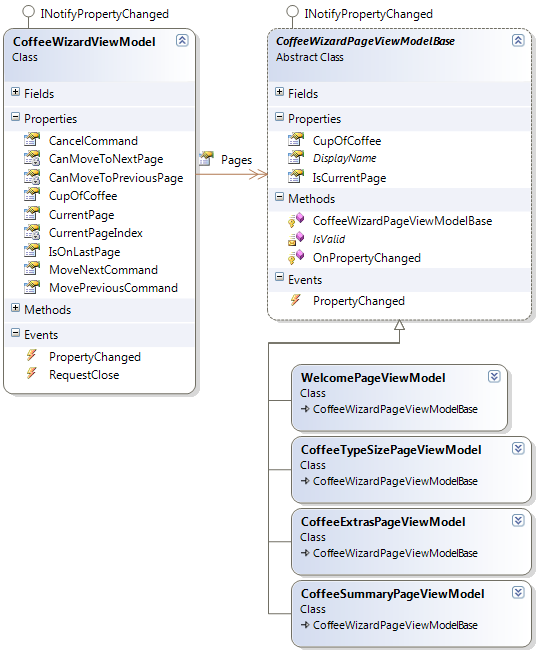
CoffeeWizardViewModel exposes two properties of type ICommand that allow the CoffeeWizardView control to provide the user with a means of navigating between the pages. Those properties are called MoveNextCommand and MovePreviousCommand. When either of these commands execute, the CurrentPage property is assigned whichever Page ViewModel should currently be in view.
CoffeeWizardView displays the appropriate View for the current Page ViewModel because it contains a HeaderedContentControl whose Content property is bound to the CurrentPage property. When the HeaderedContentControl’s Content property is set to a ViewModel object, a typed DataTemplate, whose DataType matches the “current” ViewModel type, is used to provide the correct View for visualizing that ViewModel instance. The HeaderedContentControl in CoffeeWizardView is declared like this:
<HeaderedContentControl
  Content="{Binding Path=CurrentPage}"
  Header="{Binding Path=CurrentPage.DisplayName}"
  />
These four templates are inside the <CoffeeWizardView.Resources> collection:
<!---->
<DataTemplate DataType="{x:Type viewModel:WelcomePageViewModel}">
<view:WelcomePageView />
</DataTemplate>
<DataTemplate DataType="{x:Type viewModel:CoffeeTypeSizePageViewModel}">
<view:CoffeeTypeSizePageView />
</DataTemplate>
<DataTemplate DataType="{x:Type viewModel:CoffeeExtrasPageViewModel}">
<view:CoffeeExtrasPageView />
</DataTemplate>
<DataTemplate DataType="{x:Type viewModel:CoffeeSummaryPageViewModel}">
<view:CoffeeSummaryPageView />
</DataTemplate>
The following code comes from CoffeeWizardViewModel. It shows how the MoveNextCommand decides if it can execute, and what happens when it executes.
C#
public ICommand MoveNextCommand
{
    get
    {
        if (_moveNextCommand == null)
            _moveNextCommand = new RelayCommand(
                () => this.MoveToNextPage(),
                () => this.CanMoveToNextPage);
        return _moveNextCommand;
    }
}

bool CanMoveToNextPage
{
    get { return this.CurrentPage != null && this.CurrentPage.IsValid(); }
}

void MoveToNextPage()
{
    if (this.CanMoveToNextPage)
    {
        if (this.CurrentPageIndex < this.Pages.Count - 1)
            this.CurrentPage = this.Pages[this.CurrentPageIndex + 1];
        else
            this.OnRequestClose();
    }
}
VB.NET
Public ReadOnly Property MoveNextCommand() As ICommand
    Get
        If _cmdMoveNextCommand Is Nothing Then
            _cmdMoveNextCommand = New RelayCommand( _
                AddressOf ExecuteMoveNext, _
                AddressOf CanExecuteMoveNext)
        End If
        Return _cmdMoveNextCommand
    End Get
End Property

Private Function CanExecuteMoveNext(ByVal param As Object) _
    As Boolean
    If Me.CurrentPage IsNot Nothing Then
        Return Me.CurrentPage.IsValid
    Else
        Return False
    End If
End Function

Private Sub ExecuteMoveNext(ByVal parm As Object)
    If CanExecuteMoveNext(Nothing) Then
        Dim intIndex As Integer = Me.CurrentPageIndex
        If intIndex < Me.Pages.Count - 1 Then
            Me.CurrentPage = Me.Pages(intIndex + 1)
        Else
            OnRequestClose()
        End If
    End If
End Sub
The CoffeeWizardView control makes use of the MoveNextCommand property by binding a button’s Command property to it, as seen below:
<Button
  Grid.Column="1"
  Grid.Row="0"
  Command="{Binding Path=MoveNextCommand}"
  Style="{StaticResource moveNextButtonStyle}"
  />
The demo application has two projects in it. The CoffeeLibrary project contains Model type definitions. The CupOfCoffee class contains the business data and price calculation logic upon which the rest of the application depends. Granted, the price calculation logic is rather crude and simplistic, but that is irrelevant for the purposes of this demonstration. The following diagram shows the types contained in the business library:
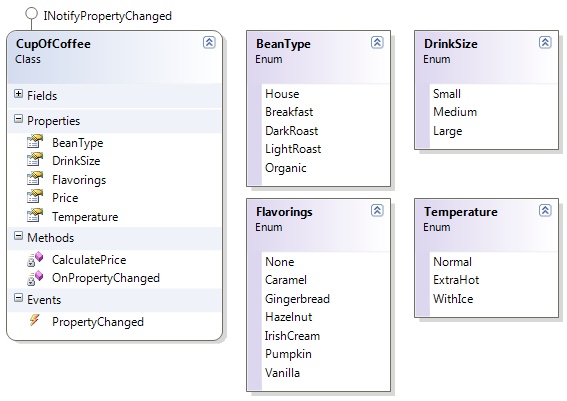
CupOfCoffee implements the INotifyPropertyChanged interface because when any of the properties are set, it could potentially cause the object’s Price property to change. CoffeeWizardView makes use of this when it binds a TextBlock’s Text property to the Price property, in order to show the current price of the user’s cup of coffee. That is the only place where the View directly accesses the Model. In all other cases, the View always binds to the ViewModel objects that wrap the underlying CupOfCoffee instance. We could have made the ViewModel re-expose the Price property and raise its PropertyChanged event when the CupOfCoffee does, but there was no distinct advantage in doing so.
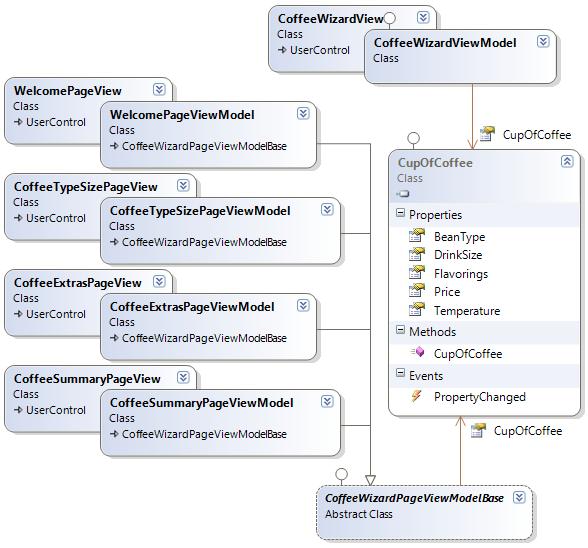
All of the ViewModel classes have a reference to a CupOfCoffee object, though not all of them necessarily make use of it. To be more specific, the Welcome page and Summary page do not need to access the CupOfCoffee object created by the user. For a high-level understanding of how the Views, ViewModels, and Model classes relate to each other, consult the following diagram:
The pages that present a list of options to the user make use of the RadioButton and CheckBox controls to provide either mutually exclusive or multiple choice lists, respectively. Each option in a list corresponds to a value from an enumeration defined in the CoffeeLibrary assembly, such as the BeanType enum. It might be tempting to display the name of each enum value in the UI, but that would prevent the UI from being localizable. Also, to facilitate consistent use of the MVVM pattern throughout the application, you should not set the Content property of the RadioButton/CheckBox to an enum value because in doing so, you create a tight coupling between the ViewModel and its associated View.
Our solution to this problem lies in the use of a ViewModel class that represents an option in the View. To that end, we created the OptionViewModel<TValue> class. It is a small type whose sole purpose is to create a UI-friendly wrapper around an option displayed in a list. It allows you to specify a localized display name for the option, the underlying value that it represents, and an optional value used to control the order in which the options are sorted, and subsequently displayed. In addition, it also has an IsSelected property to which the IsChecked property of a RadioButton or CheckBox can be bound. The following diagram shows OptionViewModel<TValue> and how it is used by other ViewModel classes:
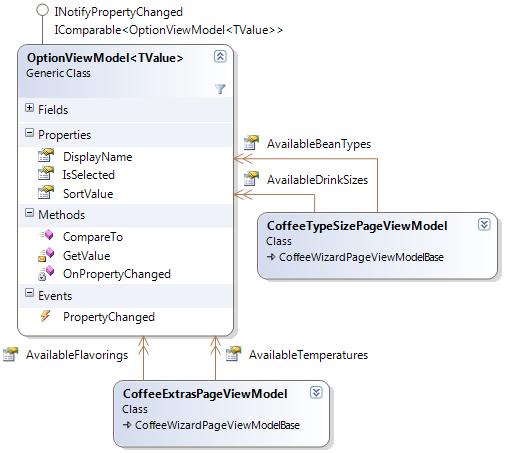
The CoffeeTypeSizePageViewModel class has two properties that make use of this type: AvailableBeanTypes and AvailableDrinkSizes. The AvailableDrinkSizes property, and associated methods, is listed below:
C#
public ReadOnlyCollection<OptionViewModel<DrinkSize>> AvailableDrinkSizes
{
get
{
if (_availableDrinkSizes == null)
this.CreateAvailableDrinkSizes();
return _availableDrinkSizes;
}
}
void CreateAvailableDrinkSizes()
{
var list = new List<OptionViewModel<DrinkSize>>();
list.Add(new OptionViewModel<DrinkSize>(
Strings.DrinkSize_Small, DrinkSize.Small, 0));
list.Add(new OptionViewModel<DrinkSize>(
Strings.DrinkSize_Medium, DrinkSize.Medium, 1));
list.Add(new OptionViewModel<DrinkSize>(
Strings.DrinkSize_Large, DrinkSize.Large, 2));
foreach (OptionViewModel<DrinkSize> option in list)
option.PropertyChanged += this.OnDrinkSizeOptionPropertyChanged;
list.Sort();
_availableDrinkSizes =
new ReadOnlyCollection<OptionViewModel<DrinkSize>>(list);
}
void OnDrinkSizeOptionPropertyChanged(
object sender, PropertyChangedEventArgs e)
{
var option = sender as OptionViewModel<DrinkSize>;
if (option.IsSelected)
this.CupOfCoffee.DrinkSize = option.GetValue();
}
VB.NET
Public ReadOnly Property AvailableDrinkSizes() As _
    ReadOnlyCollection(Of OptionViewModel(Of DrinkSize))
    Get
        If _objAvailableDrinkSizes Is Nothing Then
            CreateAvailableDrinkSizes()
        End If
        Return _objAvailableDrinkSizes
    End Get
End Property

Private Sub CreateAvailableDrinkSizes()
    Dim obj As New List(Of OptionViewModel(Of DrinkSize))
    With obj
        .Add(New OptionViewModel(Of DrinkSize) _
             (My.Resources.Strings.DrinkSize_Small, _
              DrinkSize.Small, 0))

        .Add(New OptionViewModel(Of DrinkSize) _
             (My.Resources.Strings.DrinkSize_Medium, _
              DrinkSize.Medium, 1))
        .Add(New OptionViewModel(Of DrinkSize) _
             (My.Resources.Strings.DrinkSize_Large, _
              DrinkSize.Large, 2))
    End With

    For Each objOption As OptionViewModel(Of DrinkSize) In obj
        AddHandler objOption.PropertyChanged, _
            AddressOf OnDrinkSizeOptionPropertyChanged
    Next

    obj.Sort()

    _objAvailableDrinkSizes = _
      New ReadOnlyCollection(Of OptionViewModel(Of DrinkSize))(obj)
End Sub

Private Sub OnDrinkSizeOptionPropertyChanged( _
    ByVal sender As Object, ByVal e As PropertyChangedEventArgs)
    Dim obj As OptionViewModel(Of DrinkSize) = _
        CType(sender, OptionViewModel(Of DrinkSize))
    If obj.IsSelected Then
        Me.CupOfCoffee.DrinkSize = obj.GetValue
    End If
End Sub
The value contained in an OptionViewModel<TValue> is accessible by calling its GetValue method. We decided to expose this as a method, instead of a property, so that the UI cannot easily bind to it. Elements in a View should have their properties bound to the DisplayName property, to ensure that the localized string is shown. The following XAML from CoffeeTypeSizePageView shows how this binding is created:
<ItemsControl ItemsSource="{Binding Path=AvailableDrinkSizes}">
  <ItemsControl.ItemTemplate>
    <DataTemplate>
      <RadioButton
        Content="{Binding Path=DisplayName}"
        IsChecked="{Binding Path=IsSelected}"
        GroupName="DrinkSize"
        Margin="2,3.5"
        />
    </DataTemplate>
  </ItemsControl.ItemTemplate>
</ItemsControl>
The list of RadioButtons is implemented as an ItemsControl with an ItemTemplate that generates a RadioButton for each item. This approach is more desirable, in most cases, than having the RadioButtons statically be declared in XAML, because it eliminates the need for redundant markup. In a more dynamic scenario, where the list of options might come from a database or Web Service, this approach is invaluable because it places no constraints on how many options can be displayed.
As mentioned in the Background section of this article, to globalize an application’s user interface is to make it ready and able to work properly in various cultures and languages. There have been many suggested approaches in the WPF community to accomplish this. The simple technique shown in this article has been used in real production WPF applications, and is known to be quick and reliable.
In this article, we only work with languages that read from left to right, and do not have locale-specific business logic. Those topics, while interesting and important, fall outside the scope of this article.
The Wizard is fully globalized, so that it can display its text in any language for which localized strings are available. The process of globalizing the application’s UI can be broken into two pieces: putting all of the default display text into resource files, and consuming those strings from the application. Localizing the application consists of having translators create language-specific resource files that contain translations of the original resource strings.
A resource file is commonly referred to as a “RESX” because that is the file extension used for resource files in Visual Studio. RESX’s have been around for years in the .NET world, and are the foundation of creating internationalized applications in Windows Forms and ASP.NET. Visual Studio has a RESX editor that allows you to work with many different kinds of resources. The RESX editor looks something like this:

Every time you edit a RESX file in your project, Visual Studio updates an auto-generated class that allows you to easily access the resources it contains. The name of the class matches the name of the RESX file. When you access the static (Shared in VB.NET) members of that class, it retrieves the localized value for that property, based on the current culture of the thread in which it runs. For instance, if Thread.CurrentThread.CurrentCulture references a CultureInfo object that represents French as spoken in Switzerland (culture code: “fr-CH”) and you have a resource file with resources for that culture, then the static property will return the localized resource value for Swiss French.
Accessing the localized strings from code is very easy. Here is the DisplayName property from the CoffeeSummaryPageViewModel class, which is used to show a header above the Summary page when it is in view.
C#
public override string DisplayName
{
    get { return Strings.PageDisplayName_Summary; }
}
VB.NET
Public Overrides ReadOnly Property DisplayName() As String
    Get
        Return My.Resources.Strings.PageDisplayName_Summary
    End Get
End Property
In the demo application, the RESX file base name is Strings.resx, which is why the auto-generated class is named Strings. When I mention that the RESX file base name is Strings.resx, that means that all localized RESX files include their culture code in the file name, such as Strings.fr-CH.resx for the Swiss French version of the file. This is a required naming convention for the resource system to properly locate and load the localized resources at run time.
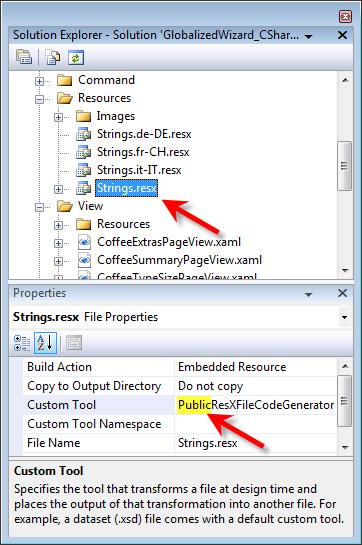
Accessing the localized strings from XAML is easy, too. However, it is critically important that you perform one step on the project’s default RESX files before you try to access their auto-generated classes from markup. By default, the auto-generated class for a RESX file is marked as internal (Friend in VB.NET), but we need it to be public instead. In order to have the class be created as public, you must select the RESX file in Solution Explorer and view its properties in the Properties window. You must change the “Custom Tool” property from “ResXFileCodeGenerator” to “PublicResXFileCodeGenerator”. This critical step is shown below:
Once that step is complete, it’s easy to consume the resource strings from XAML. First, add an XML namespace alias for the namespace that contains the auto-generated resource class. Then, simply use the {x:Static} markup extension as the value of a property setting. The following XAML snippet shows how the ApplicationMainWindow’s Title is set to a localized string:
<Window
  x:Class="GlobalizedWizard.ApplicationMainWindow"
  xmlns="http://schemas.microsoft.com/winfx/2006/xaml/presentation"
  xmlns:x="http://schemas.microsoft.com/winfx/2006/xaml"
  xmlns:res="clr-namespace:GlobalizedWizard.Resources"
  Title="{x:Static res:Strings.ApplicationMainWindow_Title}"
  >
There is one more trick to be aware of that makes internationalization possible in WPF apps. For whatever reason, WPF does not make use of the current culture in Bindings. In order for the current culture to be used by Bindings, such as getting the correct currency symbol when setting a Binding’s StringFormat property to “c” (the currency format string), you must run this line of code as the application first loads up:
C#
FrameworkElement.LanguageProperty.OverrideMetadata(
typeof(FrameworkElement),
new FrameworkPropertyMetadata(
XmlLanguage.GetLanguage(CultureInfo.CurrentCulture.IetfLanguageTag)));
VB.NET
FrameworkElement.LanguageProperty.OverrideMetadata( _
    GetType(FrameworkElement), _
    New FrameworkPropertyMetadata( _
    System.Windows.Markup.XmlLanguage.GetLanguage( _
    CultureInfo.CurrentCulture.IetfLanguageTag)))
If you would like to see what the demo application looks like when running in other cultures, open the App.xaml.cs file (or the Application.xaml.vb file) and uncomment one of the lines of code that creates a CultureInfo object. This ensures that the current thread uses a culture for which localized resource strings are available.
- December 17, 2008 - Published the article.
