
Content
WITIYMIWYG - What Is There In Your Mind Is What You Get. Is a Multi Language
Support (English and Kannada) Wizard, The Wizard has 4 Steps/Screens. It is a Kind of Mind Reader, It will ask
you 3 simple and similar questions and based on that it will display what is
there in your mind. In this example I have used 21 Heart Images. We can use any
kind of Images, Numbers and String etc... But the Base Concept is the same.
What Is There In Your Mind Is What You Get - 21 Heart Images will be displayed.
in 3 rows
1 to 7 in first Row
8 to 14 in second Row
15 to 21 in third Row
Step A

We can have either row or column doesn’t matter, In this example I have used
rows. then ask the user to select in which row his selected heart image exist.
Step B
If the user select 3rd row then take the third row and insert in between 1st or
2nd row (so that it can appear in middle).

Step C
Take each item and split it into 3 rows one by one. First item in first row, Second item in second row, third item in third row, 4th item in first row and so on... till the last item.

I have shown the example for one cycle, repeat the steps for Total 3 cycle,
which ever row user select place it in middle, in case if user select middle row then just follow Step B and Step C.
After 3d Cycle Complete then take the 2nd Row 4th Item or in 3d Cycle Step B take the 11th Item. This is what is there in your mind/what you have thought.
Display the item to the user what he has thought.
How does it work?, when ever we place the selected row in between other two rows,
the item may appear in first row 4th or 5th order or in second row 3rd,4th or
5th order or in the third row 3rd or 4th order. During the 3rd Cycle, what
is there in our mind item will always occupy the middle row and middle item. So that we can display to the user what he has thought.
The wizard has 4 Screens.
Select the Language English or Kannada, the above displayed screen is the first screen in the wizard.
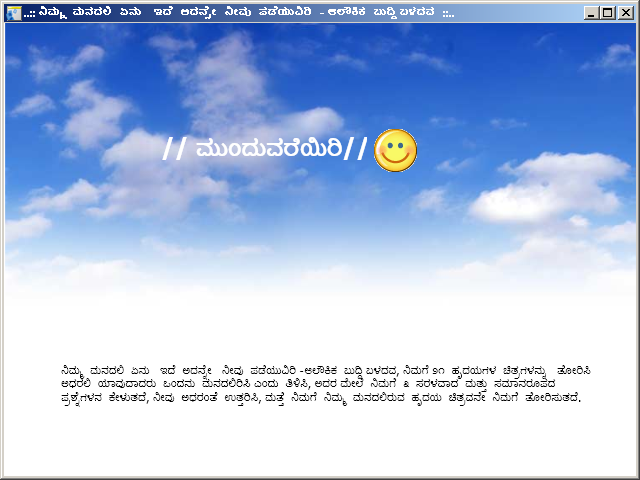
This Screen will give the Introduction of the Application.
In English

In Kannada
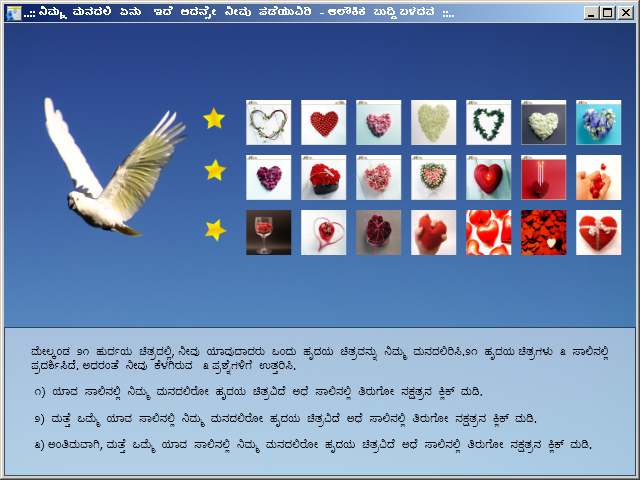
This Screen will show you 3 questions and ask you to answer on the same screen. Once all the 3 questions are answered it will take the user to next screen.
In English

In Kannada
This Screen will show exactly the same Heart Image what you remembered.
In English
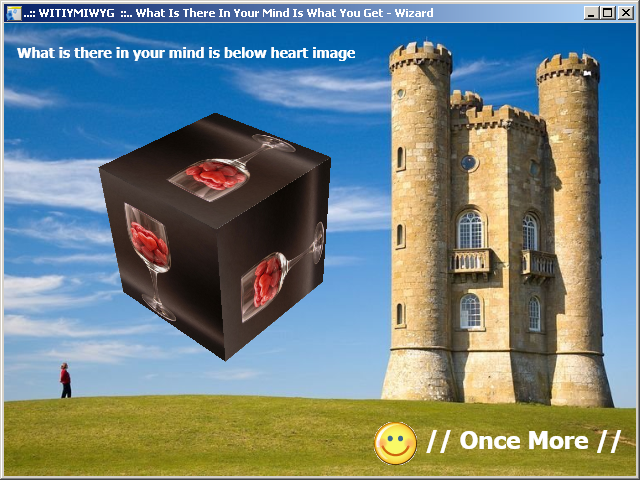
In Kannada
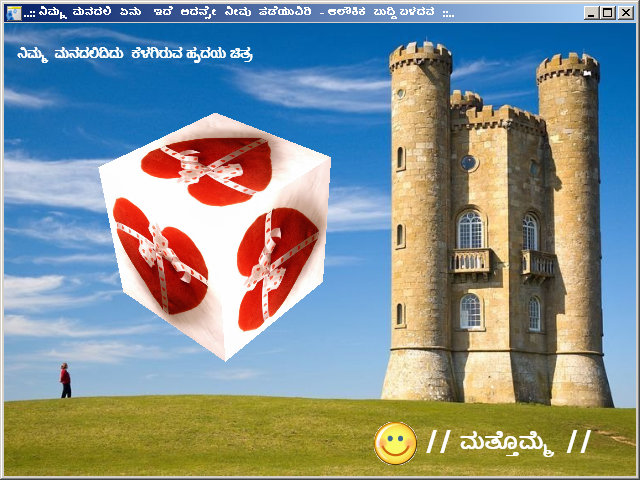
First thing before we start any Multi Language Application, we have to check our PC Supports it, if not we can setup,
for Indian Language Support we have Install Indic, it requires OS Setup Disk I386 Folder Contents.
Non Supported PC
The Non Supported PC will display the Junk Characters if you open the Resource
file and enter the desired language text.

Even if we have same resource file with junk character during executing program
if we want to Fetch/Bind/Display the same we get the junk chars only.

In this case we need to go to Control Panel and Select Regional and Language
Options.

And go to Language Tab. And Click on the Checkbox "Install files for Complex
Script...."

You will get the following Popup Message Titled "Install Supplemental Language
Support" Click on [OK] this includes Complex (Indic) which enable Indian languages. For more info follow link [here]
And Click on [Apply] Button on the above Displayed Dialog, you need to have
OS Setup CD, Browse and Select the I386 Folder and Proceed...
After Successful Installation, you will get a popup to restart the system, Restart
the System. Now your System will support Indian languages.
Supported PC
In Supported PC you can view the Language Text Correctly, if you open visual studio resource editor. You can see the
correct language text
here I am showing the same example, above screen earlier it displayed junk chars now it is showing correctly after setup.

Now If we fetch/bind/display the data we get it in correct format and right characters are displayed.

When we open the code behind files in Expression Blend for the first time if you
have vs2008 as default we get the conversion wizard after conversion the project
file gets altered. but if you want your expression blend 1 .csproj file to open
in vs2008/vs2005 with minimum changes in .csproj file and also to refer the 3.5
version in expression blend 1 project(by default it refers 3.0 framework). Open
the .csproj file in text editor. and just add a Tools Version in the project Tag.
example <Project ToolsVersion="3.5" ...> and if you want to include project
reference you can include as shown in the Example <Reference Include="System.Core"
/>. If you open it in vs2005 for the first time you will get Security Warning
for [Project Name] dialog, just Select Load project normally and click on [OK]
button. Please follow the link
[here]
for more info.
This Wizard uses Runtime Globalization, languages are decided during runtime.
to do this first we need to have resource files. one of the resource will be
the default resource file in which auto generated code behind file needed, in
visual studio 2008 it generates the code behind file. for example if we have
default file as Resource.resx which has default language en - for English, the
code behind files will be Resource.resx.cs which will have auto generated code.
In the resource editor go and set the Access Modifier to "Internal" then add
one more Resource file for the other language. Just keep the same "Resource"
file name before first dot and then add the language code with dot before file
extinction for example if I want to add Kannada Language which has code kn or
kn-In I can rename to Resource.kn.resx and in the resource editor change the
Access Modifier to "No Code Generation" and save it, each Resource file does
not require Code Generation when it has same file name before first dot. Please
follow the link [here]
for other culture/language code.

Create a Properties Folder from solution explorer if not exist then move the Resource files to that Properties folder.
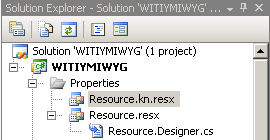
Note: both the resource files should have the same Key Names.
In this Application I have used the key names called Title, SplashEnglish,
SplashKannada, Intro, OnceMore, Proceed, Questions, YouThought. I have used
the same Key Names in both the files Resource.resx and Resource.kn.resx, so
that when I change the language culture I can access the values from the same
KeyNames. for Example if the culture is en during runtime and if I use Properties.Resource.OnceMore
it will return OnceMore key value in English from Resource.resx file, if I change
the culture to kn then if I use Properties.Resource.OnceMore it will return
Kannada Value from Resource.kn.resx file.
English Resource
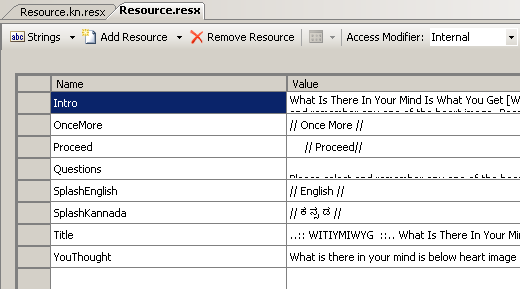
Kannada Resource

I have used 2 very simple animations in this Application
1) Spinning Star Animation
2) Expanding Mat Animation.
To make spinning star animation button, In Microsoft Expression Blend go to
file->New and select the installed template User Control

Set the following attributes to User Control Tag Width="48" Height="40" Cursor="Hand"
Add the Star Image to the Project By Right Click on the Project -> Add Existing Item.
Then browse and select the star image. After adding it to project double clicks on the image in solution explorer.
It will appear on the user control, resize it as shown in the image below.
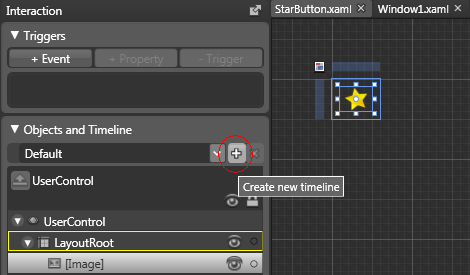
As shown on the above image select the image and create new timeline.
Then you will get the timeline dialog. Click on [OK].
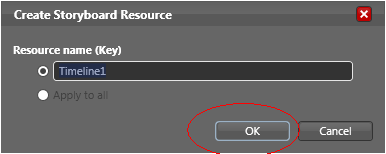
Then Select the Image and Create/Click on the Record Key Frame.
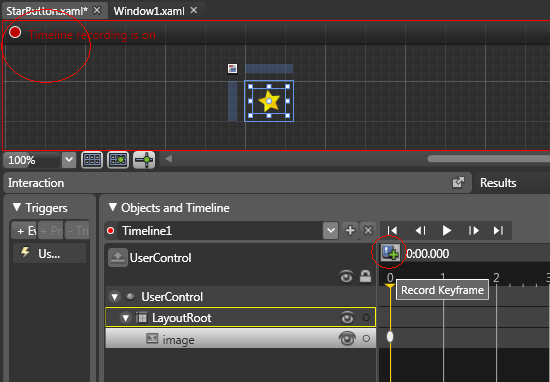
Then Pull/Drag the Yellow Time Line to 2 Seconds. And Just Hold the Bottom
Right Corner Image Handle and Rotate clock wise for one complete round.
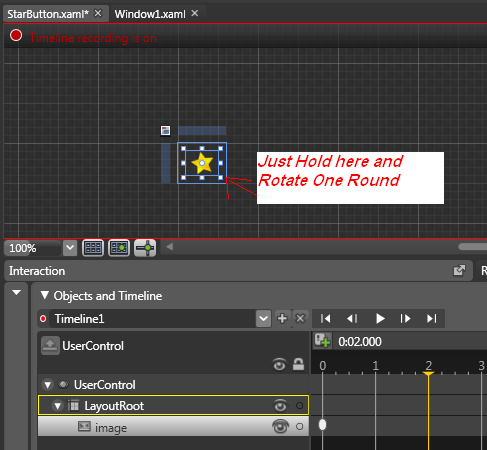
You can see the Record Key Frame is now created at 2 Seconds where yellow time line exist and also smoke white line joining this two Record Key Frames.

Now if you play the star will spin only once, so how to make the star spin continuously.
In the object and timeline Image Drill down Expand the Image Animations till the last drill down Angle.
As shown in the image below and then right click on it you will get the popup menu - Select Edit Repeat Count.
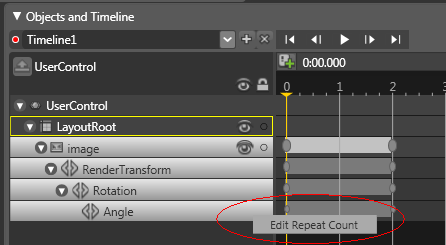
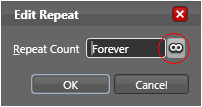
Click on Infinite/Forever Button and click on [OK] in the popup dialog. This will make the star spin for ever.
How to pause the animation spinning star when mouse down. And resume the spinning star animation when mouse is up? Go to Triggers section first and click on add event. And select the when user control loaded event is raised select the timeline1.begin this will start the animation when control is loaded. (Note in the image all the 3 triggers are displayed I am explaining one by one)
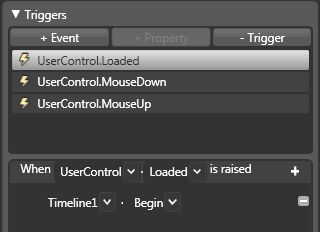
Then add mouse down event and select the timeline to pause. So that when ever the mouse down occurs on user control it will pause the spinning star.
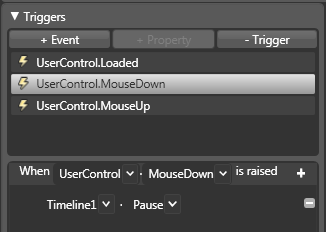
Then add mouse up event and select the timeline to Resume. So that when ever the mouse up occurs on user control it will Resume the spinning star.
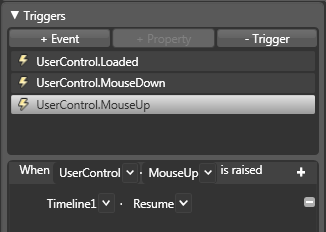
Now Build the project, after successful build, the control will appear in asset library on the toolbox and select custom control tab.
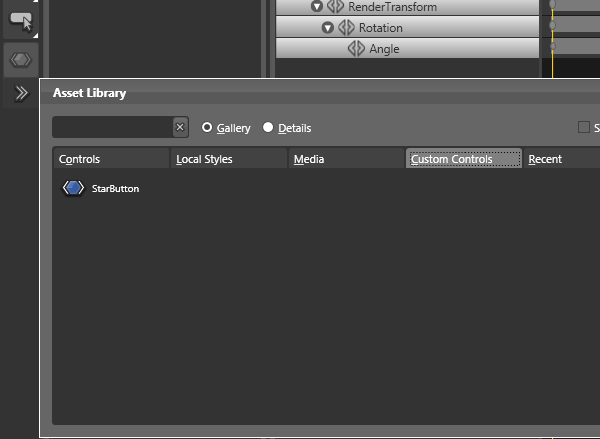
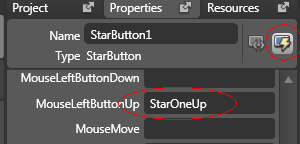
Drag and Drop the StarButton on the Window Form. To handle the event of that star button go to events and write the event handler for MouseLeftButtonUp.
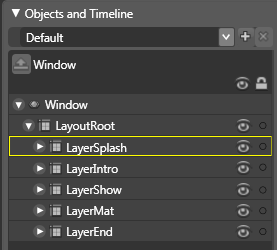
There are 5 layers in this application, at a time any one layer will be visible
except LayerMat which i used for animation which appears over LayerShow. LayerSplash
is the first screen in the WITIYMIWYG Wizard, LayerIntro is the 2nd Screen in
the WITIYMIWYG Wizard which gives introduction, LayerShow is the 3rd screen in
the WITIYMIWYG Wizard which shows all 21 heart images. LayerMat is the animation
Layer which will appear on top of the LayerShow to hide the 21 heart images by
displaying animation when user click on spinning star button. LayerEnd is the
Last screen shown to the user what heart image he has thought.

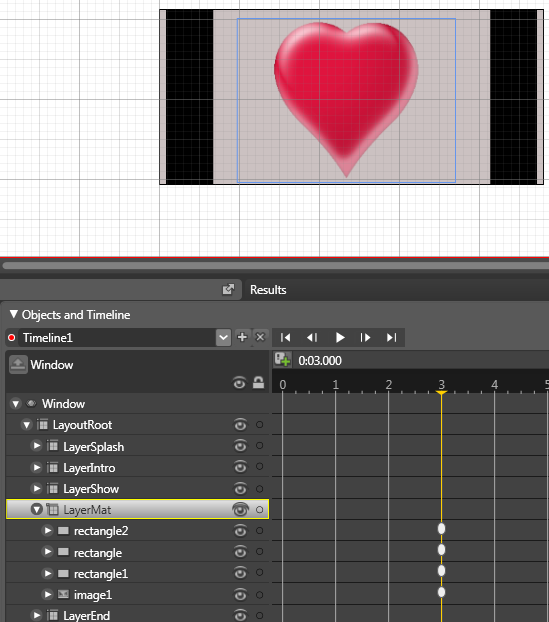
The above image shows mat fully expanded when user has clicked any one of the start button, Mat will expand from the center of displayed 21 heart images with very small or invisible appearance and it will expand both the side’s right and left and it will cover all 21 images. At this time in the background shuffle will take place for 21 heart images and then again it will collapse and come to the same small appearance in the center and disappear. You can also notice when user has answered the below question green tick mark is appearing before each question.
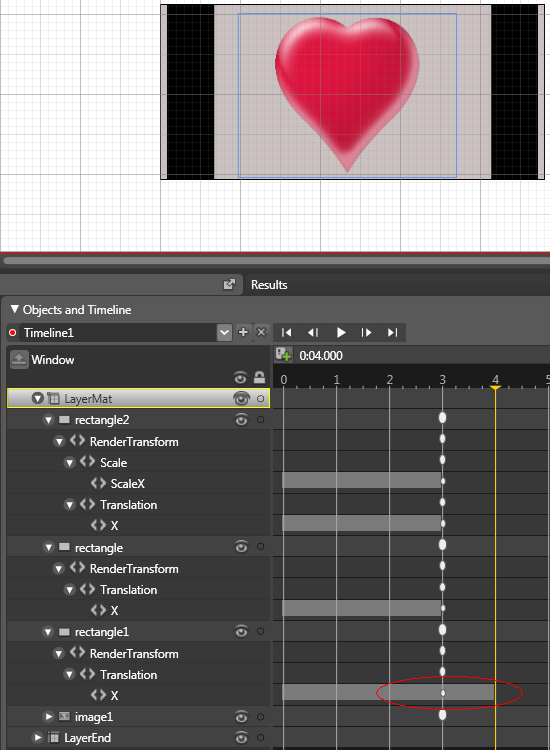
Mat Expandable Animation is created on the LayerMat as explained above, Add
3 Vertical Rectangles/vertical bars and then add one Heart Image, 2 rectangles
will move on two sides one in right side from center and other will move left
side from center. And one rectangle will just expand both the sides right and
left from the center. Place the heart image in center and reduce it to very
small size. in below shown image there are 3 vertical bars/rectangles two are in front one is at the back and that is not visible in the image. All are same size.

This is the very simplest animation, how to create timeline and record key frame
please see above, come to timeline1 and then Pull/Drag the Yellow Time Line to
3 Seconds Only. And just pull/move the left hand side rectangle to left
side desired location and pull/move the right side rectangle to right side same
distance as what you have move left and side. And then the middle rectangle will
be visible just expand the rectangle so that it touches both the right and left
rectangles. and also expand the heart image size. And play the animation and check.
You can notice some black color rectangles additional, those are Stroke Thickness
when you expand even Stroke Thickness will get expanded. If you want you can set
Stroke Thickness to 0 in the properties.
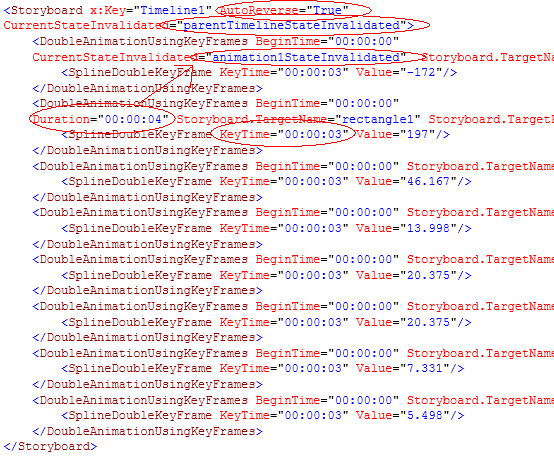
Once Mat Expanded we need to trap the event so go to the xaml editor and set any one of the double animation duration to 4 seconds.
And trap
CurrentStateInvalidated event in any other double animation which has less time then 4 seconds. In this case
all other double animation has 3 seconds choose any one of the double animation in that. When the all the animations are executing in the same timeline
up to 3 seconds one animation will further go up to 4 seconds even though its key time is 3 seconds. During this time the remaining double animations will raise the
CurrentStateInvalidated
becaue it will be idle in the storyboard, so trap this event. And swap the heart images. Here we have used
CurrentStateInvalidated="animation1StateInvalidated"
there is one more event highlighted
CurrentStateInvalidated="parentTimelineStateInvalidated" assigned to story board. When all the animations under story board is complete
this event will trigger. This happens when the animation cycle is complete in this Scenario.
Now the Mat Animation is expanded we need to bring it to same state/collapse it
as earlier we have to set the
AutoReverse="True" in the storyboard
so that it will completely reverse all the animations in it. For better Understanding
of Animation events please follow the link
[here]
and
[here].
In Designer how it looks.
I have used 3D Cube to display the What is there in your mind heart image,
For more understanding of 3D Cube please follow the link [here],
[here]
and [here].
I have explained some of the important methods in this application, when ever
the user select the language on the first screen the culture is set during run
time. based on the language selection. this.Title = Properties.Resource.Title;
this code will set the Title Text of the window by fetching from resx file based
on culture selection.
private void lblKannada_MUp(object sender, System.Windows.Input.MouseButtonEventArgs e)
{
	LayerSplash.Visibility = Visibility.Hidden;
	LayerIntro.Visibility = Visibility.Visible;

	string culture = "kn";
	CultureInfo ci = new System.Globalization.CultureInfo(culture);
	System.Threading.Thread.CurrentThread.CurrentUICulture = ci;
	this.Title = Properties.Resource.Title;
	this.lblIntro.Content = Properties.Resource.Intro;
	this.lblProceed.Content = Properties.Resource.Proceed;
}
private void lblEnglish_MUp(object sender, System.Windows.Input.MouseButtonEventArgs e)
{
	LayerSplash.Visibility = Visibility.Hidden;
	LayerIntro.Visibility = Visibility.Visible;

	string culture = "en";
	CultureInfo ci = new System.Globalization.CultureInfo(culture);
	System.Threading.Thread.CurrentThread.CurrentUICulture = ci;
	this.Title = Properties.Resource.Title;
	this.lblIntro.Content = Properties.Resource.Intro;
	this.lblProceed.Content = Properties.Resource.Proceed;

}
ArrangeHeartImages()Method will set the positions of the display heart images.
Row1Selected();Row2Selected();Row3Selected();
these are the method which place the selected row in the middle and swaps the
image positions in hash table collections based on the rotating star button click.
private void ArrangeHeartImages()
{
int j = 0;
int k;
myHashAllControls.Clear();
myHashRow1.Clear();
myHashRow2.Clear();
myHashRow3.Clear();
foreach (UIElement uie in CanvasImages.Children)
{
Image im = uie as Image;
if (im != null)
{
if (im.Name.StartsWith("_"))
{
k = int.Parse(im.Name.Substring(1, im.Name.Length - 1));
if (k < 8)
{
j = k - 1;
Canvas.SetTop(im, (int)HeartRows.Row1);
Canvas.SetLeft(im, RowLeftStart + (j * RowLeftIncrement));
myHashAllControls.Add(im.Name, im);
myHashRow1.Add(j, im.Name);
}
else if ((k >= 8) && (k < 15))
{
j = k - 8;
Canvas.SetTop(im, (int)HeartRows.Row2);
Canvas.SetLeft(im, RowLeftStart + (j * RowLeftIncrement));
myHashAllControls.Add(im.Name, im);
myHashRow2.Add(j, im.Name);
}
else if ((k >= 15) && (k < 22))
{
j = k - 15;
Canvas.SetTop(im, (int)HeartRows.Row3);
Canvas.SetLeft(im, RowLeftStart + (j * RowLeftIncrement));
myHashAllControls.Add(im.Name, im);
myHashRow3.Add(j, im.Name);
}
}
}
}
}
private void Row1Selected()
{
int i;
int j = 0;
myHashAllRows.Clear();
for (i = 0; i < 7; i++)
{
myHashAllRows.Add(j, myHashRow2[i]);
j++;
}
for (i = 0; i < 7; i++)
{
myHashAllRows.Add(j, myHashRow1[i]);
j++;
}
for (i = 0; i < 7; i++)
{
myHashAllRows.Add(j, myHashRow3[i]);
j++;
}
myHashRow2.Clear();
myHashRow1.Clear();
myHashRow3.Clear();
Image R1;
Image R2;
Image R3;
j = 0;
for (i = 0; i < 7; i++)
{
R1 = GetImageControlByName((string)myHashAllRows[j]);
Canvas.SetTop(R1, (int)HeartRows.Row1);
Canvas.SetLeft(R1, RowLeftStart + (RowLeftIncrement * i));
myHashRow1.Add(i, R1.Name);
R2 = GetImageControlByName((string)myHashAllRows[j + 1]);
Canvas.SetTop(R2, (int)HeartRows.Row2);
Canvas.SetLeft(R2, RowLeftStart + (RowLeftIncrement * i));
myHashRow2.Add(i, R2.Name);
R3 = GetImageControlByName((string)myHashAllRows[j + 2]);
Canvas.SetTop(R3, (int)HeartRows.Row3);
Canvas.SetLeft(R3, RowLeftStart + (RowLeftIncrement * i));
myHashRow3.Add(i, R3.Name);
j = j + 3;
}
}
private void Row2Selected()
{
int i;
int j = 0;
myHashAllRows.Clear();
for (i = 0; i < 7; i++)
{
myHashAllRows.Add(j, myHashRow1[i]);
j++;
}
for (i = 0; i < 7; i++)
{
myHashAllRows.Add(j, myHashRow2[i]);
j++;
}
for (i = 0; i < 7; i++)
{
myHashAllRows.Add(j, myHashRow3[i]);
j++;
}
myHashRow1.Clear();
myHashRow2.Clear();
myHashRow3.Clear();
Image R1;
Image R2;
Image R3;
j = 0;
for (i = 0; i < 7; i++)
{
R1 = GetImageControlByName((string)myHashAllRows[j]);
Canvas.SetTop(R1, (int)HeartRows.Row1);
Canvas.SetLeft(R1, RowLeftStart + (RowLeftIncrement * i));
myHashRow1.Add(i, R1.Name);
R2 = GetImageControlByName((string)myHashAllRows[j + 1]);
Canvas.SetTop(R2, (int)HeartRows.Row2);
Canvas.SetLeft(R2, RowLeftStart + (RowLeftIncrement * i));
myHashRow2.Add(i, R2.Name);
R3 = GetImageControlByName((string)myHashAllRows[j + 2]);
Canvas.SetTop(R3, (int)HeartRows.Row3);
Canvas.SetLeft(R3, RowLeftStart + (RowLeftIncrement * i));
myHashRow3.Add(i, R3.Name);
j = j + 3;
}
}
private void Row3Selected()
{
int i;
int j = 0;
myHashAllRows.Clear();
for (i = 0; i < 7; i++)
{
myHashAllRows.Add(j, myHashRow1[i]);
j++;
}
for (i = 0; i < 7; i++)
{
myHashAllRows.Add(j, myHashRow3[i]);
j++;
}
for (i = 0; i < 7; i++)
{
myHashAllRows.Add(j, myHashRow2[i]);
j++;
}
myHashRow1.Clear();
myHashRow3.Clear();
myHashRow2.Clear();
Image R1;
Image R2;
Image R3;
j = 0;
for (i = 0; i < 7; i++)
{
R1 = GetImageControlByName((string)myHashAllRows[j]);
Canvas.SetTop(R1, (int)HeartRows.Row1);
Canvas.SetLeft(R1, RowLeftStart + (RowLeftIncrement * i));
myHashRow1.Add(i, R1.Name);
R2 = GetImageControlByName((string)myHashAllRows[j + 1]);
Canvas.SetTop(R2, (int)HeartRows.Row2);
Canvas.SetLeft(R2, RowLeftStart + (RowLeftIncrement * i));
myHashRow2.Add(i, R2.Name);
R3 = GetImageControlByName((string)myHashAllRows[j + 2]);
Canvas.SetTop(R3, (int)HeartRows.Row3);
Canvas.SetLeft(R3, RowLeftStart + (RowLeftIncrement * i));
myHashRow3.Add(i, R3.Name);
j = j + 3;
}
}
Event Handlers for Star Button Click will
Start the Mat Animation.
private void StarOneUp(object sender, System.Windows.Input.MouseButtonEventArgs e)
{
	ShowQuestImages();
	HideStarButtons();
	SelectedRowStar = 1;
	LayerMat.Visibility = Visibility.Visible;
	Storyboard sb = LayerMat.TryFindResource("Timeline1") as Storyboard;
	sb.Begin(LayerMat);
}
Mat Animation Invalid State Event Handlers, in this
parentTimelineStateInvalidated the mat animation is played 3 times
when the user answers the 3 questions. Here it is checked when the 3rd question is answered it will show the next screen.
In event handler
animation1StateInvalidated when the mat animation is fully expanded and only one of the animation goes for 1 extra second and all
other animations will raise CurrentStateInvalidated in the story board at this time the image swapping is done.
private void parentTimelineStateInvalidated(object sender, EventArgs args)
{
	Clock myClock = (Clock)sender;
	if (myClock.CurrentState.ToString() == "Filling")
	{
		LayerMat.Visibility = Visibility.Hidden;
		ShowStarButtons();
		Image im = (Image)myQuest[2];
		if (im.Visibility == Visibility.Visible)
		{
			this.lblOnceMore.Content = Properties.Resource.OnceMore;
			this.lblYouThought.Content = Properties.Resource.YouThought;
			this.lblOnceMore.Visibility = Visibility.Visible;
			this.imgOnceMore.Visibility = Visibility.Visible;

		}

	}
}
private void animation1StateInvalidated(object sender, EventArgs args)
{
	Clock myClock = (Clock)sender;
	if (myClock.CurrentState.ToString() == "Filling")
	{
		this.lblOnceMore.Visibility = Visibility.Hidden;
		this.imgOnceMore.Visibility = Visibility.Hidden;
		if (SelectedRowStar == 1)
			Row1Selected();
		else if (SelectedRowStar == 2)
			Row2Selected();
		else if (SelectedRowStar == 3)
			Row3Selected();

		Image im = (Image)myQuest[2];
		if (im.Visibility == Visibility.Visible)
		{
			ShowMindImage((string)myHashRow2[3]);
			LayerShow.Visibility = Visibility.Hidden;
			LayerEnd.Visibility = Visibility.Visible;
			this.lblYouThought.Content = Properties.Resource.YouThought;
			this.lblOnceMore.Content = Properties.Resource.OnceMore;
		}
	}
}
I have shown the example of Mind Reader (WITIYMIWYG), Covered Simple Spinning Star Animation Control, and Simple Mat Animation with Event Handling during animation execution, Runtime Globalization.
Note - First time when you open the project, build the project so that the control will get referenced in the Display XAML Window.
Thank You, Enjoy Madi!
Initial Posting 31st October 2008
