Introduction
I recently had a requirement to create a Gadget-like control, similar to the desktop gadgets found in Vista and Windows 7. After years of lurking on CodeProject (and benefiting), I decided to post my results.
Background
In researching this requirement, CodeProject was my first stop, where I found Josh Smith's excellent article on the DragCanvas (Dragging Elements in a Canvas). Josh provided the foundation of dragging UIElements around on a canvas, so I turned my attention to creating the actual Gadget control.
Using the code
I wanted a fairly generic container control which provided the look and feel and behaviour of a gadget, while allowing me to insert my own content in the form of a UserControl or custom control. After much deliberation, I decided on this control structure:

GadgetContainer – this is the custom controlPART_Gadget – this is a ContentControl which is used to host the gadgetPART_ControlBarGrid – this is a Grid control used to house gadget controlsPART_CloseButton – this is the button used to close or unload a gadgetPART_OptionButton – is the button used to provide settings or resizing functionalityGrip – provides the gripper bar for dragging the gadget
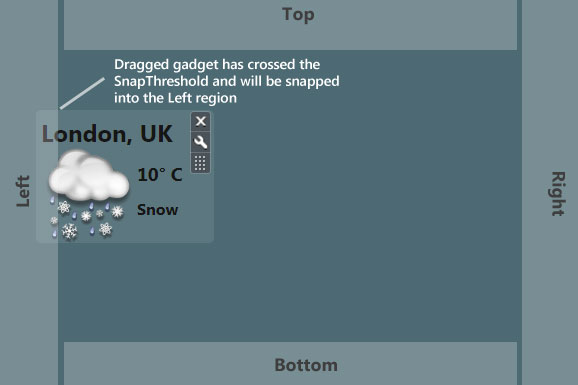
The SnapCanvas control is a modified version of Josh’s DragCanvas. The main difference is the SnapCanvas sets up “snap regions” running along the left, top, right, and bottom areas of the canvas. When dragging a gadget, if you cross the SnapThreshold (a property on the SnapCanvas which determines whether snapping should occur), the gadget will snap into place.

As you may have guessed, there is a strong relationship between the SnapCanvas and the GadgetContainer. I have included the SnapCanvas in the GadgetLibrary project, as the GadgetContainer is pretty much useless without it.
Because the SnapCanvas does the “snapping”, the GadgetContainer needs to know whether it’s been snapped. This is accomplished by implementing the IGadgetContainer interface:
namespace GadgetLibrary
{
     public interface IGadgetContainer
     {
          SnapRegions SnapRegion { get; set; }
     }
}
When the SnapCanvas snaps a gadget, it sets the SnapRegion property on the control. This is needed when the SnapCanvas is resized...
private void SnapCanvas_SizeChanged(object sender, SizeChangedEventArgs e)
{
     SetSnapRectanges(e.NewSize);
     RelocateSnappedContainers();
}
SetSnapRectangles recalculates the snap regions based on the new size of the canvas. RelocateShappedContainers cycles through the children looking for IGadgetContainers that have been snapped, and relocates them accordingly.
The GadgetPrototype project includes a basic demonstration of how to use and wire-up the GadgetContainer. The sample gadgets included are useless and simply illustrate use.
In the Window1.xaml file, you will find:
<GadgetLibrary:SnapCanvas x:Name="_SnapCanvas"
    Grid.Row="1"
    AllowDragging="True"
    SnapThreshold="20"
    AllowDragOutOfView="False">
</GadgetLibrary:SnapCanvas>
SnapThreshold is set to 20 pixels, which feels right to me. The menu handler for the Add Gadget | Weather menu item looks like this:
private void _AddWeatherGadget_Click(object sender, RoutedEventArgs e)
{
    var gadgetContainer = new GadgetContainer();
    Canvas.SetTop(gadgetContainer, 100);
    Canvas.SetLeft(gadgetContainer, 100);
    gadgetContainer.OptionButtonType = OptionButtonTypes.Settings;
    gadgetContainer.Close += OnGadgetClose;
    var weatherGadget = new WeatherGadget();
    gadgetContainer.Gadget = weatherGadget;
   _SnapCanvas.Children.Add(gadgetContainer);
}
So, we create a new GadgetContainer, set its Top and Left properties, set the OptionButtonType to OptionButtonTypes.Settings (Settings, Resize, and Other), create an event handler for the Close event and then, set the Gadget property to the WeatherGadget UserControl. And lastly, add it to the SnapCanvas' Children collection.
Responding to the OptionButton Click event
Just below the Close button in the ControlBar is the OptionButton. The OptionButton can serve different purposes depending on your gadget. Most commonly, it is used to launch a settings dialog window; in Windows 7, it can also resize or enlarge the gadget.
I wanted the gadget itself to respond to this event. I ended up doing this through the IGadget interface, which is implemented by the gadget.
public interface IGadget
{
    void OnShowOptions(OptionButtonTypes type);
}
When the OptionButton is clicked, the GadgetContainer will call the OnShowOptions method of the gadget.
In WeatherGadget.cs, we find:
public void OnShowOptions(OptionButtonTypes type)
{
    if(type.Equals(OptionButtonTypes.Settings))
    {
        WeatherGadgetSettings settings = new WeatherGadgetSettings();
        settings.Show();
    }
}
which displays a settings window for the gadget. The PictureGadget uses the Resize option, and very crudely resizes its contents in response to this event.
Points of interest
I think that’s pretty much all I have to say about this. I hope someone finds some use for it. As always with WPF, I’m sure there are better, more efficient ways of skinning this cat. Any and all comments/questions welcome.
More info
History
- Version 1.0 posted on 6 March 2009.
