Introduction
This article covers an important topic, dialog boxes. With the release of Vista came the cool TaskDialog that all Vista users are getting used to. It provides a richer dialog than the standard message box dialog available on Windows XP.
However, this great new feature causes a minor bump in the carpet for WPF developers. Which dialog should WPF developers use? Should WPF developers customize their dialogs for each Operating System? What about application documentation? Should documentation have to cover two flavors of every dialog box? The TaskDialog clearly provides for much more information than the message box, so what to do?
This is the very question that tapped on my shoulder about three months ago. So I developed a custom dialog class that works on both Vista and XP. It looks just like Vista's TaskDialog, yet without all the messy API business. (Microsoft, please add TaskDialog to the 3.6 Framework so we WPF developers do not need to fool with the Windows API and so that it can be an Operating System independent feature.) If you're interested in looking at the Windows API TaskDialog code, you can have a look at the VistaBridge application in the Windows Vista SDK.
We will look at some dialog usage examples and then have a look at some of the code.
Features
- Same simple interface for WPF developers programming against Vista or XP
- Common icons and text allow for standard documentation for Vista and XP
- Rich Vista TaskDialog like capabilities
- Detailed user dialog usage logging capabilities built in (see TODO in project)
- Optional delay feature
- Dialog box must be closed by clicking on a button (ALT-F4 is also disabled)
Usage
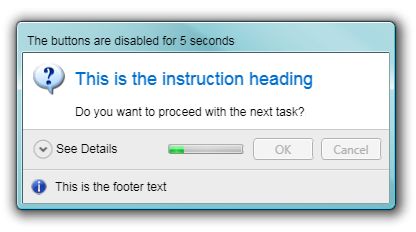
For demonstration purposes, I have provided an image and the corresponding code used to open the dialog.
Sample One - All TaskDialog Properties Set
Vista Version
Windows XP Version

Dim obj As New CommonDialog.CustomDialog
obj.AdditionalDetailsText = "These are additional details"
obj.Buttons = CommonDialog.CustomDialogButtons.OKCancel
obj.ButtonsDisabledDelay = 5
obj.Caption = "The buttons are disabled for 5 seconds"
obj.DefaultButton = CommonDialog.CustomDialogResults.OK
obj.FooterIcon = CommonDialog.CustomDialogIcons.Information
obj.FooterText = "This is the footer text"
obj.InstructionHeading = "This is the instruction heading"
obj.InstructionIcon = CommonDialog.CustomDialogIcons.Question
obj.InstructionText = "Do you want to proceed with the next task?"
Dim objResults As CommonDialog.CustomDialogResults = obj.Show
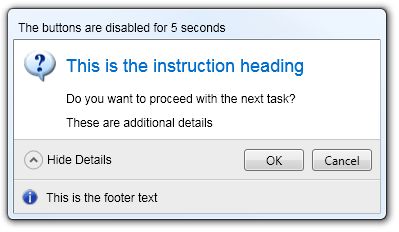
The above image was captured after the delay timer had completed and the user had clicked "See Details" which exposed the AdditionalDetailsText information.
Comparing the two images with the CommonDialog.CustomDialog properties makes it very easy to see where each property is displayed.
You can also see how the dialog will look on a Windows XP system.
Allow me to touch on the ButtonsDisabledDelay property. Many times, our beloved users are quick on the keyboard or mouse and just click through important dialog boxes. They tend to tell customer support, "I never saw that box!" For those users (I can smell a new user profile setting), or for very important dialog boxes, the ButtonsDisabledDelay property was added. Assign how many seconds you want the buttons to be disabled before the user can respond to the dialog box. Since this dialog can't be closed with the little red X or by pressing ALT-F4, your user will have plenty of time to actually read and digest the information you are trying to communicate. Just don't get too crazy with the delay feature.
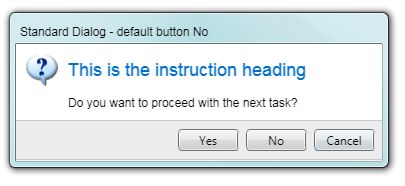
Sample Two - Standard Dialog
Dim obj As New CommonDialog.CustomDialog
obj.Buttons = CommonDialog.CustomDialogButtons.YesNoCancel
obj.Caption = "Standard Dialog - default button No"
obj.DefaultButton = CommonDialog.CustomDialogResults.No
obj.InstructionHeading = "This is the instruction heading"
obj.InstructionIcon = CommonDialog.CustomDialogIcons.Question
obj.InstructionText = "Do you want to proceed with the next task?"
Dim objResults As CommonDialog.CustomDialogResults = obj.Show
In this dialog, the DefaultButton has been set to No, the rest is very basic and standard.
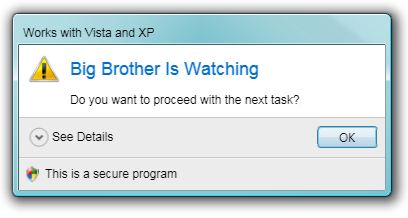
Sample Three - Dialog Using Different Icons
Dim obj As New CommonDialog.CustomDialog
obj.AdditionalDetailsText = "Cool WPF dialog box!P"
obj.Buttons = CommonDialog.CustomDialogButtons.OK
obj.Caption = "Works with Vista and XP"
obj.DefaultButton = CommonDialog.CustomDialogResults.OK
obj.FooterIcon = CommonDialog.CustomDialogIcons.Shield
obj.FooterText = "This is a secure program"
obj.InstructionHeading = "Big Brother Is Watching"
obj.InstructionIcon = CommonDialog.CustomDialogIcons.Warning
obj.InstructionText = "Do you want to proceed with the next task?"
Dim objResults As CommonDialog.CustomDialogResults = obj.Show
In this dialog, I've selected different icons and changed the text.
Vista and XP Differences
The only difference in the way this custom dialog renders is that on Vista, the dialog takes advantage of Aero Glass and, if available, uses it on the Window chrome. On XP, the custom dialog uses the system XP Window chrome.
CommonDialog Project
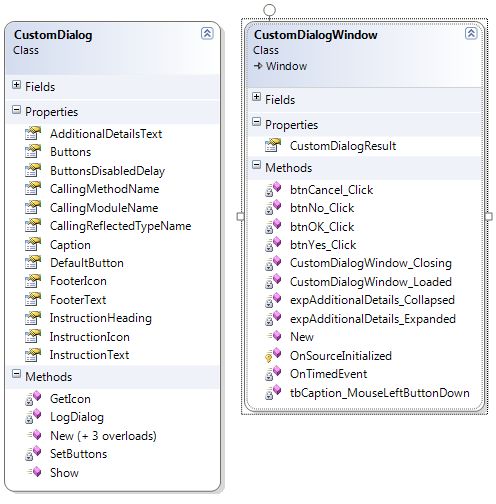
The above CustomDialog class provides the public interface for the CommonDialog project. Consumers instantiate and set properties on this class and call the Show method to display the CustomDialogWindow. The CustomDialog class constructs the CustomDialogWindow and returns the result after logging the user's dialog actions (see optional logging feature below).
Logging Feature
The CommonDialog.CustomDialog class provides a Private Sub LogDialog procedure that gets called when the user closes the dialog. By default, this procedure has no code, since the actual implementation would be very specific to each user's application and requirements. However, developers can very easily use this stub to provide rich dialog logging to their applications.
In addition to the properties used to construct the dialog and the user's response, the following properties can also be logged:
CallingMethodNameCallingModuleNameCallingReflectedTypeName
Public Function Show() As CustomDialogResults
Dim objTrace As System.Diagnostics.StackTrace = _
New System.Diagnostics.StackTrace()
If _strCallingReflectedTypeName.Length = 0 Then
_strCallingReflectedTypeName = _
objTrace.GetFrame(1).GetMethod.ReflectedType.Name
End If
If _strCallingMethodName.Length = 0 Then
_strCallingMethodName = objTrace.GetFrame(1).GetMethod.Name
End If
If _strCallingModuleName.Length = 0 Then
_strCallingModuleName = objTrace.GetFrame(1).GetMethod.Module.Name
End If
rest of the code...
The above code snippet shows how the CallingMethodName, CallingModuleName, and CallingReflectedTypeName properties are populated. This information can be helpful to developers trying to troubleshoot an issue and the user was not sure what they did.
Aero Glass

The VistaAeroAPI class allows developers to use Aero Glass in their WPF windows. There are so many Internet examples of extending Aero Glass in C#, so I've included this class here which is written in VB.NET.
Using Aero Glass
Aero Glass is a feature of Windows Vista. So XP users do not have this feature. Additionally, Vista users can turn Aero Glass off. So, when using this feature in your applications, you must be able to handle XP and Aero-off situations.
Public Sub New(ByVal intButtonsDisabledDelay As Integer)
InitializeComponent()
If System.Environment.OSVersion.Version.Major < 6 Then
Me.AllowsTransparency = True
_bolAeroGlassEnabled = False
Else
_bolAeroGlassEnabled = True
End If
_intButtonsDisabledDelay = intButtonsDisabledDelay
End Sub
Protected Overrides Sub OnSourceInitialized(ByVal e As System.EventArgs)
MyBase.OnSourceInitialized(e)
If _bolAeroGlassEnabled = False Then
Me.ResizeMode = Windows.ResizeMode.NoResize
Me.borderCustomDialog.Background = _
System.Windows.SystemColors.ActiveCaptionBrush
Me.tbCaption.Foreground = System.Windows.SystemColors.ActiveCaptionTextBrush
Me.borderCustomDialog.CornerRadius = New CornerRadius(10, 10, 0, 0)
Me.borderCustomDialog.Padding = New Thickness(4, 0, 4, 4)
Me.borderCustomDialog.BorderThickness = New Thickness(0, 0, 1, 1)
Me.borderCustomDialog.BorderBrush = System.Windows.Media.Brushes.Black
Else
If VistaAeroAPI.ExtendGlassFrame(Me, New Thickness(0, 25, 0, 0)) = False Then
Me.borderCustomDialog.Background = _
System.Windows.SystemColors.ActiveCaptionBrush
Me.tbCaption.Foreground = _
System.Windows.SystemColors.ActiveCaptionTextBrush
Me.borderCustomDialog.Padding = New Thickness(4, 0, 4, 4)
Me.borderCustomDialog.BorderThickness = New Thickness(0, 0, 1, 1)
Me.borderCustomDialog.BorderBrush = System.Windows.Media.Brushes.Black
_bolAeroGlassEnabled = False
End If
End If
End Sub
The first logical step when working with the Aero Glass feature is to determine the Operating System version. I have elected to perform this check in the constructor using this code: System.Environment.OSVersion.Version.Major < 6.
When using the Aero Glass feature, you need to Override the Window OnSourceInitialized method and place your Aero Glass code here.
This is also the location to handle non-Aero or Aero-off scenarios. In the case of this application, I have coded the Window object, setting its properties, assuming that Aero Glass will be available and enabled. In the above code, if the Operating System is XP, then a small amount of adjustments are necessary to make the dialog Window look the same or as close as possible to the Vista Aero dialog. Likewise, if the Operating System is Vista and the Aero Glass feature is turned off, a few small adjustments are made to the Window object to make it look good even without Aero.
This is an important and necessary step when implementing Aero Glass in your WPF applications.
Additional Resources
I have started a WPF Sample Series on my blog. I will be posting 3-6 WPF Sample Applications a month. I won't be posting every sample here on CodeProject, but you can still read them and download the code from my blog.
Close
Hope this code helps someone learn a little more about WPF.
History
- 28 December 2007: Initial release.
- 30 December 2007: Updated code. Corrected resize issue on XP.
