A meaningful way to visualize variables in the debugger
The Autos, Locals and the four watch windows provided by the Visual Studio IDE allow you to inspect and modify variable values. However, for viewing complex objects having many properties and fields, this is not the friendliest interface to inspect values. The main issue is the lack of an overall picture. For example, for a DataTable, you may want to visualize the data in the table without inspecting the Rows collection and the DataRow objects it contains. This detailed view of variables, though useful, is not always the perfect visual for debugging.
Fortunately, debuggers in Visual Studio 2005 and Visual Studio 2008 have a feature called Debugger Visualizer which allows an alternative and friendly way to view complex objects. A good example of this is the DataSet Visualizer which shows the actual data of the DataTable in a grid and also allows you to modify it. It provides a high level view of the DataTable which is sometimes useful to quickly figure out bugs or issues. Visualizers can be easily written for custom types, and if you are a framework author, you can supply visualizers for types in your framework.
While working with WPF, I found it a little painful that there was no easy way to visualize the UI hierarchy while debugging. Then, I found a neat debugger visualizer that visualized the WPF visual tree, by David Sleeckx. After using that for some time, it struck to me that it will be neat to have a XAML visualizer which will allow visualizing the XAML representation of an object and also allowing modifying the object by modifying the XAML. I personally have used the visualizer extensively to modify templates in a debugging session. This allows me to test things without cancelling the debugging session or starting a new build. In the next section, I will take you on a guided tour of the visualizer and we will see it in action.
Using the XamlVisualizer - A guided tour
If you have not already downloaded and installed the visualizer, go ahead and do so as per the instructions in the Download and Installation section. Assuming you have followed the steps in the Download and Installation section correctly, you are now ready to use the visualizer. Let's start with a quick debugging session. I have used VS 2008 to develop this step by step tutorial, but the instructions are equally valid if you have VS 2005 and the Visual Studio Tools for Orcas installed.
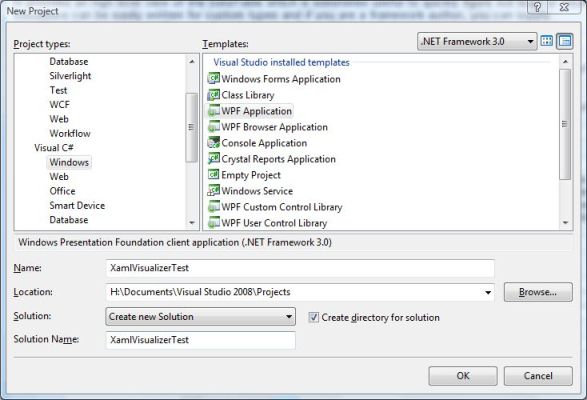
First, let's start off by creating a new WPF project. For the sake of this tutorial, we will create a new WPF application in C#. Let's name the project XamlVisualizerTest as shown in the screenshot below. Also, notice the combo box in the upper right corner whose selected value is ".NET Framework 3.0". This is the new multi-targeting feature of VS 2008. When you select .NET Framework 3.0, you indicate that you will like to use the WPF/WCF/WF technologies which are available in .NET Framework 3.0 but you don't want to use the .NET Framework 3.5 features such as LINQ. What VS 2008 does in such a case is that it does not add references to LINQ assemblies. But you are free to use C# 3.0 features such as anonymous classes, lambda expressions, and auto implemented properties - these features are not specific to LINQ or .NET Framework 3.5.
As a courtesy, the wizard creates Window1.xaml, Window1.xaml.cs, App.xaml, and app.xaml.cs (though in real world apps, I have to always delete the Window1.xaml file, so it is more of a pain than a courtesy). Open the Window1.xaml.cs file and put a breakpoint at the end of the constructor. To immediately see the effect of the debugger, run the debugging session (press F5). The break point will be hit in the constructor as shown below:
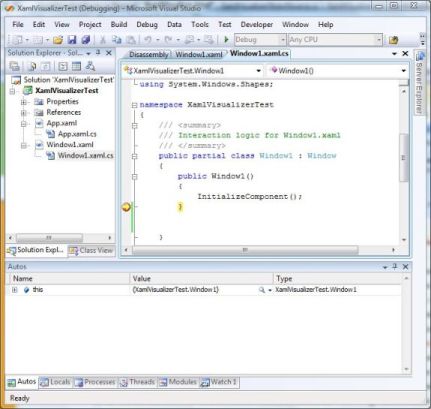
Notice the magnifying glass icon on the extreme right in the Value column for the variable this. Clicking on it will lead to the XAML Visualizer being shown:
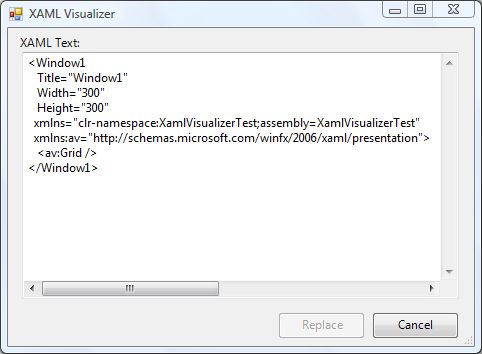
Notice that the XAML code is not the same as the XAML you specified in the Window1.xaml file. This is because the XAML shown by the XAML Visualizer is the run-time representation of the object. So if a property specified in XAML gets modified programmatically, then the XAML visualizer will show the programmatically modified value. Also, notice that the element name is Window1 instead of Window as we specified in the Window1.xaml. Again, the reason is that the XAML used in Window1.xaml is used to define the Window1 class, whereas the XAML shown by the XAML Visualizer is the representation of any object with the type Window1. Finally, notice that the Replace button is disabled as it is not possible to modify the this object.
Viewing more complex XAML content
A common task when working in WPF is to use control templates. Even if you don't specify a control template, a control inherits a template automatically from the theme. The default control templates for controls used by WPF are available for all the themes supported by WPF with the Windows SDK samples. But in this section, we will see how we can get the markup of a template using the XAML Visualizer.
To view the control template, we need to have more interesting content in our window. So, let's modify Window1.xaml to include a Button, as shown below:
<Window x:Class="XamlVisualizerTest.Window1"
    xmlns="http://schemas.microsoft.com/winfx/2006/xaml/presentation"
    xmlns:x="http://schemas.microsoft.com/winfx/2006/xaml"
    Title="Window1" Height="300" Width="300">
    <Grid>
        <Grid.RowDefinitions>
            <RowDefinition  />
            <RowDefinition Height="40" />
        </Grid.RowDefinitions>
        <Button Grid.Row="1" HorizontalAlignment="Right" Margin="0,9,9,11"
                Name="button1" Width="75">Button</Button>
    </Grid>
</Window>
Let's launch the debugger again, and when the debugger hits the breakpoint in InitializeComponent, type the expression button1.Template in the watch window, as shown in the screenshot below.

As you can see in screenshot, the XAML for the default template in all its details is shown in the XAML Visualizer window. Also, notice that the Replace button is active, which gives us something to do in the next section.
Replacing the XAML content
One nice feature of modern debuggers is that they allow the values of variables to be modified during the debugging process. The same ability is also available in the XAML Visualizer. You can modify the XAML code in the visualizer window and see the effects in the application being debugged. To try it out, let's modify the XAML content of button1's template as shown below:
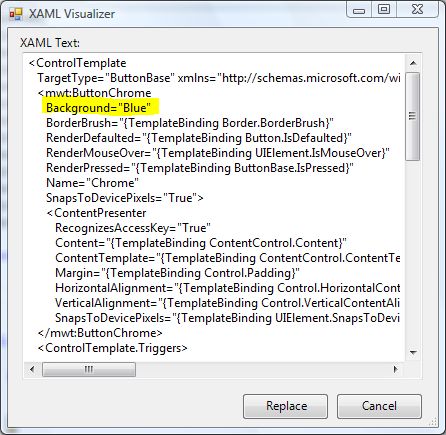
The change is highlighted in the above screenshot. We change the BackgroundColor to Blue, and the result, unsurprisingly, appears as shown below:
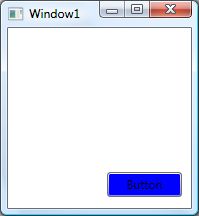
We managed to change the color to blue without modifying the main application code. It's all between the debugger and debuggee, the main code still remains unmodified. If you stop the debugger and re-run the application, then the button's appearance will revert back.
Replacing the XAML is powerful but...
Let me start this section by saying that XAML replacement will not always work. In this section, we will understand why and when it will not work. Let's run our sample app again in the debugger, and break in the InitializeComponent function. This time, let's visualize the button1 variable as shown below and replace the contents as shown in the highlighted portion of the screenshot below:

You will expect that the button text will change once you click the Replace button. But alas, this does not happen. You will see that the original text remains. Is this a bug? Although this behavior is not expected on the outset, if we give it a more careful thought, we will realize that the visualizer did exactly what it was supposed to do. It replaced the button1 member variable with the XAML supplied in the visualizer dialog. The button1 member variable held a reference to the button in the WPF visual tree, and now it refers to the new object created by the XAML visualizer. Replacing the member variable does not mean that the content is replaced in the visual tree. In fact, if you visualize the button1 variable again, you will see that it has the new XAML we supplied. This is an important thing you need to be aware of when using the XAML visualizer.
How Visualizers work?
In this section, I will quickly go through the internal working of the XAML Visualizer. XAML Visualizer has three main classes as shown below:

The DialogDebuggerVisualizer and the VisualizerObjectSource belong to the VS IDE. The DialogDebuggerVisualizer is the most important class, and a visualizer should have a class derived from DialogDebuggerVisualizer. The DialogDebuggerVisualizer has a method called Show which is invoked by the IDE when the user wants to display a value using the visualizer. It is here that the visualizer displays the dialog, gets any changes by the user, and asks Visual Studio to replace the object if the user intends to do so.
protected override void Show(IDialogVisualizerService windowService,
IVisualizerObjectProvider objectProvider)
{
Stream dataStream = objectProvider.GetData();
using (XamlVisualizerForm displayForm = new XamlVisualizerForm())
{
displayForm.XamlText = new StreamReader(dataStream).ReadToEnd();
displayForm.IsObjectReplaceable = objectProvider.IsObjectReplaceable;
if (windowService.ShowDialog(displayForm) == DialogResult.OK)
{
MemoryStream replacementDataStream = new MemoryStream();
using (XmlWriter xmlWriter =
XmlTextWriter.Create(replacementDataStream))
{
xmlWriter.WriteRaw(displayForm.XamlText);
}
replacementDataStream.Seek(0, SeekOrigin.Begin);
objectProvider.ReplaceData(replacementDataStream);
}
}
}
The objectProvider parameter passed to the Show method is used to obtain the actual object to display in the Visualizer. In our case, this is the streamed XAML. Data is transferred back and forth between the debuggee process and the debugger process using streams. In our case, this stream consists of the XAML representation. At this point, you might be wondering how the stream got the XAML in the first place? This is where the XamlVisualizerObjectSource comes into picture. The XamlVisualizerObjectSource has methods that run both in the debuggee process and the debugger process. The method which runs in the debuggee process is called GetData, and it is responsible for writing the contents of the object being visualized to a stream. In the case of the XAML Visualizer, we directly use the XamlWriter class to write the contents to the stream.
public override void GetData(object target, System.IO.Stream outgoingData)
{
XmlWriterSettings settings = new XmlWriterSettings();
settings.OmitXmlDeclaration = true;
settings.Indent = true;
settings.IndentChars = " ";
settings.NewLineOnAttributes = true;
using (XmlWriter writer =
XmlWriter.Create(outgoingData, settings))
{
XamlWriter.Save(target, writer);
}
}
It is this stream which is obtained by the objectProvider.GetData call in the Show method discussed above. The other method of interest is CreateReplacemntObject, which takes a stream passed from the debugger and converts it to an object which will replace the object in the debugger.
public override object CreateReplacementObject(object target,
System.IO.Stream incomingData)
{
return XamlReader.Load(incomingData);
}
It is no surprise that we are using XamlReader to load the data and create the replacement object. So now, we have a DialogDebuggerVisualizer, a VisualizerObjectSource, and an object of a given type being visualized. How do we link all three? This is done through an assembly attribute named DebuggerVisualizerAttribute, as shown below:
//Apply XamlVisualizer Visualizer to a WPF Visual
[assembly: DebuggerVisualizer(typeof(XamlVisualizer.XamlVisualizer),
    typeof(XamlVisualizer.XamlVisualizerObjectSource),
    Target=typeof(Visual), Description = "XAML Visualizer")]

//Apply XamlVisualizer Visualizer to a WPF Style
[assembly: DebuggerVisualizer(typeof(XamlVisualizer.XamlVisualizer),
    typeof(XamlVisualizer.XamlVisualizerObjectSource),
    Target = typeof(Style), Description = "XAML Visualizer")]

//Apply XamlVisualizer Visualizer to templates
[assembly: DebuggerVisualizer(typeof(XamlVisualizer.XamlVisualizer),
    typeof(XamlVisualizer.XamlVisualizerObjectSource),
    Target = typeof(FrameworkTemplate), Description = "XAML Visualizer")]
In the above code, we indicate that we want to use the XAML Visualizer to visualize WPF Visuals, Styles, and Templates. If you want to add more types (for example, a FlowDocument), you can do so by adding an attribute as follows:
//Apply XamlVisualizer Visualizer to documents
[assembly: DebuggerVisualizer(typeof(XamlVisualizer.XamlVisualizer),
    typeof(XamlVisualizer.XamlVisualizerObjectSource),
    Target = typeof(FlowDocument), Description = "XAML Visualizer")]
You can add this attribute to all objects or all DependencyObjects if you want to, but that is not recommended as XamlWriter and XamlReader may not always work.
Installing the Visualizer
To install the Visualizer:
- Download the binary for the appropriate version from the download link on the top of this article.
- Extract the zip and copy the XamlVisualizer.dll to My Documents\Visual Studio 2005\Visualizers for VS2005, or to My Documents\Visual Studio 2008\Visualizers for VS2008.
Update
I started writing this article about two months back, though I have been using the visualizer for a long time. By the time the article got posted, Josh Smith had posted Woodstock for WPF, which is similar to the WPF tree visualizer by David Sleeckx. Both XAML Visualizer and Woodstock can be used together.
