Mole 2010 is Now Available

If you are using Visual Studio 2010 and would like to use the Mole debugging tool, please visit http://www.molosoft.com to get your copy today. Mole 2010 makes debugging easier.
Mole v4 for Visual Studio - With Editing Released
All versions of Mole have been replaced by Mole v4 for Visual Studio.
Please refer to this article for the latest information and code: Mole v4 for Visual Studio - With Editing.
This article is here for informational purposes. The downloads have been removed. Please download and use Mole v4 for Visual Studio - With Editing. Thank you!
Mole II Version 2.1.1
Introduction
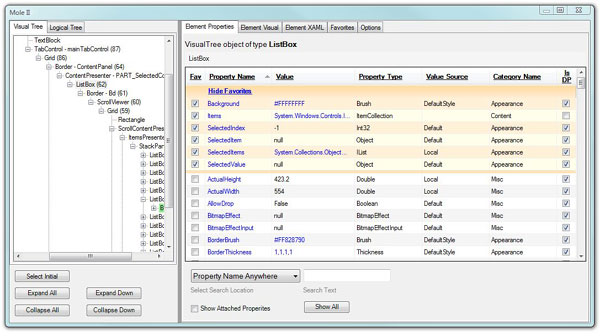
This is the third CodeProject article about an on-going effort to create the best WPF debugger visualizer that we can. A significant amount of the underlying technical details of how this visualizer works has already been covered in depth by the previous articles, so the primary focus of this article is to introduce the new features of Mole II.
In-depth Manual
Mole now has an in-depth manual that can be read here: Mole's Home Page.
The manual can be viewed on-line or downloaded as a PDF.
The History of Mole II
If you are interested in knowing about the background of Mole and its evolution, read this section. If you couldn't care less, feel free to skip ahead.
At first, Josh Smith cobbled together a modest WPF debugger visualizer called Woodstock, which provided rudimentary visualizations of the visual tree and element properties. Immediately after posting the Woodstock article, he received many comments, suggestions, and words of encouragement from WPF developers around the world. One of those developers, Karl Shifflett, decided to use Woodstock as a prototype for his own WPF visualizer, called Mole.
Mole introduced many user-friendly features, a cleaner design, and better performance, so Josh decided to join forces with Karl and work on Mole. They published an article about Mole here on CodeProject, and the positive feedback kept rolling in strong. Thanks to many enthused developers out there, but particularly Andrew Smith from Infragistics, a large number of great feature requests, optimizations, and critiques helped fuel the fire for further enhancements to Mole.
In fact, so many improvements were made to Mole it was decided that updating the existing Mole article was insufficient. A new article was needed because the second version is so much better and more feature rich. This is the new article which explains all of the new goodness found in Mole II.
Who Did What
The source code for Mole II can truly be considered the result of a group effort. Karl was the master code integrator. He worked tirelessly at adding new features while integrating code Josh and Andrew sent to him via e-mail (oh, how we missed source control!). We received many, many helpful code snippets from Andrew Smith, which were much appreciated, and always worked as promised. Andrew seemed to effortlessly fix many bugs that Karl and I bashed our heads against for a long time.
Josh wrote the original article. Karl adds to Josh's stress level by adding features to Mole and updating this article. The development team is identified by listing each developer as an author for this article.
What Mole II has to Offer
Here is a quick listing of the big-ticket items which Mole II has. The features that are new to version 2 are tagged with "(new)".
- Lightning fast performance (new)
- View the visual tree in a
TreeView control
- View the logical tree in a
TreeView control (new)
- View all properties, dependency properties, and attached properties of any element in the visual or logical tree.
- Drill into and view the properties of sub-objects of any object, and use a breadcrumb control to navigate back (new)
- Optionally specify your "favorite" properties and then view those properties in a special section of the grid which is "frozen" in place as you scroll
Note, this feature used to allow you to specify a list of properties for a given element type, but now the list applies to all types. This prevents you from having to select the same properties over and over again for many classes.
- View the items in a collection directly in the main property grid, as a group which can be expanded and collapsed (new)
- View the items in a collection in a popup window; use the New Data View button to utilize this feature (new v2.1)
- View a snapshot image of any element, whenever possible
- View a XAML representation of any element, whenever possible
- Configure the visualizer in the "Options" tab (new)
- Click on a property name in the grid to open a Web browser to a Google search for that property
- An improved visual design (new)
Lightning Fast Performance
We were fanatically obsessed with improving the speed of Mole; from how long it takes to initially load the Window, to how long it takes for an element's properties to appear in the grid. This was a very high priority because most developers simply will not use a debugging tool which slows them down. So it had to be lightning fast. Period.
To speed things up, we did many things, such as:
- The entire application uses lazy-loading of data to prevent unnecessary performance bottlenecks.
- A
TreeView subclass, called MoleTreeView, performs lazy-loading of its nodes so that we only create the nodes which must exist at any point in time.
- The data transfer objects, which are sent via remoting between the debuggee and the debugger processes, implement custom serialization to avoid using the default Reflection-based algorithm. This also allows us to only serialize the fields which must be persisted at that point in time.
Drilling into Sub-Objects
This feature allows you to view the properties of a sub-object off any object. It even provides a nice breadcrumb control which allows you to navigate back to previous objects you have inspected. I think this feature is easiest to explain via screenshots. Suppose we select a ListBox in the visual tree TreeView and its properties appear in the grid, like this:
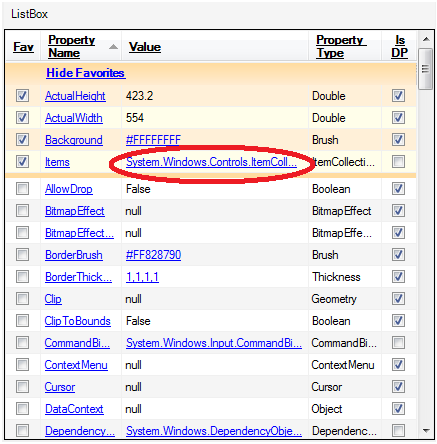
If you then click on the value of the Items property (circled in red above), the same grid will display all properties of the ItemCollection object which is returned by the Items property. The grid would then look like this:
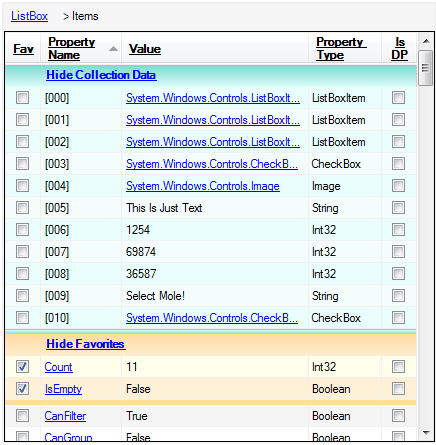
Notice how in the above grid there is a breadcrumb control which keeps track of which object(s) you have viewed and which one you are currently viewing. This control will follow you to any depth of sub-objects, so feel free to navigate as deep into the managed heap as you need to go. When you want to return to an object you previously viewed, just click on the item in the breadcrumb trail which represents it.
If you decide that you do not want to view the items in the collection, or your "favorite" properties associated with ListBoxItem, you can collapse those two groups. At that point, the grid looks like this:
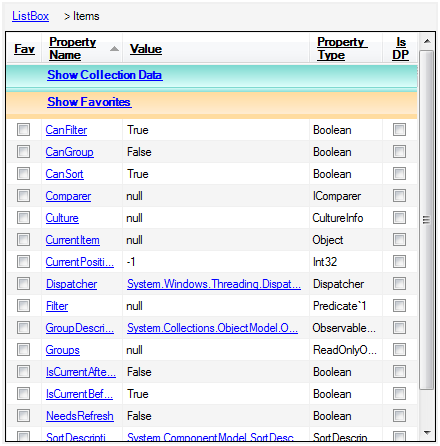
That's right; we added expandable groups to the standard DataGridView control! ;)
If you would prefer to drill further into the objects in the collection, expand the Data Collection group and simply continue drilling into the objects. For example, if you were to drill into the first ListBoxItem element seen previously, the UI would look like this:
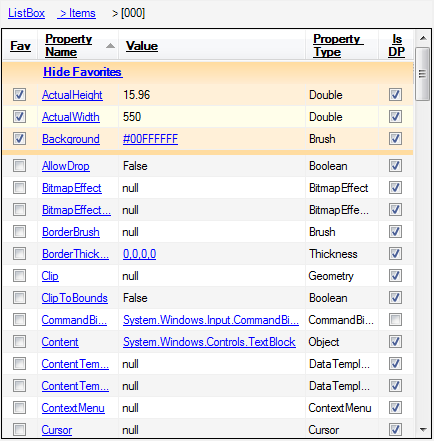
From an implementation perspective, this feature is very interesting. Keep in mind that the code running in the debugger process, including the visualizer UI, does not have direct references to the objects being displayed. When you drill into a property of an object, a request is serialized and sent to the debuggee process. That request is then unpacked and interpreted to figure out how to walk the object graph to the requested object on the heap.
If you are interested in seeing how that logic works, check out the MoleVisualizerObjectSource class. The main method responsible for maintaining the state of a drilling operation is called GetDrillingOperationProperties.
View the Logical Tree in a TreeView Control
In Mole v1, you could view the visual tree of the UI you were debugging, but not the logical tree(s). In Mole v2, we added support for viewing logical trees, as well as the properties, image snapshots, and XAML view of elements in the logical tree. The impetus behind this feature was to allow developers to inspect the logical tree so that they could understand how inherited dependency properties (such as FontSize and DataContext) get their values. Since property inheritance flows down the logical tree, this should help people better understand how and why their dependency properties inherit certain values.
Implementing this feature turned out to be rather challenging, because a significant amount of research and experimentation were necessary to fully grasp what needed to be done. After Josh completed his research into the differences between the visual tree and the logical tree, he published the "Understanding the Visual Tree and Logical Tree in WPF" article here on CodeProject. If you intend on using the Logical Tree feature, you should be sure to read that article because it will explain the subtleties and quirks involved with the logical tree.
Here is a screenshot of the Logical Tree tab:
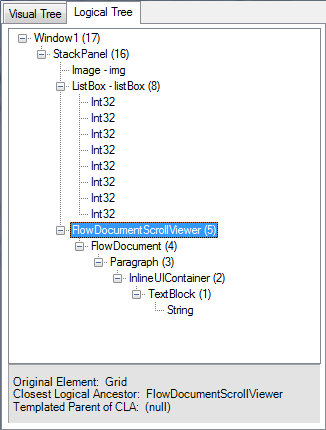
Notice how beneath the TreeView there is a text area which lists three pieces of information. The "Original Element" refers to whatever element you had selected in the Visual Tree tab before opening the Logical Tree tab. The Logical Tree tab shows the logical tree of that visual element, or, if that element is not in a logical tree, the logical tree of the element's closest ancestor which is in a logical tree. Clear as mud, right?
The "Closest Logical Ancestor" refers to the first ancestor element of the original element which is in a logical tree. If the original element (i.e., the one selected in the Visual Tree tab) is in a logical tree, then this value will read "(self)".
Lastly, the "Templated Parent of CLA" refers to the templated parent of the closest logical ancestor element. This is useful information when elements are generated by templates and are disconnected from the logical tree of the templated element/control in which they exist. If you have no idea what any of this means, we recommend that you read the article Josh wrote about this topic, and hopefully it won't seem so bizarre afterwards.
Configure the Visualizer in the Options Tab
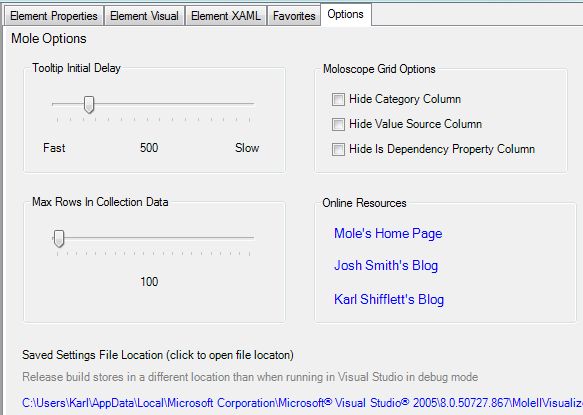
Mole automatically remembers many settings for you, such as the window size, window location, which column is sorted in the grid, the width of the TreeViews, and more. However, it also now provides you with additional useful settings in the "Options" tab. Here is what that tab has to offer:
Mole II Version 2.1 New Features
When releasing a product, the development team must make a decision to exclude features that could possibly cause confusion for users. This was the case with the "Mole II Collection Viewer" dialog. It was actually in the original Mole II code, but we commented it out because the results could sometimes be misleading or incorrect.
Karl really wanted this feature in Mole II, so he went back and rewrote it from scratch and has posted it here.
Mole II v2.1 Changes
- Enabled the "View Data" button for all properties that store their values in an
IEnumerable collection. Clicking that button will open the Collection Viewer.
- Removed the "Show All" button in the search area, and added a Vista-like Search textbox containing an "X" button which resets the search interface.
Mole II v2.1 Collection Viewer
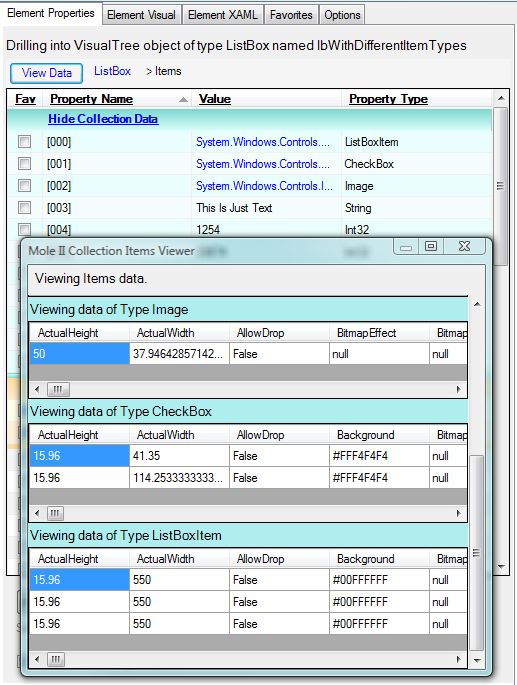
For each distinct type of object in the items collection, a separate DataGridView will display the properties for all objects of that type found in the collection.
Mole's Home Page
Mole's Home Page contains more documentation and tips on using Mole.
For everything Mole, including the lighter side of Mole, please visit Mole's Home Page.
Known Issues
In an ideal world, software would be released without a single bug. But here in the real world, things are not so simple. We know about two problems that can occur when using Mole, but there is not much we can do to fix it, only create workarounds.
XamlWriter can throw exceptions when trying to write out XAML for certain kinds of objects. There is nothing we can do to prevent it, but we attempt to catch the exception and show a message box explaining what went wrong.
Opening up a release build of Mole can cause Visual Studio to display a message box stating: "This module was built either without optimizations enabled or without debug information". To make that stop, go to Tools | Options | Debugging | General, and then uncheck the "Warn if no user code on launch" option.
Standalone Install
- Download binary for the version of Visual Studio you are using, save, and unzip.
- Copy the file to one of the following directories:
- vs install path\Common7\Packages\Debugger\Visualizers
- My Documents\Visual Studio 2005\Visualizers {VS2005}
- My Documents\Visual Studio 2008\Visualizers {VS2008}
Source Code Install
We have provided source for both VS2005 and VS2008. The only difference is the reference to Microsoft.VisualStudio.DebuggerVisualizers.DLL. For VS2005, the file version is 8.0.0.0, and for VS2008, the file version is 9.0.0.0.
- Download source, save, and unzip.
- Copy files to your Projects directory for either VS2005 or VS2008.
Parting Thoughts
Creating Mole II has been a very interesting and enjoyable programming experience. We are all very proud of the application, even though there are many things we would do differently if we started all over again.
I, Josh, would like to thank Karl for being such a blast to work with and putting up with my endless stream of suggestions, ideas, questions, critiques, and inquiries. You're the man, Karl! I would also like to thank Andrew for the great suggestions, encouragement, and amazing help with resolving some nasty bugs.
This project has been an incredible experience, and we all hope that you will have as much fun using Mole II as we had creating it. If you have some constructive criticism, questions, suggestions, or feature requests, please leave a comment at the bottom of this article letting us know what you have in mind.
Revision History
- December 6, 2007 - Created the article.
- December 7, 2007 - Mole II v2.1.1 released.
- December 7, 2007 - Added link near the top of the article for Mole's in-depth manual.
