Table of Contents
In this article, I will introduce a library containing a confirm box, message box, and some new buttons for easy coordination with them. There are some articles on a similar topic, but they were not I wanted. I was looking for a compact solution to be used in a simple way.
This article is prepared for two types of readers. The library introduced here is standalone, and is very easy to deploy and use. You can just see the live examples listed at the end of the article and use them without any knowledge of what's inside. The examples are also available in a download package. On the other hand, a reader who is interested in the theory and the architecture can read the whole article.
- Everything is located inside one DLL, even the CSS files and the JS files, which means easy deployment.
- Does not use third party libraries or the AJAX Control Toolkit.
- JavaScript and CSS files are loaded automatically.
- Some parts of the library are open for customization.
Note: The examples require the Microsoft AJAX JavaScript Library to be loaded. This means we need to add the ScriptManager control to our page.
This article is primarily about a message box and a confirm box. But I have created some new types of buttons as well. I will discuss the buttons first and then explain the popup boxes. The buttons and the boxes mentioned in this article are kind of connected in order to be used in a simple way. But remember that they are independent. In case you do not like my buttons, you can just use the popup boxes. Let's look at the class diagram for the buttons:

Picture 1 - Class Diagram for Buttons
As you can see from the picture, there is the ButtonBase class and N number of concrete buttons. The idea of these buttons is that the button is a simple DIV element. This gives you the freedom to design buttons. If you are good at CSS and design, then imagine what you can do with a simple DIV. And, this DIV can be declared as a button. Basically, you are not restricted to the input tag with type button, or the ASP.NET ImageButton, or stuff like that. All you need to do is to create your own class, derive from ButtonBase, and specify the content of the button. The ButtonBase class contains all the functionality around ASP.NET buttons. You can imagine that the ButtonBase is a DIV container, and you can put everything (controls) into this container, and what you put into it will be an ASP.NET button. If you noticed, there is the generic T argument which has to be specified in the concrete implementation of the button. And this T argument is the content of the DIV.
Note: If you are familiar with HTML and CSS, then you can propose that a DIV is not appropriate to be a button due to its special behavior in HTML formatting. That's the reason why the ButtonBase class always wrap it into a table with zero cell spacing and zero margin and padding.
In the library, there are some already created concrete implementations of the button. The table below lists the currently available buttons:
| Name |
Description |
TextButton |
DIV with text element inside. |
ClassicButton |
The input tag with the type of button inside the DIV. |
ImageButton |
Image inside the DIV. |
LinkButton |
HTML link inside the DIV. |
Now, it's time to visit the first demo. Here is the link: Demo 1. Please be patient, there is nothing impressive in demo 1. These are just examples of the listed buttons. I think demo 2 will be much more interesting.
Back to demo 1. As you can see, the code is simple. For example, for TextButton, it is:
<dns:TextButton runat="server" ID="cmdButtA" Text="Button A"
                OnClick="Click_ButtonA" PredefinedStyle="Red" />
Note: I completely ignored the submit behavior of the HTML forms and every postback is send via JavaScript (__doPostBack and __doPostBackWithOptions functions). I know, that is not normal, but to be honest, I don't need the submit behavior. I don't need two approaches to send the form to the server. What if JavaScript is not allowed in a browser? Well, this topic is about AJAX, and I need to have more than JavaScript available, and if at least JavaScript is not available, then sorry.
Yes, there is. It's the property ConfirmText. If you set it to a text, then this text will displayed in a confirm box before the postback will be sent. Here is an example:
<dns:TextButton runat="server" ID="cmdButtA" Text="Button A"
  OnClick="Click_ButtonA" PredefinedStyle="Red"
  ConfirmText="Do you want to really send a postback?"  />
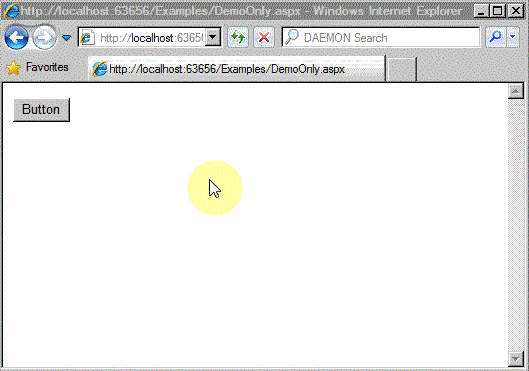
Let's see the screenshot:

Picture2 - Screenshot of the confirm box
The previously introduced code can be explored as a live demo right here: demo 2. It is basically demo 1, but the buttons have the property ConfirmText set.
Now, I will explain how to create a custom button with custom content, and afterwards, I will explain where the confirm box in Demo 2 comes from.
I will introduce it in the steps to create an ImageButton.
public class ImageButton {
}
Derive from ButtonBase and specify the content
public class ImageButton : ButtonBase<Image> {
}
Because I'm creating a button with image as content, I specify Image as a generic parameter.
Override and implement the CreateContentControl method
protected override Image CreateContentControl() {
  return new Image();
}
The CreateContentControl method is called in OnInit and a new control returned by this method is added to the page life cycle before the base.OnInit is called, which means the OnInit itself will be called on your content control.
Note: after the Init phase of the page life cycle, you will have your content control available in the ContentControl property.
Add custom properties to your control
Is it obvious that the ImageButton will need something like an ImageUrl to specify the URL of the image. So, let's add it:
public string ImageUrl {
  get {
    string str = (string)this.ViewState["ImageUrl"];
    if (str != null) {
      return str;
    }
    return string.Empty;
  }
  set {
    this.ViewState["ImageUrl"] = value;
  }
}
Override OnPreRender to do the final changes on your control
OnPreRender is the right time to set the final changes to the content control. Let's set ImageUrl to the real image, and the Text property to the AlternateText, on a real image, like the following:
protected override void OnPreRender(EventArgs e) {

  ContentControl.ImageUrl = ImageUrl;
  ContentControl.AlternateText = Text;

  base.OnPreRender(e);
}
The whole source code is available in download.
Let me introduce the class diagram first.
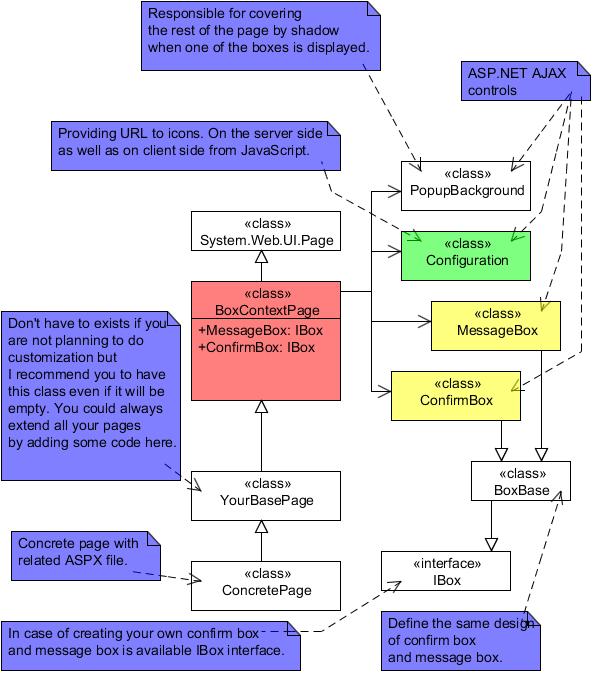
Picture 3 - The Class Diagram of Confirm Box and Message Box
As you can see on the diagram, there is the class called BoxContextPage. What exactly is the BoxContextPage taking care of? It is taking care of: one instance of the confirm box, one instance of the message box, the configuration, the localization, and the loading of the CSS resources. To derive from this page is the easiest way to add the boxes into your page. For example, the code-behind of the Demo 2 page looks like this:
public partial class Default : BoxContextPage {

    protected void Page_Load(object sender, EventArgs e) {
    }

    protected void Click_ButtonA(object sender, object args) {
        lblResult.Text = "You clicked on button A";
    }

    protected void Click_Cat(object sender, object args) {
        lblResult.Text = "You clicked on a cat with glasses";
    }

    protected void Click_Classic(object sender, object args) {
        lblResult.Text = "You clicked on a classic button.";
    }

    protected void Click_LinkButton(object sender, object args) {
        lblResult.Text = "You clicked on a LinkButton.";
    }
}
You see? Just derive from BoxContextPage instead of System.Web.UI.Page, and all functionality about the boxes will be available in your page.
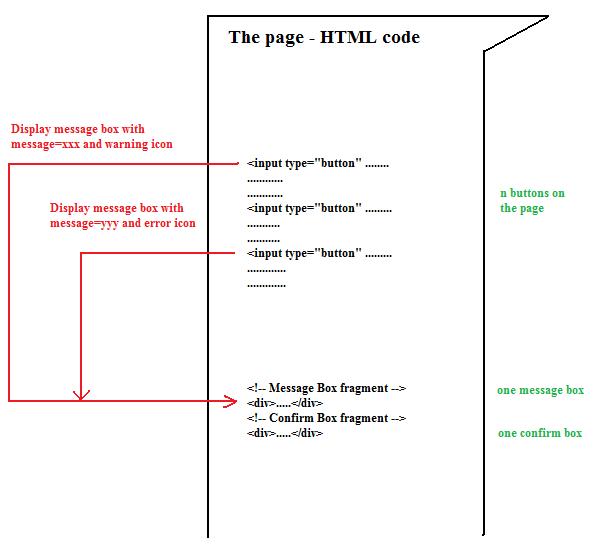
From the precedent class diagram, you can assume that there will be only one instance of the message box and one instance of the confirm box for the page. This is because there is no reason to have more instances of that on the page because only one popup box can be displayed at the moment. Thus, only one HTML code of the confirm box and message box is downloaded to the client. Plus, the popup boxes are client-driven, both the message displayed in the box and the icon in the box. For visual representation, look at the following picture:
Picture 4
I'm pretty sure you have heard about the ASP.NET page life cycle. If you haven't, please look at reference [4] listed in the References section at the end of this article. I injected into two stages of the page life cycle in order to create instances of the controls and in order to localize them. For a visual explanation, take a look at the following activity diagram:
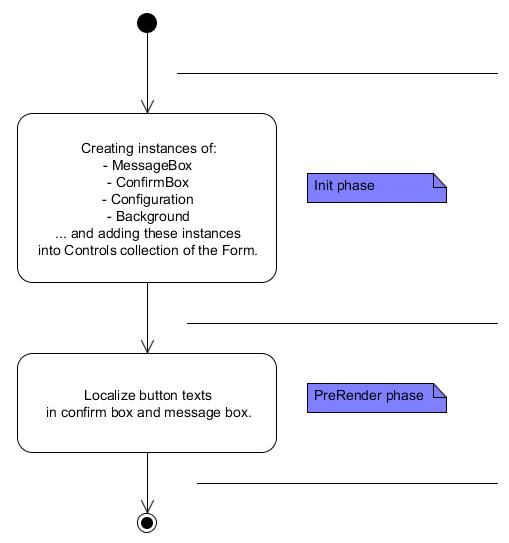
Picture 5 - The BoxContextPage Life-cycle
There are four ASP.NET AJAX controls in the library. They are basically ASP.NET controls extended with a JavaScript class, and some of them have related CSS files. For a visual presentation, you can look at the following picture:
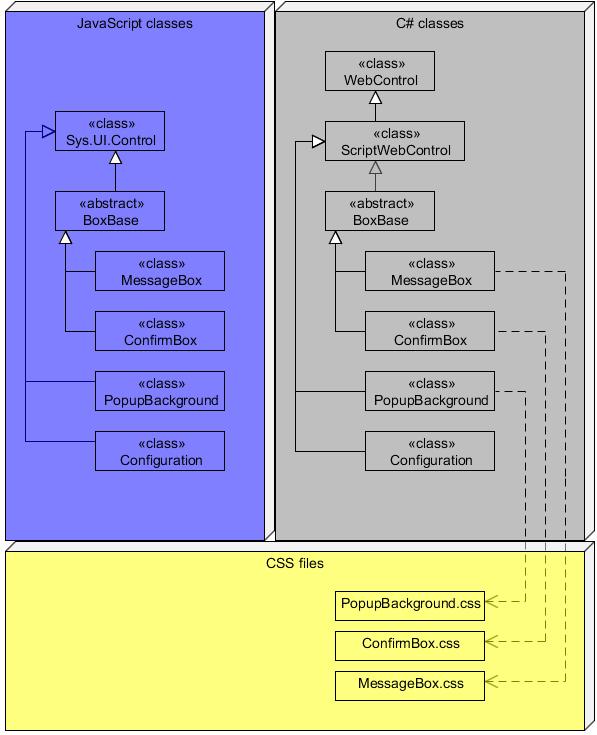
Picture 6
The PopupBackground control is responsible for covering the whole page by a shadow when one of the popup boxes is displayed. It's automatically used by MessageBox and ConfirmBox.
As I mentioned, the popup boxes are server and client side driven. The message box is especially required to be server and client side driven. The Configuration control provided the URLs to the icons on the server side as well as on the client side. The advantage of having the Configuration control is the ability to override this class and specify custom icons. Let's look at the steps for how to do that.
public class MyConfiguration : Configuration {

    public override string QuestionIcon {
        get {
            return "http://www.myserver.com/question.png";
        }
    }

    public override string InfoIcon {
        get {
            return "http://www.myserver.com/info.png";
        }
    }

    public override string WarningIcon {
        get {
            return "http://www.myserver.com/warning.png";
        }
    }

    public override string ErrorIcon {
        get {
            return "http://www.myserver.com/error.png";
        }
    }
}
In your page, override the CreateConfiguration method. And, return the instance of your new Configuration class. This can be done by the following code:
public partial class Default : BoxContextPage {

    protected override Configuration CreateConfiguration() {
        return new MyConfiguration();
    }
}
And that's it. Now comes the chapters on how to handle the message box and the confirm box directly.
There is the MessageBox variable available directly in your page, and you can call the Show method on it. Here is the code:
protected void Click_cmdButt(object sender, object args) {
MessageBox.Show("Your operation was successfully completed.",
DotNetSources.Web.UI.Buttons.Popup.Icon.Info);
}
Demo 3 is available here.
If you are developing a custom control such as an User Control or a Web Control, you can access the message box like this:
Helper.RetypeToBoxContextPage(Page).MessageBox.Show(
  "Your operation was successfully completed.",
  DotNetSources.Web.UI.Buttons.Popup.Icon.Info);
The method RetypeToBoxContextPage is already responsible for throwing an Exception if your page is not derived from BoxContextPage.
This scenario is not supported by this library. Why? Because it's not usual. It's usual for message box because in the case of a message box, you are about to inform what happened on the server. In the case of a confirm box, you are asking a simple question (if the user wants to send a postback), and you probably don't need to have server interaction. That's the reason I do not support this scenario.
Before I show you how to handle the confirm box and the message box from the client, I will introduce the class diagram for the JavaScript classes. Here it is:
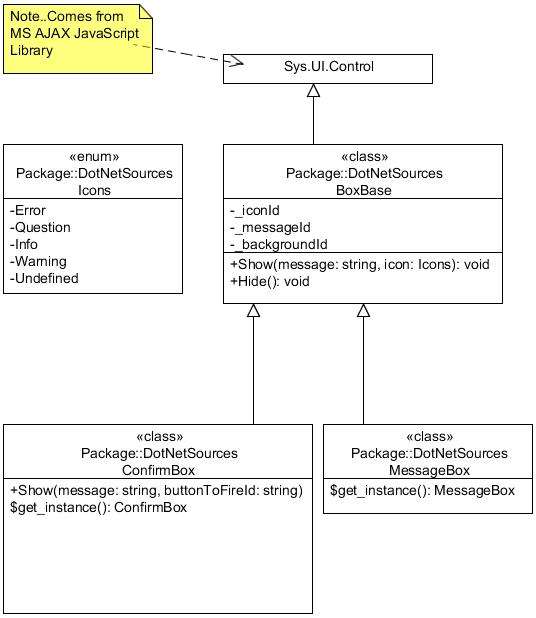
Picture 7 - Class Diagram of JavaScript Classes
This scenario is a little bit unusual. However, this library is prepared for it. From the class diagram of the JavaScript classes, you can see that there is a static method named get_Instance on the MessageBox class. So, you can display the message box from the JavaScript like this:
DotNetSources.MessageBox.get_instance().Show(
  'This message box was displayed from JavaScript!',
  DotNetSources.Icons.Info)
This is demo 4 and you can try it here.
This scenario is useful when you don't want to use the buttons from this library. The situation is very similar to the client side driven message box. From the class diagram of the JavaScript classes, you can assume there is the static get_instance method for getting an instance of the ConfirmBox and the Show method to display it. However, the parameters for the Show method are different. Especially, the second parameter is not of type icon, but the client ID of the button you want to fire when the user clicks Yes. Take note that it is the client ID of the control. I mean the ID which is rendered to HTML. Here is an example of how to use a client side driven confirm box:
<asp:Button runat="server" ID="cmdSubmit"
    Text="This is a simple ASP.NET button with confirmation"
    OnClick="Click_Submit"
    OnClientClick="javascript: DotNetSources.ConfirmBox.get_instance().Show(
           'This message box was displayed from JavaScript!',
           'ctl00$contentExample$cmdSubmit'); return false;" />
Look at Demo 6 here.
If you are not so familiar with the MS AJAX JavaScript library, this chapter helps you better understand when an object like MessageBox is ready to be used. All application objects are created in the load phase of the ASP.NET AJAX Client Life-Cycle. See resource [3] for more information about it. The earliest safe time when you can call it is in the pageLoad function. See the demo here..
Sometimes you want to have texts in buttons localized to your language. No problem. There are three properties on BoxContentPage for this:
MessageBoxButtonTextPositiveButtonTextNegativeButtonText
And, if you remember the BoxContextPage life-cycle, it must be set before the PreRender phase of the page life-cycle. See Demo 7 here.
The most common situation of using a confirm box is in Repeater or DataGrid. Imagine you have a table with records and the button to delete the record from the table. Usually you want to ask the user if he/she really wants to delete an item. The buttons are prepared for it, and you can see how it works on the following demos:
Yes it does, and I have prepared the last demo on it. The demo is available here.
Well, everything in this article was made by me, excluding the icons in the popup boxes. Unfortunately, I'm not a graphic person, so I found the icons on the internet. The icons were drawn by Bruno Maia, IconTexto, and they are for free for non-commercial use. For more information, please read the license here. If you want to get rid of the efault icons and use your own icons, read this section.
The sources are also available at http://popupboxes.codeplex.com/. The issue tracker is available there. This library is tested; however, if you find a bug, please report it to the issue tracker. Thank you.
I hope you liked my article and I hope it was useful. I'd like to invite you to the message board below this article. I will try to answer all of your questions. I will be very glad if you will also vote. Thank you very much for reading.
- Demo 1
- Description: Click --> Postback
- Link: here
- Demo 2
- Description: Click --> Confirm Box --> Postback
- Link: here
- Demo 3
- Description: Click --> Postback --> Display message box
- Link: here
- Demo 4
- Description: Click --> JavaScript call to display message box
- Link: here
- Demo 5
- Description: Displaying message box when the page is loaded
- Link: here
- Demo 6
- Description: Client side driven confirm box on a simple ASP.NET button
- Link: here
- Demo 7
- Description: Localization of buttons
- Link: here
- Demo 8
- Description: Repeater
- Link: here
- Demo 9
- Description: DataGrid
- Link: here
- Demo 10
- Description: Partial rendering
- Link: here
- 25 October 2009 - Initial release.
- 02 November 2009 - Few text changes and intro GIF added.

