Introduction
This starter kit and sample code can be used as a starter project to write your own screen saver. It handles the arguments passed to a screen saver application by the system, which includes the preview in the desktop screen saver property dialog, as well as a configuration dialog. This code simplifies the necessary steps to an absolute minimum.
Background
I wanted to write a simple screen saver by myself: worms. I started with the Screen Saver Starter Kit that comes with Visual Studio 2005, but wasn't happy with how they implemented it. The disadvantages of it are:
- It refreshes the screen at every single step of an animation; doing this every 50 ms ends in more CPU usage than normal idle mode (my PC changed from about 0-2% up to 60%, which switched on the ventilator)
- There's no support for the preview possibility in the desktop screen saver properties
My intention was not to write an application with high quality and/or fancy-rendering OpenGL or DirectX animations (there are hundreds to find on the web). It should be a starter kit that:
- Uses as little CPU power as possible
- Supports the preview possibility in the desktop screen saver properties
- Handles everything needed to set up a screen saver, so one can concentrate on a new animation
- Has the possibility to switch off the screen saver after awhile
- Makes it easy to handle different animations
Using the Code
Difference to a Normal Application
The big difference between a screen saver application and a normal Windows application is that we have the full screen for us when it's running, so we don't have to be able to re-draw any part of the client area in a paint event handler. Either the screen saver is on and the full screen is ours, or it is off. This means that we don't use the paint event handler to draw our animation; we can do it directly in the timer event handler. Also, if we have just little parts on the screen that change in every animation step, we can directly update these parts and don't have to refresh the full screen. This saves a lot of CPU usage.
What the Starter Kit Does
ScreenSaverForm is the form of the application. It prepares and handles everything needed. The actual screen saver animation drawing is done in a derived class from ScreenSaverBase. All of the objects that are needed for the animation by the different screen savers are in the internal class Globals.
Class ScreenSaverForm
The constructor gets an integer passed, which is the Windows handle for a possible preview window. If the system calls the screen saver in preview mode, it passes this handle as the second argument after /p (see Microsoft Support). The method ScreenSaverForm_Load prepares everything before the animation drawing takes place.
In full screen mode, the form is initialized as a maximized and top-most window, a simple task to do. In preview mode, we have to manipulate the window settings with some Windows API calls. The trick is to set the parent window of our form to the passed Windows handle. We also have to set the window style of our form to be a child window. This is so that it will properly receive a close message from the systems screen saver properties dialog when a new screen saver is selected for the preview window. After that, we read the parent's client size and set that for our form, too. Finally, we set the global screen size to use.
The next steps is to capture the screen (full or preview) in a bitmap so that we can re-draw it later. We also need to load and set up the timer values. After all that, we instantiate the screen saver of choice and call its OnLoad method. The final steps are to create the graphics, capture the mouse position and start the timer.
private void ScreenSaverForm_Load( object sender, EventArgs e )
{
if( _ipParentHandle == IntPtr.Zero )
{
this.WindowState = FormWindowState.Maximized;
this.TopMost = true;
}
else
{
_boFullScreen = false;
WinAPI.SetParent( this.Handle, _ipParentHandle );
WinAPI.SetWindowLong( this.Handle, WinAPI.SysConst.GWL_STYLE,
WinAPI.GetWindowLong( this.Handle, WinAPI.SysConst.GWL_STYLE ) |
WinAPI.SysConst.WS_CHILD );
Rectangle rect;
WinAPI.GetClientRect( _ipParentHandle, out rect );
this.Size = rect.Size;
this.Location = new Point( 0, 0 );
}
Globals.ScreenSize = this.Size;
Globals.BackGroundBitmap =
new Bitmap( Globals.ScreenSize.Width, Globals.ScreenSize.Height );
Graphics g = Graphics.FromImage( Globals.BackGroundBitmap );
g.CopyFromScreen( this.DesktopLocation, new Point( 0, 0 ),
Globals.ScreenSize );
g.Dispose();
_tsBlackAfter =
new TimeSpan( Math.Min( Math.Max( 0,
Properties.Settings.Default.Main_BlackAfterHH ), 23 ),
Math.Min( Math.Max( 0,
Properties.Settings.Default.Main_BlackAfterMM ), 59 ),
Math.Min( Math.Max( 0,
Properties.Settings.Default.Main_BlackAfterSS ), 59 ) );
Globals.ScrSvrTimer = new Timer();
Globals.ScrSvrTimer.Interval = 100;
Globals.ScrSvrTimer.Tick += new System.EventHandler( this.timer1_Tick );
switch( Properties.Settings.Default.Main_ScreenSaver % 4 )
{
case 0:
_scrSvr = new ScreenSaverWorms();
break;
case 1:
_scrSvr = new ScreenSaverPacman();
break;
case 2:
_scrSvr = new ScreenSaverMaze();
break;
case 3:
_scrSvr = new ScreenSaverChromachron();
break;
}
_scrSvr.OnLoad( sender, e );
Globals.Graph = CreateGraphics();
_pntMouseLocation = Control.MousePosition;
_dtStart = DateTime.Now;
Globals.ScrSvrTimer.Start();
}
The implemented event handlers of the form are very simple. When a KeyDown, a MouseDown or a MouseMove event occurs, we just close the application if it runs in full screen mode. OnPaintBackground forwards the event directly to the OnPaintBackground method of the current screen saver. The ScrSvrTimer_Tick event handler first checks if the switch-off time has elapsed. If so, it stops the timer and fills the screen with black color. Otherwise, it calls the OnTimerTick method of the current screen saver.
Class ScreenSaverBase
Class ScreenSaverBase is abstract and has the following four methods. OnLoad is abstract and called in the load event handler of the screen saver form. Set Globals.Timer.Interval and initialize/load all data that your screen saver needs to run. OnPaintBackground is not abstract and, as default, draws the background image that's saved in Globals.BackGroundBitmap. Override this method if, for instance, you want a black background. OnTimerTick is abstract and called at every timer event. Implement your animation here. Dispose is to properly clean up the allocated resources, just as good practice wants it.
Class Globals
This contains all the objects that are needed for the animation drawing, so we don't have to allocate it in every timer event.
ScreenSize: the maximum screen size to useBackGroundBitmap: the screenshot that was captured when the screen saver startedGraph: the graphics device to draw toScrSvrTimer: the timer on which the animation is basedRand: to generate random numbers
The Screen Saver Samples
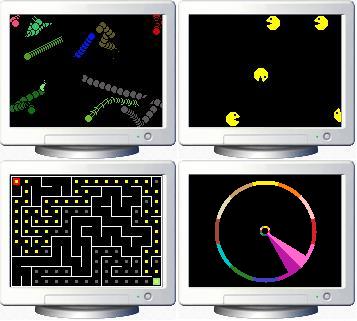
ScreenSaverWorms implements three type of worms that "eat" the screen: WormStreight, WormCurly and WormSinWave. Worm is an abstract class that handles the movement, so the derived classes only need to implement CalcNewPosition to control the motion/animation. ScreenSaverPacman is a very simple animation where Pacmans "eat" the screen. No need to tell more... ScreenSaverMaze generates a maze on the screen and also searches for the solution path with the Depth-First Search (DFS) algorithm. My implementation is based on the pseudo-code from MazeWorks. You can also find it described on Wikipedia. Both generating and searching can be animated on screen or calculated in the background. The animation speed can be set in the properties, where a step time of 0 (zero) generates the maze or search path without animation. Since the current path is drawn to the screen while generating, the code has to walk back to the starting point to clean up all "footsteps." ScreenSaverChromachron is also a very simple one that shows the current time based on the color-time-circle of Swiss designer Tian Harlan. It is to read like this: A full color shown is equal to a full hour. Every angle between two full colors is a ratio of the time between two full hours. For example: all yellow = 00:00 or 12:00, half blue/half green = 06:30 or 18:30.
How to Write Your Own Screen Saver Animation
To implement your own screen saver, just derive a class from ScreenSaverBase. You have to override at least the abstract methods OnLoad and OnTimerTick. Then create a new instance of your class in ScreenSaverForm_Load and store it in _scrSvr.
Points of Interest
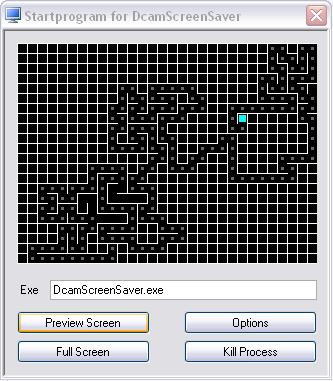
While working on the problem to handle the preview mode, I created another project, StartProg, to run the given application in all three modes. It's easier to run the screen saver from this application than to always copy it to the system's directory and start it from the desktop property dialog. It's also very useful when working on the options dialog. Copy the EXE to your working directory of the DcamScreenSaver project and start it from there.
I put a batch file to the debug directory that copies the file to c:\windows\system32 and renames it to extension *.scr so you can select it in the desktop property dialog. Unfortunately, there are two things I couldn't solve:
- The desktop property dialog shows the file name in the drop down list to select the screen saver, which isn't user friendly for multilingual usage. I didn't find any information on what to do to show a different name.
- The debugger does not work anymore. If you set a break point, the application freezes and you have to kill the process using TaskManager. I did not find out why.
Maybe someone has an answer to these two points.
License
This code is free to use for anybody. Copy, rename, change and/or expand it.
History
04.11.2007 First post

