Abstract
This article describes how to edit a transparent GIF image by writing a text on it and save it back to disk without loosing the transparency of the image.
You can also edit the image by appending other images to it and also by drawing shapes, but it is not included in this article and I may add it later.
Introduction
As GIF images are indexed (had a color palette and pixel color is represented by the index of the color in the palette), you cannot create Graphics object from the Image object containing the GIF image.
If you tried to get the Graphics object by executing
Graphics g = Graphics.FromImage(gifImage);
You will recieve an exception with the following message:
"A Graphics object cannot be created from an image that has an indexed pixel format."
So you cannot edit the GIF image directly and if you converted it to a non-indexed image then try to write it back to the dist, you will loose the transparency information.
Approach
The approach is to convert the GIF into non-indexed image so all the modifications required can be done through its Graphics object, then convert it back into an indexed image to be saved as GIF.
It is easy to convert the indexed image to non-indexed image by simply creating a new non-indexed image with the same width/height of the original image then draw the original image to it.
using (Graphics g = Graphics.FromImage(this.DestinationImage))
{
g.DrawImage(this.SourceImage, 0, 0);
g.Dispose();
}
As the image now is non-indexed image we can easily draw shapes, images and text to it using the Graphics object.
g.TextRenderingHint = TextRenderingHint.AntiAlias;
g.DrawString(title, titleFont, titleBrush, left, top, StringFormat.GenericTypographic);
The problem now is how to convert the non-indexed image back into an indexed image, the same approach used to convert the indexed into non-indexed will be used. We will create a new indexed image with the same width/height.
Bitmap dest = new Bitmap(src.Width, src.Height, PixelFormat.Format8bppIndexed);
We should now draw the non-indexed image content to the indexed image, but before doing that where we get the palette that will be used in the resulting image? For now I used the palette from the original image, but you can modify the code to deduce the palette from the non-indexed image.
dest.Palette = palette;
We should now obtain the transparent color index and cache the palette into a dictionary to speed up the search for color.
Dictionary colors = new Dictionary();
int transparent = 255;
for (int i = 0; i < palette.Entries.Length; i++)
{
colors[Color2Int(palette.Entries[i])] = i;
if (palette.Entries[i].A == 0)
transparent = i;
}
As we are not able to use the graphics object of the indexed image so we should modify the image raw data. To be able to obtain the image raw data you should first lock it for modification.
Rectangle rect = new Rectangle(0, 0, src.Width, src.Height);
BitmapData destData = dest.LockBits(rect, ImageLockMode.ReadWrite, dest.PixelFormat);
We should obtain the raw data of the image so we can edit it.
int dStride = Convert.ToInt32(Math.Abs(destData.Stride));
byte[] destBytes = new byte[dest.Height * dStride];
IntPtr destPtr = destData.Scan0;
Marshal.Copy(destPtr, destBytes, 0, dest.Height * dStride);
We should loop for each pixel in the non-indexed image, get the pixel image and obtain the index of the pixel color from the palette.
If the pixel color is transparent (Alpha part is zero), we use the transparent index. If the pixel color found in the palette we use this index.
If the pixel color is not found in the palette, then we choose the nearest color. The nearest color in the palette have the minimum distance from the original color based on the formula:
distance = (o.Red-d.Red)2 + (o.Blue-d.Blue)2 + (o.Green-d.Green)2
Color c = src.GetPixel(col, row);
int index = 255;
if (c.A == 0)
{
index = transparent;
}
else
{
int ic = Color2Int(c);
if (colors.ContainsKey(ic))
{
index = colors[ic];
}
else
{
index = GetNearestColor(palette, c);
colors[ic] = index;
}
}
Update the image raw data with the selected color.
destBytes[row * dStride + col] = (byte)index;
After updating all image data, we should copy data back to the image and unlock the data.
Marshal.Copy(destBytes, 0, destPtr, dest.Height * dStride);
dest.UnlockBits(destData);
Using the code
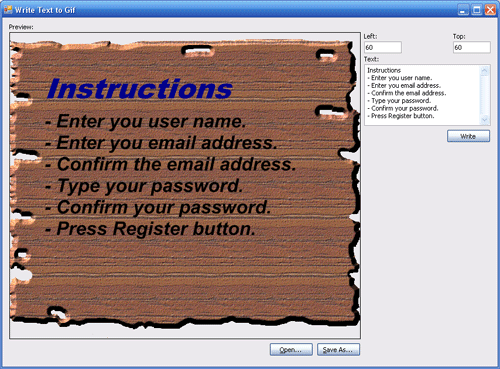
When the user presses the Open button, we simply load the image into SourceImage, DestinationImage.
this.SourceImage = new Bitmap(fileName);
this.DestinationImage = this.SourceImage;
The image is now loaded and stored in SourceImage. When the user presses the Write button we should create a new non-indexed image from the source image and prepare the fonts and brushes for the title and text body.
this.DestinationImage = new Bitmap(this.SourceImage.Width, this.SourceImage.Height, PixelFormat.Format32bppArgb);
Font titleFont = new Font("Arial Black", 36, FontStyle.Italic, GraphicsUnit.Point);
Brush titleBrush = new SolidBrush(titleColor);
Font bodyFont = new Font("Arial", 24, FontStyle.Bold | FontStyle.Italic, GraphicsUnit.Point);
Brush bodyBrush = new SolidBrush(bodyColor);
As the image is now non-index image we can get its Graphics object and use all the drawing methods exposed by the Graphics object.
using (Graphics g = Graphics.FromImage(this.DestinationImage))
{
g.DrawImage(this.SourceImage, 0, 0);
g.TextRenderingHint = TextRenderingHint.AntiAlias;
g.DrawString(title, titleFont, titleBrush, left, top, StringFormat.GenericTypographic);
float y = top + g.MeasureString(title, titleFont).Height;
g.DrawString(body, bodyFont, bodyBrush, left, y, StringFormat.GenericTypographic);
g.Dispose();
}
Now the edited image is stored in DestinationImage but it is non-indexed image. When the user presses the Save As button we should convert it into an indexed image and save it to disk.
Bitmap gif = CreateIndexedImage(this.DestinationImage, this.SourceImage.Palette);
gif.Save(fileName, ImageFormat.Gif);
