Introduction
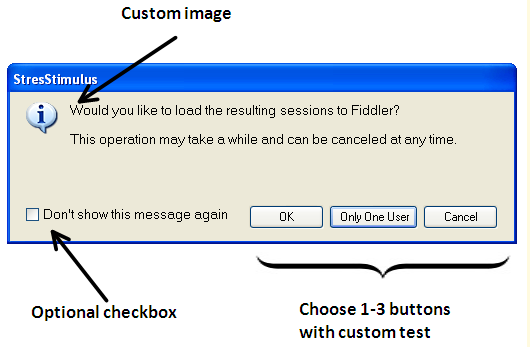
When I do .NET WinForms programming, I often need a message box with different options. .NET offers the MessageBox.Show() API which shows a standard Windows message box. The Windows message box has very limited button combinations (like OK-Cancel, Yes-No, and a few more). I needed a message box with customizable button captions (like Install-Don't Install or Send Error Report-Don't Send). Also, it would be nice to have a "Don't show this message again" checkbox. So I developed a message box Form (derived from Form) which would allow me all that and I thought I'd share it.
Features
- 1-3 buttons with custom captions.
- Optional checkbox with custom text.
- Optional icon. Either a standard Windows icon or any custom icon.
- Custom dimensions of the message box.
Constructors
The message box comes with three constructors. The simplest one takes the message box text and title. The message can be any length and width because the message box stretches to fit the text. To show the message box, call the ShowDialog(this) method.
MsgBox db = new MsgBox("This is a test message", "This is a test title");
db.ShowDialog(this);
To add an icon to the top left corner, use one of the two other constructors. You can either provide a standard Windows icon using the System.Windows.Forms.MessageBoxIcon enumeration or any custom icon object. You can also get a standard Windows icon object through the System.Drawing.SystemIcons class.
MsgBox db = new MsgBox("This is a test message",
"This is a test title", MessageBoxIcon.Information);
db.ShowDialog(this);
MsgBox db = new MsgBox("This is a test message",
"This is a test title", SystemIcons.Information);
db.ShowDialog(this);
Button setup
The message box comes with 1-3 buttons, each with a DialogResult value. Buttons are customized using the SetButtons method. By default, if this method is not called, then an OK button is created. This method is overloaded. The simplest one takes String[] button captions (the string array must have a length between 1 and 3). These buttons will have a DialogResult value DialogResult.None. To determine which button was clicked, you can use the DialogBoxResult property.
MsgBox db = new MsgBox("This is a test message",
"This is a test title",
MessageBoxIcon.Information);
db.SetButtons("First Button", "Second Button");
db.ShowDialog(this); DialogBoxResult result = db.DialogBoxResult;
Another variation also takes DialogResult[] that assigns a DialogResult value to a button (the array must be the same length as captions) and the default button number (must be 1-3). To determine which button was clicked, DialogResult is returned from ShowDialog(this).
MsgBox db = new MsgBox("This is a test message",
"This is a test title", MessageBoxIcon.Information);
db.SetButtons(new string[]{"Yes Button.", "No Button"},
new DialogResult[] {DialogResult.Yes, DialogResult.No}, 2);
DialogResult r = db.ShowDialog(this);
Checkbox Setup
The message box also comes with an optional checkbox. By default, the checkbox is hidden. Use the SetCheckbox() method to add a checkbox. It takes two arguments: the checkbox caption and the default checked value. The CheckboxChecked property returns whether the checkbox was checked.
MsgBox db = new MsgBox("This is a test message",
"This is a test title", MessageBoxIcon.Information);
db.SetCheckbox("Don't show this message again.", false);
db.ShowDialog(this); bool isChecked = db.CheckboxChecked;
Inner Workings (Optional)
This is a brief summary of what is going on behind the scenes. The MsgBox class inherits from the System.Windows.Forms.Form class. Initially, the form has three button controls, a checkbox control, and a label control. The buttons and checkbox are hidden and become visible when the SetButtons() and SetCheckbox() methods are called.
The most interesting part is auto sizing the form. The form must fit all the controls (and add proper spacing and margins). The controls will have unknown sizes because they will depend on the text assigned to them. For instance, the buttons will vary in width depending on the captions set in the SetButtons() method. The trick is to set the Control.AutoSize property to true on all the controls in order to auto-size the control. Once the controls are set up and the user calls ShowDialog() method, the Form.Load event is fired and my setDialogSize() method is called. This method adds up all the controls' height/width (from Control.Size.Height and Control.Size.Width properties), plus all the spacing and margins, and sets the Form's height and width.
The final step is the button/checkbox row placement. In the Form.Load event handler, there is a call to my setButtonRowLocations() method. This calculates the placement of the buttons in the bottom right corner based on their widths and the checkbox is always placed in the bottom left corner.
Refer to the source files for the full implementation of the setDialogSize() and setButtonRowLocations() methods.
Other mentions
The message box also has a SetMinSize() method which sets the minimum dimensions of the message box. If the text size is greater than the minimum size, then the message box will increase in size in order to fit the text. I would recommend using this method if the message is really small, but you don't want the message box to be small.
The ShowDialog() method used in all examples is a standard Form.ShowDialog() method. Use the proper version of this method to accommodate your code.
This class inherits the Form class so it is customizable. For instance, you can easily set the MsgBox.Icon property to add an icon in the title bar.
Here is a screenshot of a sample message box:

