Introduction
Windows Services can be installed using the Microsoft Installer (MSI) by adding custom actions. This tutorial gives step-by-step details on how to add custom actions to install user services silently. It then modifies the registry entries for the installed services and user account based on user input.
Windows NT resource kit provides two utilities, srvany.exe and instsrv.exe which can be used to allow any Windows application to run as a Windows Service, as well as install and remove any Windows Service.
Creating Custom Action Exe
Use the following steps to create a custom action executable:
- Create a project of type
Windows Application say ServiceInstaller. - Add a component class to it. Derive the class from
System.Configuration.Install.Installer which will provide the foundation for custom installation. - Set its
[RunInstaller] attribute to true. - Add references to the project using Solution Explorer and in code.
- Override the
Install, Uninstall, and Rollback methods of the base class. - Add a
main function. - Compile the project.
using System.Text;
using System.Configuration.Install;
using System.Windows.Forms;
using System.IO;
using System.Reflection;
using System.ServiceProcess;
using System.Resources;
using System.Threading;
using System.Management;
using System.DirectoryServices;
using System.Collections;
using Microsoft.Win32;
using System.Runtime.InteropServices;
namespace ServiceInstaller
{
[RunInstaller(true)]
public partial class ServiceInstall : System.Configuration.Install.Installer
{
public override void Install(IDictionary savedState)
{
base.Install(savedState);
}
public override void Uninstall(IDictionary savedState)
{
base.Uninstall(savedState);
}
public override void Rollback(IDictionary savedState)
{
base.Rollback(savedState);
}
public override void Commit(IDictionary savedState)
{
base.Commit(savedState);
}
static void Main()
{
}
}
}
Add Custom Action to an MSI project
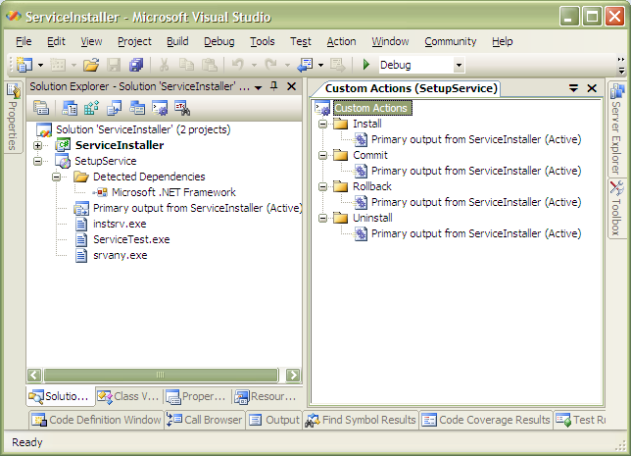
Add a Setup and Deployment project named SetupService in the same solution.
- In the File System Editor, select the application folder. On the Action menu, point to Add, and choose Project Output.
- In the Add Project Output Group dialog box, select the primary output for the
ServiceInstaller project. Click OK to close the dialog box. - In the Custom Actions Editor, select the Install node. On the Action menu, choose Add Custom Action. In the Select Item in Project dialog box, double-click the Application Folder to the select the primary output from the
ServiceInstaller project. Do the same for the Uninstall and Rollback nodes. This signifies that the Install, Rollback and Uninstall methods of the base class have been overridden with custom actions. - In the Properties window, set the
RemovePreviousVersion property to true. - Build the project and click Install on the Project menu.

LaunchService Method
This method shows how the service is installed using the Windows NT utilities instsrv.exe and srvany.exe.
private bool LaunchService(string serviceEXE)
{
bool blnServiceInstalled = true;
System.ServiceProcess.ServiceController[] services;
services = System.ServiceProcess.ServiceController.GetServices();
if (services != null)
{
for(int intServiceCount=0; intServiceCount<services.Length;intServiceCount++)
{
if(services[intServiceCount].ServiceName == serviceEXE)
{
if(services[intServiceCount].Status == ServiceControllerStatus.Running)
{
using(StreamWriter sw = File.CreateText(strPath + batchFileName))
{
sw.WriteLine("net stop {0}", serviceEXE);
}
ExecuteBatchFile();
File.Delete(strPath + batchFileName);
}
break;
}
}
}
using (StreamWriter sw = File.CreateText(strPath + batchFileName))
{
sw.WriteLine("cd {0}", strPath);
sw.WriteLine("instsrv " + serviceEXE + " " + strPath + "\\" + "srvany.exe");
sw.Flush();
sw.Close();
}
ExecuteBatchFile();
File.Delete(strPath + batchFileName);
RegistryKey SystemServicesKey =
Registry.LocalMachine.OpenSubKey("System\\CurrentControlSet\\Services");
if (SystemServicesKey != null)
{
RegistryKey userServiceKey = SystemServicesKey.OpenSubKey(serviceEXE, true);
if (userServiceKey != null)
{
userServiceKey.SetValue("Description", "Test Service Application");
if (userName != "")
{
userServiceKey.SetValue("ObjectName", ".\\" + userName);
}
else
{
userServiceKey.SetValue("ObjectName", ServiceAccount.LocalSystem);
}
userServiceKey.SetValue("ImagePath", strPath + "\\" +serviceEXE+serviceExtn);
userServiceKey.SetValue("Start", 0x02);
userServiceKey.Close();
SystemServicesKey.Close();
}
else
{
SystemServicesKey.Close();
MessageBox.Show("Windows Service registration failed.Installation aborted!");
blnServiceInstalled = false;
}
}
return blnServiceInstalled;
}
Key Points
- The user can enter the logon account under whose security context this service will run. The sample code checks whether the logon account entered by the user is one of the domain users on the system. If an invalid user is entered, then
LocalSystem is set as the logon account for this service. - Custom actions always run at the end of the default installation.
Conclusion
I hope this code provides an insight into writing custom actions and installing Windows services using Windows NT utilities. This is one possible method for installing services. Since the custom action is compiled into an executable, more customized code can, of course, be added.
