Click here to Skip to main content
65,938 articles
CodeProject is changing. Read more.
Articles
(untagged)

Creating Dynamic form and making the content fit

0.00/5 (No votes)
16 Jan 2007 1  
How to create dynamic form and organizing its content in a very simple way

Introduction

The following program was written in order to share the technics needed to implement the dynamic construction of a form. The initial idea was about writing a program in C#, that would allow its users, to manage any kind of collection structure (coins, stamps, guns, etc...). I had to overcome 2 main challenges. First of all i needed to learn how to create in runtime, a database table, with a dynamic name, and dynamic fields in a comprehensive way for the most basic users. Second, it became obvious that the form that would support these tables would also have to be dynamic. You can see the result by downloading My Collections manager.

Let's focus only on the second part of the challenge, the dynamic creation of forms, also the most visual and rewarding.

First, in order to make a valid sample of what you can create with dynamic forms, I've made a little dynamic forms generator.
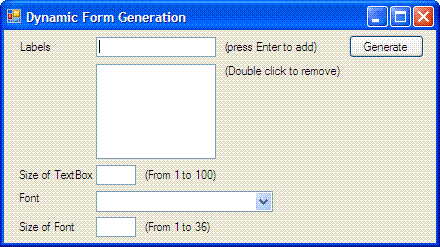
The main screen of the generator

By running DynamicForm.exe which can be found in the DynamicForm_demo.zip file, you will be able to access this form and create simple dynamic forms according to the parameters you have supplied. The form that is created is very simple. Supplying labels, font, font size, textbox size into the generator screen, it builds a form with a series of labels and textboxes, arranged vertically. It also adds a button to demonstrate how to implement events to dynamically created objects.

Using the code

The project consists in a simple form class using standard system namespaces that you can find in any windows project:

//

// System namespace used in the project

//

using System;
using System.Collections.Generic;
using System.Drawing;
using System.Windows.Forms;

Creating the dynamic content is not much different from what the Editor you are using (in this case SharpDevelop) does for you at design mode and stores in the .Designer.cs file.

One of the main difficulty, was to find a way to measure the size of objects precisely. For this, the best way I've found is to use a picture box to define a graphic string so i could retrieve its size in pixel. I don't know at that point if it's the best solution, since, for very small font size (below 5), the text in the label gets wrapped.

//

// Creating dynamic form and dynamic objects in it.

//

//vertical position of each object on the form

int intVertPos = 0;
//maximum width of labels on the form

int intMaxWidthLabel = 0;
//maximum width of textBox on the form

int intWidthTextBox = 0;
//gap between fields

int intGapHeight = 0;
//string to be measured

string measureString = "";
//Font of the string

Font stringFont = null;
//Size of the string

SizeF stringSize;
//Dynamic tabIndex

int intIndex = 0;
            
//use an invisible picturebox that will help to graphically

//measure strings according their font and font size

Graphics g = pictureBox1.CreateGraphics();

//Calculate the height gap that has to be generated. For 

//this calculation, we have to follow the principles above:

//The gap should be determined only by the height of the 

//tallest object on window: the textBox

//Simulate the drawing of a dummy textBox, that will never 

//been showed, and retrieve its height for spacing purposes.

TextBox dummyTextBox = new TextBox();
dummyTextBox.Font = new System.Drawing.Font(cmbFont.Text, 
  float.Parse(txtSizeFont.Text), System.Drawing.FontStyle
  .Regular, System.Drawing.GraphicsUnit.Point,((byte)(0)));
int intHeight = int.Parse(txtSizeFont.Text) + int.Parse(
  txtSizeFont.Text)/2;
dummyTextBox.Name = "TextBoxDummy";
intGapHeight = dummyTextBox.Height;


//Draw the Form object

//close it, if eventually existing

if (frm != null) frm.Close();
frm = new Form();
frm.AutoScaleDimensions =new System.Drawing.SizeF(6F, 13F);
frm.AutoScaleMode =System.Windows.Forms.AutoScaleMode.Font;
frm.Name = "frm_test";
//dimension is irrelevant at the moment

frm.ClientSize = new System.Drawing.Size(10, 10);
//the parent will be the current form

//frm.MdiParent = this;

//splash screen mode form, why not...

frm.ControlBox = false;
frm.FormBorderStyle = System.Windows.Forms.FormBorderStyle
   .FixedSingle;
frm.AutoSizeMode = System.Windows.Forms.AutoSizeMode
   .GrowAndShrink;
frm.BackColor = System.Drawing.Color.LightGray;

//for all the content of the Labels listbox

for (int i=0;i//Object label

    Label aLabel = new Label();
    aLabel.Font = new System.Drawing.Font(cmbFont.Text, 
    float.Parse(txtSizeFont.Text), System.Drawing.FontStyle
    .Regular, System.Drawing.GraphicsUnit.Point, 
    ((byte)(0)));
    //backcolor is for testing purposes, to see if the 

    //control fits correctly

    aLabel.BackColor = System.Drawing.Color.AliceBlue;   
  aLabel.Location = new System.Drawing.Point(5,intVertPos);
  // Set up string.

  measureString = lbLabels.Items[i].ToString();
  stringFont = new Font(cmbFont.Text, float.Parse(
    txtSizeFont.Text));
  // Measure string.

  stringSize = new SizeF();
  stringSize = g.MeasureString(measureString, stringFont);
  int intWidthLabel = int.Parse(stringSize.Width.ToString("####0"));
  //store the biggest width, so that the textboxes can be vertically aligned

  if (intWidthLabel > intMaxWidthLabel)
  {
      intMaxWidthLabel = intWidthLabel;
  }
  aLabel.Size = new System.Drawing.Size(intWidthLabel, intGapHeight);
  aLabel.Name = "LabelTitle";
  aLabel.Text = lbLabels.Items[i].ToString();
  
  intVertPos += intGapHeight;
    
  frm.SuspendLayout();
  aLabel.SuspendLayout();
    frm.Controls.Add(aLabel);
}

// Size of textBox padding with "W" the largest char in 

// ascii representation

char chrPadding = 'W';
if (int.Parse(txtQt.Text) > 30)
measureString = measureString.PadRight(30, chrPadding);
else
measureString = measureString.PadRight(int.Parse(
  txtQt.Text), chrPadding);
stringFont = new Font(cmbFont.Text, float.Parse(
  txtSizeFont.Text));
// Measure string.

stringSize = new SizeF();
stringSize = g.MeasureString(measureString, stringFont);
intWidthTextBox = int.Parse(stringSize.Width.ToString(
  "####0"));
intVertPos = 0;

//for all the content of the Labels listbox - 

//designing textbox

for (int i=0;i//Object label

    TextBox aTextBox = new TextBox();
    aTextBox.Font = new System.Drawing.Font(cmbFont.Text, 
    float.Parse(txtSizeFont.Text), System.Drawing.FontStyle
    .Regular, System.Drawing.GraphicsUnit.Point,
    ((byte)(0)));
    aTextBox.BackColor = System.Drawing.Color.Yellow;   
  aTextBox.Location = new System.Drawing.Point(5 + 
     intMaxWidthLabel, intVertPos);
  aTextBox.Size = new System.Drawing.Size(intWidthTextBox + 
     10, intGapHeight);
  //giving a name to all your object will be the only way 

  //to retrieve them and use them

  //for the purpose of this sample, the name can be the 

  //same for all textboxes.

  aTextBox.Name = "TextBoxTitle";
  //giving the maximun size in caracters for the textbox.

  aTextBox.MaxLength = int.Parse(txtQt.Text);
  //tab have to be ordered

  aTextBox.TabIndex = intIndex;
  intIndex +=1;
  //Vertical position is to be manage according the 

  //tallest object in the form, in this case the 

  //textbox it self

  intVertPos += intGapHeight;
  //adding the textbox to the form

  frm.SuspendLayout();
  aTextBox.SuspendLayout();
    frm.Controls.Add(aTextBox);
}

//put an action button to the left

Button btnFill = new System.Windows.Forms.Button();
btnFill.Location = new System.Drawing.Point(
  intMaxWidthLabel + intWidthTextBox + 20,  0);
btnFill.Name = "btnNew";
btnFill.Size = new System.Drawing.Size(75, 23);
btnFill.TabIndex = intIndex;
btnFill.Text = "&Fill";
//define an event on click button to fill all the textboxes

btnFill.Click += new System.EventHandler(btnFillClick);
frm.Controls.Add(btnFill);

frm.Width = intMaxWidthLabel + intWidthTextBox + 95;
frm.Height = intVertPos + 10;
if (frm.Height > Screen.PrimaryScreen.WorkingArea.Height 
   || frm.Width > Screen.PrimaryScreen.WorkingArea.Width)
    MessageBox.Show("Beware! The size of the window is 
       bigger than your actual definitions...", "Warning", 
       MessageBoxButtons.OK);
frm.Show();

Now, the only remaining issue is to add events to the objects you've created. Once again the class designer file helps you a lot, and you can copy its content widely:

//

// Adding Events

//

btnFill.Click += new System.EventHandler(btnFillClick);

I've created a very simple function associated to this event in order to fill each textbox on the form:

//

// Event click function

//

private void btnFillClick(object sender,System.EventArgs e)
    {
        foreach (Control chcontrol in frm.Controls)
        {
            if (chcontrol.Name == "TextBoxTitle")
         {
                //just to see if the changes apply

                if (chcontrol.Text == "Filling Test")
                   chcontrol.Text = "Filling Test Again";
                else        
                   chcontrol.Text = "Filling Test";
         }
    }
}

Since every textbox in the form had the same name, I just had to create a small loop among all objects in the form and work only with those having the same name as the textboxes. Another solution consists in creating another instance of the object and work with it just as follow:

//

// instanciating the object on form to retrieve them

//

TextBox tb = (TextBox)frm.Controls["TextBoxTitle"];
if (tb.Text == "Filling Test")
    tb.Text = "Filling Test Again";
else        
    tb.Text = "Filling Test";

Et voil�, le tour est jou�!

Please feel free to comment this code and suggest new implentations and ideas!

History

2006-01-10: First version

License

This article has no explicit license attached to it but may contain usage terms in the article text or the download files themselves. If in doubt please contact the author via the discussion board below.

A list of licenses authors might use can be found here