Click here to Skip to main content
Email Password   helpLost your password?

Screenshot - dropshadow.png

Introduction

For a project I'm working on, I had to create transparent fuzzy drop shadows similar to those found in various Windows applications. Want to have them too? Then read on! Or just download the sources...

Background

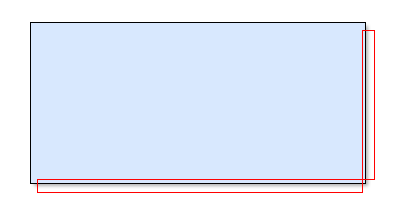
Unfortunately, there's no support at all for these drop shadows in Visual Studio 2005/WinForms, but there is in WPF! Fortunately, I only needed panels with shadows and shadows for rectangular shapes are easy. I just took the method I use for web pages and applied it to WinForms. The trick is as follows: Using strategically placed and tiled pictures of a shadow, we can simulate a shadow effect. When transparent PNGs are used, it looks just like the real thing. The image parts we need are outlined in red below:

Screenshot - shadow4.png

Normally, I'd start with creating these images. Luckily for you, I've already done it and have provided them with the source. Now it's time to start coding!

The project

Go to File > New > Project and select Class Library. Call it ShadowPanel and click OK. Now rename class1.cs to ShadowPanel.cs. That's the file we'll work with. It's always handy to create a test project. So, right click the solution in the solution explorer and select Add > New Project. Pick Windows Application this time and call it ShadowPanelTest.

Properties

First, we need some properties. It would be nice to provide at least a border and a background color. So, it's time to open ShadowPanel.cs and add the following:

using System;
using System.Text;
using System.Drawing;
using System.Drawing.Drawing2D;
using System.Windows.Forms;         

namespace ShadowPanel
{
    public class ShadowPanel : Panel
    {
        private Color _panelColor;         

        public Color PanelColor
        {
            get { return _panelColor; }
            set { _panelColor = value; }
        }         

        private Color _borderColor;         

        public Color BorderColor
        {
            get { return _borderColor; }
            set { _borderColor = value; }
        }

We can't use the original panel BackgroundColor property because that's for the entire panel, including the shadow area! So, I created a PanelColor property that defines the color for the area inside the shadow. About those references to System.Drawing and System.Drawing.Drawing2D: You might have to add them manually by right-clicking on References in the Solution Explorer and selecting them in the list.

Images

Now for the images that we can use to actually draw the shadow. You can download them with the sources if you didn't do this already. Create a folder in the project called Images and add the tshadowXXXX.png files. Select them in the solution explorer and change the Build Action to Embedded Resource. That way, the files will be compiled into the DLL and you won't need to distribute them with your application.

I added the images as static in the code; kudos go to Remco Schrijvers for proposing this. I also added two private members to describe the size of the images -- they are 5�5 pixel images -- and the offset (margin) of the shadow from the left and top. Please add the following code to the ShadowPanel class:

        private int shadowSize = 5;
        private int shadowMargin = 2;      

        // static for good performance

        static Image shadowDownRight = 
            new Bitmap(typeof(ShadowPanel), "Images.tshadowdownright.png");
        static Image shadowDownLeft = 
            new Bitmap(typeof(ShadowPanel), "Images.tshadowdownleft.png");
        static Image shadowDown = 
            new Bitmap(typeof(ShadowPanel), "Images.tshadowdown.png");
        static Image shadowRight = 
            new Bitmap(typeof(ShadowPanel), "Images.tshadowright.png");
        static Image shadowTopRight = 
            new Bitmap(typeof(ShadowPanel), "Images.tshadowtopright.png");

OnPaint()

Everything is now prepared for us to do the cool stuff: Creating GDI+ drawing code! Let's override the OnPaint method of the Panel base class.

        protected override void OnPaint(PaintEventArgs e)
        {
            base.OnPaint(e);    

            // Get the graphics object. We need something to draw with  

            Graphics g = e.Graphics;

First, we'll do the tiled images on the bottom and the right:

Screenshot - shadow1.png

I think the code says it all. Just add the following after Graphics.g = e.Graphics;:

            // Create tiled brushes for the shadow on the 

            // right and at the bottom.

            TextureBrush shadowRightBrush = 
                new TextureBrush(shadowRight, WrapMode.Tile);
            TextureBrush shadowDownBrush = 
                new TextureBrush(shadowDown, WrapMode.Tile);   

            // Translate (move) the brushes so the top or 

            // left of the image matches the top or left of the

            // area where it's drawed. If you don't understand why 

            // this is necessary, comment it out. 

            // Hint: The tiling would start at 0,0 of the control, so 

            // the shadows will be offset a little.

            shadowDownBrush.TranslateTransform(0, Height - shadowSize);
            shadowRightBrush.TranslateTransform(Width - shadowSize, 0);   

            // Define the rectangles that will be filled with the brush.

            // (where the shadow is drawn)

            Rectangle shadowDownRectangle = new Rectangle(
                shadowSize + shadowMargin,              // X

                Height - shadowSize,                    // Y

                Width - (shadowSize * 2 + shadowMargin),// width (stretches)

                shadowSize                              // height

                );                                       

            Rectangle shadowRightRectangle = new Rectangle(
                Width - shadowSize,                      // X

                shadowSize + shadowMargin,               // Y

                shadowSize,                              // width

                Height - (shadowSize * 2 + shadowMargin) // height (stretches)

                );   

            // And draw the shadow on the right and at the bottom.

            g.FillRectangle(shadowDownBrush, shadowDownRectangle);
            g.FillRectangle(shadowRightBrush, shadowRightRectangle);

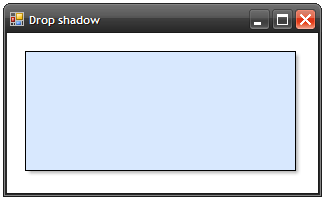
You can add ShadowPanel to the test project by opening the Form1.cs designer. If you build the project once, ShadowPanel should appear in the toolbox. Just drag it to the form and run it. You'll hopefully get the following result:

Screenshot - shadow2.png

By the way: I set my form's background color to white, so it might look different for you.

Bring in the corners

To draw the small bitmaps in the corners, just add the following:

            // Now for the corners, draw the 3 5�5 pixel images.

            g.DrawImage(shadowTopRight, new Rectangle(Width - shadowSize, 
                shadowMargin, shadowSize, shadowSize));
            g.DrawImage(shadowDownRight, new Rectangle(Width - shadowSize, 
                Height - shadowSize, shadowSize, shadowSize));
            g.DrawImage(shadowDownLeft, new Rectangle(shadowMargin, 
                Height - shadowSize, shadowSize, shadowSize));

It's almost too easy.

Filling and bordering

We already have the PanelColor and BorderColor properties. Now it's time to put them to use.

            // Fill the area inside with the color in the PanelColor property.

            // 1 pixel is added to everything to make the rectangle smaller. 

            // This is because the 1 pixel border is actually

            // drawn outside the rectangle.

            Rectangle fullRectangle = new Rectangle(
                1,                                              // X

                1,                                              // Y

                Width - (shadowSize + 2),                       // Width

                Height - (shadowSize + 2)                       // Height

                );                      

            if (PanelColor != null)
            {
                SolidBrush bgBrush = new SolidBrush(_panelColor);
                g.FillRectangle(bgBrush, fullRectangle);
            } 

            // Draw a nice 1 pixel border it a BorderColor is specified

            if (_borderColor != null)
            {
                Pen borderPen = new Pen(BorderColor);
                g.DrawRectangle(borderPen, fullRectangle);
            }

Time to check our results so far:

Screenshot - shadow3.png

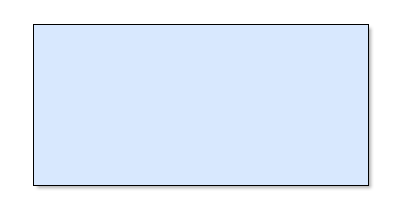
Well, that's about it. We're almost done.

Finishing up

As a formality, end the OnPaint method with:

            // Memory efficiency

            shadowDownBrush.Dispose();
            shadowRightBrush.Dispose(); 

            shadowDownBrush = null;
            shadowRightBrush = null;
        }

To make sure the control repaints correctly when resized, we need to override the OnResize method. Thanks, BobishKindaGuy!

        // Correct resizing

        protected override void OnResize(EventArgs e)
        {
            base.Invalidate();
            base.OnResize(e);
        }  
    }
}

Done!

Points of interest

Of course, I won't stop you from adding more functionality. Please do! Also, let me know if you appreciated this tutorial!

History

You must Sign In to use this message board.
 
 
Per page   
 FirstPrevNext
GeneralMy vote of 1
xcvsdfsdf
21:06 9 Feb '09  
trivial to do! nearly useles, and needlesly complicated
GeneralApply Transparent Drop Shadow to a WinForm
Member 982223
5:43 11 Feb '08  
Have you tried to apply the logic to a Windows Form control ie. with no border. I can't get the edges quite right.
GeneralRe: Apply Transparent Drop Shadow to a WinForm
iorchwaters
16:27 21 Aug '09  
I have the same problem, did you work it out ?
QuestionCustomize Shadow Size...
claudiocas
10:45 10 Aug '07  
Dear Mark,
your shadow panel is great, but how can I costumize the shadow size?
If I change the value of shadowSize, down and right shadows bug... (because the texture brush doesn't stretch the image, only tile it...)

ClaudioCas

AnswerRe: Customize Shadow Size...
Mark de Haan
13:22 11 Sep '07  
Hi There!

Well, you could try creating bigger images, like 20x20 instead of 5x5, and then setting the shadow size property. But I created this panel to look like the standard MS shadows, so I didn't really take it into account.

Did you find a solution to your problem?

Regards,
Mark
Generalcool gradient panel
OwfAdmin
10:30 5 Aug '07  
this articles also uses transparent drop shadow to make a cool gradient panel. try this
http://www.openwinforms.com/creating_cool_gradient_panel_gdi.html


Generalwell done!
blue.pan@163.com
23:02 24 Jul '07  
i have been looking for this solution for a long time~
GeneralNicely Done
Paul Conrad
8:50 15 Jul '07  

Nicely done article Big Grin

"The clue train passed his station without stopping." - John Simmons / outlaw programmer

GeneralAnother solution
nguyenthanhtungtinbk
15:31 5 Jul '07  
Check out this link:
http://www.codeproject.com/useritems/tungAnimation.asp

I think you can find smt interesting there

Cheers,
Tung
GeneralShadow in Web Application
Jay Khanpara
20:03 28 Jun '07  
Hi,

Nice Article, thanks a lot !!!!1

I want to implement same effect in Web Application, is it possible?

Just give me a hint.


Regards,

Jay Khanpara
GeneralRe: Shadow in Web Application
Mark de Haan
13:04 30 Jun '07  
Hi,

You can do it in several ways. If you're a beginner or intermediate web developer (and not a CSS guru) i'd recommend starting out with a table for it as it's simple and works also from WYSIWYG editors. Here is a very brief explanation:

Create a HTML table with 3 rows and 3 columns, set the width of the top and bottom row and the left and right column to 5 pixels. The middle cell shouldn't have size set, because we want it to auto-fill. Put the corner images in the corner cells, set the side and bottom images as the background image of the respective cells.

The images from the download will work fine, but not in Internet Explorer 6 or below, as it didn't support transparent PNG's correctly.

Do you need more information? Sources? There are also articles about using CSS to create this effect. Big Grin
GeneralRe: Shadow in Web Application
Pascal Ganaye
6:28 18 Jul '07  
I really love some comments.

Do you think this effect work in photoshop?


GeneralExcellent article!
MangeA
18:38 26 Jun '07  
Well written, and unusually clearly described! good work! Thanks Smile

GeneralRun-time resizing problem
iro1977
23:17 22 Jun '07  
When trying resizng in run time you have to redraw the control, because it not doing it itself.
Put the control on the form. set all the anchors to true and try to resize the form...
GeneralRe: Run-time resizing problem
xfUSiONx
3:26 26 Jun '07  
Create a resize event of the panel and write Invalidate(); into it.
GeneralRe: Run-time resizing problem [modified]
BobishKindaGuy
8:52 26 Jun '07  
A code snippet for adding this Resize event:

               protected override void OnResize(EventArgs e)
               {
                        base.Invalidate();
                        base.OnResize(e);
               }


GeneralRe: Run-time resizing problem [modified]
Mark de Haan
12:53 30 Jun '07  
Thanks! How could I forget to add this! I'll send an update ASAP.

AnswerRe: Run-time resizing problem
Thomas Freudenberg
4:58 5 Jul '07  
I suggest to call
SetStyle(ControlStyles.ResizeRedraw, true);
in the constructor. You don't have to override OnResize then.

Regards
Thomas

Disclaimer:
Because of heavy processing requirements, we are currently using some of your unused brain capacity for backup processing. Please ignore any hallucinations, voices or unusual dreams you may experience. Please avoid concentration-intensive tasks until further notice. Thank you.

GeneralSimilar Control
Prasad Khandekar
22:37 19 Jun '07  
Hello,

You may want to have a look at Header Panel control.

Regards,

Prasad P. Khandekar
Knowledge exists, man only discovers it.

Generalvery nice article
vito_
12:30 19 Jun '07  
you’ve got 5.
GeneralRe: very nice article
Mark de Haan
0:39 20 Jun '07  
Thanks Big Grin


Last Updated 3 Jul 2007 | Advertise | Privacy | Terms of Use | Copyright © CodeProject, 1999-2010