Introduction
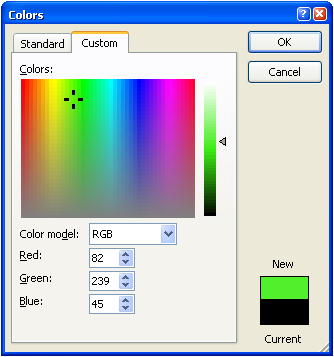
XColorSpectrumCtrl mimics behavior of spectrum control on
custom page of Microsoft Office® color picker:
This is companion article to my
XColorHexagonCtrl article,
but you need not read that article to make use of this control.
XColorSpectrumCtrl Features and Behaviors
The
XColorSpectrumCtrl control has two areas of user interaction,
the
spectrum and the
slider:

Each of the areas has its own selection indicator, the
crosshair
and the
arrow.
These user interface behaviors are implemented in XColorSpectrumCtrl:
 |
Clicking on spectrum or slider sends
WM_XCOLORPICKER_SELCHANGE message to parent window, with
RGB (COLORREF) color as WPARAM and
control id as LPARAM.
|
|
Double-clicking on spectrum or slider sends
WM_XCOLORPICKER_SELENDOK message to parent window, with
RGB (COLORREF) color as WPARAM and control id as
LPARAM.
|
|
When the control has focus, focus will be shown separately for spectrum
vs. slider. Focus on spectrum is indicated by black crosshair;
lack of focus by white crosshair. Focus on slider is indicated by
solid black arrow; lack of focus by arrow outlined in black, with gray
interior. The TAB key (or SHIFT+TAB) may be used to step
between spectrum and slider.
|
|
The arrow, Page Up, Page Down, Home and
End keys may be used when either area of control has focus.
They work identically in two areas, except that Home and
End keys in the spectrum will move cursor to left or right
edges, instead of top or bottom edges as in slider.
|
|
The selection indicators (crosshair and arrow) may be clicked
and dragged to new position. This will result in multiple
WM_XCOLORPICKER_SELCHANGE messages sent to parent window.
|
|
Tooltips in four formats may be optionally displayed for spectrum and
luminosity slider.
|
The programmatic interface to XColorSpectrumCtrl attributes is very
simple: just eight functions to get/set RGB and HSL values, background color,
and tooltip format:
| Function |
Description |
|
COLORREF GetBackground()
|
Retrieves current background color
|
|
void GetHSL(BYTE* h, BYTE* s, BYTE* l)
|
Retrieves HSL values for current color
|
|
COLORREF GetRGB()
|
Retrieves RGB value for current color
|
|
void GetTooltipFormat()
|
Retrieves tooltip format
|
|
CXColorSpectrumCtrl& SetBackground(COLORREF cr)
|
Sets background color
|
|
CXColorSpectrumCtrl& SetHSL(BYTE h, BYTE s, BYTE l)
|
Sets color from HSL values
|
|
CXColorSpectrumCtrl& SetRGB(COLORREF cr)
|
Sets color from RGB value
|
|
CXColorSpectrumCtrl& SetTooltipFormat(TOOLTIP_FORMAT eFormat)
|
Sets tooltip format
|
Tooltip Formats
There are five options for
XColorSpectrumCtrl tooltip format
(including no tooltip). The tooltip will be shown both on spectrum
and on luminosity slider:
XColorSpectrumCtrl Color Models
XColorSpectrumCtrl allows you to work with either RGB or
HSL color model, depending on requirements of your application.
The following information was extracted from online sources such as MSDN and
Wikipedia [
1,
2].
RGB Color Model
The RGB model is used to designate colors for displays and other devices
that emit light. Valid red, green, and blue values range from 0 through 255,
with 0 indicating minimum intensity and 255 indicating maximum intensity.
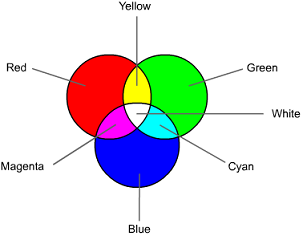
The following illustration shows how primary colors red, green, and
blue can be combined to produce four additional colors. (For display devices,
the color black results when red, green, and blue values are set to 0. In
display technology, black is absence of all colors.) [
Source:
MSDN]
The RGB color model is the most widely used in web design. Typically,
HTML authors refer to
named colors
or to so-called
216 web-safe colors.
In developing this control I have followed Microsoft convention (which
seems to be arbitrary) of only allowing HSL values between 0 and 240. In
some references and conversion algorithms you will find HSL values
between 0 and 255. Some HSL representations even use degrees and percentages,
as I discuss later.
The name HSL is often used interchangeably with
HSI (I = Intensity) and HSB (B = Brightness); HSB is the name used
in .Net.
|
HSL Color Model
HSL (Hue, Saturation, Luminosity) is alternative way of specifying color
values. There is simple algorithm to convert between RGB color
and HSL color. You don't get more colors with one or the other, but with
HSL you get better control over color's appearance, in terms of color
lightness/darkness (luminosity) and color intensity (saturation). For this
reason, HSL is more intuitive way of dealing with color in some applications
The HSL color model is sometimes represented by wheel:

This is representation used in
proposed CSS3 Color Module
recommendation, where hue is represented as angle of the color wheel.
So red = 0 degrees, green = 120 degrees, etc. Saturation and luminosity are
represented as percentages: 100% is full saturation, 0% luminosity is black,
and 100% luminosity is white. To quote CSS3: The advantage of HSL over
RGB is that it is far more intuitive: you can guess at the colors you want,
and then tweak.

To give an example of how to "tweak" using HSL, consider two named colors
LawnGreen and Chartreuse:
| Color Name |
HTML Hex |
HSL |
Color |
| LawnGreen |
#7CFC00 |
90°,100%,99% |
|
| Chartreuse |
#7FFF00 |
90°,100%,100% |
|
HSL representation makes it obvious how close the two colors are. Of course,
web designers have known about this for long time, and there are many color
utilities that display both HTML hex and HSL values, such as
HPS PixelColor.
CSS3 has not yet been formally approved; you can check status of
various CSS3 modules
here.
Getting back to
XColorSpectrumCtrl, here are some colors and their HSL
and RGB values as returned by
XColorSpectrumCtrl control:
| Color Name |
RGB |
HSL |
Color |
| Red |
255,0,0 |
0,240,120 |
|
| Maroon |
128,0,0 |
0,240,60 |
|
| Yellow |
255,255,0 |
40,240,120 |
|
| Lime |
0,255,0 |
80,240,120 |
|
| Green |
0,128,0 |
80,240,60 |
|
| Aqua |
0,255,255 |
120,240,120 |
|
| Blue |
0,0,255 |
160,240,120 |
|
| Navy |
0,0,128 |
160,240,60 |
|
| Magenta |
255,0,255 |
200,240,120 |
|
| Purple |
128,0,128 |
200,240,60 |
|
| White |
255,255,255 |
0,0,240 |
|
| Gray |
128,128,128 |
0,0,120 |
|
| Black |
0,0,0 |
0,0,0 |
|
You can find more information about named colors
here and
here.
Implementation Notes
Initially I created
XColorSpectrumCtrl using MFC. This is very fast
way to construct and develop new user interface components, with many support
classes in framework. Later, I decided that I might want to use
XColorSpectrumCtrl with other languages besides C++, so I began
process of conversion. I immediately discovered that two MFC classes I use
very often -
CDC and
CRect - were so useful that
I could not do without them. After looking at functions I use in both of
these classes, I came up with minimalist replacement classes,
CXDC and
CXRect. These do not contain all
functions of original classes, but have all functions I used in making
XColorSpectrumCtrl, and can easily be expanded in future if
necessary. The entire implementations of these new classes are
contained in files
CXCD.h and
CXRect.h.
I also had to decide whether to bundle tooltip functionality with
XColorSpectrumCtrl. Ultimately I liked the benefits that
tooltips provided, so I created CXToolTipCtrl class
in CXToolTipCtrl.h to replace standard MFC CToolTipCtrl.
Internal Design
One of the first problems I identified in the design is drawing speed. I knew
that drawing spectrum would be very time consuming, compared to other parts of
the control. To address this issue, I used old Win32 trick of
caching DC. The first time the spectrum needs to be drawn,
I create a persistent DC and bitmap. For subsequent drawing,
I
BitBlt the saved
DC to target DC, and then do any additional drawing on that.
Once I did this, the spectrum drew instantly with no discernible
flicker at all.
I wasn't sure whether I would have to do the same trick when drawing
luminosity slider (especially because I had made dumb coding error,
which increased flicker, rather than reducing it). After a few bug fixes,
drawing luminosity slider was just as rock-solid as drawing spectrum,
with no flicker even in debug mode, and without having to resort to
a persistent DC. This was definitely a plus, because the slider - unlike
the spectrum - changes frequently; every time the user clicks on spectrum,
or uses any nav key, the
slider is redrawn using new hue and saturation (the slider arrow changes
position only when user clicks on slider or uses nav keys in slider,
to change luminosity).
Next came the crosshair and arrow indicators. I briefly considered
hand-coding the drawing function using
MoveTo(), LineTo(), etc.,
but quickly got sick of writing all that boring code,
especially after I realized that the indicators would change appearance
depending on whether their area of the control had internal focus:
With Focus
 |
|
Without Focus
 |
|
With Focus
 |
|
Without Focus
 |
I switched to using internal bit array; each pixel
is represented by one BYTE, whose value determines whether the
pixel should be drawn (if non-zero), and if so what color should be used.
Here is bit array for slider arrow:
static BYTE pixels[ARROW_HEIGHT][ARROW_WIDTH] =
{
0,0,0,0,0,0,0,0,1,0,
0,0,0,0,0,0,0,1,1,0,
0,0,0,0,0,0,1,2,1,0,
0,0,0,0,0,1,2,2,1,0,
0,0,0,0,1,2,2,2,1,0,
0,0,0,1,2,2,2,2,1,0,
0,0,1,2,2,2,2,2,1,0,
0,1,2,2,2,2,2,2,1,0,
1,2,2,2,2,2,2,2,1,0,
0,1,2,2,2,2,2,2,1,0,
0,0,1,2,2,2,2,2,1,0,
0,0,0,1,2,2,2,2,1,0,
0,0,0,0,1,2,2,2,1,0,
0,0,0,0,0,1,2,2,1,0,
0,0,0,0,0,0,1,2,1,0,
0,0,0,0,0,0,0,1,1,0,
0,0,0,0,0,0,0,0,1,0
};
In each pixel location where '2' appears, the color will depend
on state of internal focus.
The only other major issue I had to contend with is tab key.
In the MS Office® color picker Standard page, you can see that tabbing
through all the controls on that property page will jump from spectrum
to slider in forward direction, and from slider to spectrum in reverse
(SHIFT+TAB) direction. However, XColorSpectrumCtrl is one control,
not two, and so it must catch and handle the tab key internally. This
involved two things: first, XColorSpectrumCtrl returns the
code DLGC_WANTARROWS | DLGC_WANTTAB when it receives
WM_GETDLGCODE message. This tells system that
XColorSpectrumCtrl wants to receive arrow keys and tab keys,
when it has the focus.
The second thing was to keep track of whether the spectrum or the
slider had (internal) focus, to know how to respond to tab key presses.
When user is tabbing out of control, XColorSpectrumCtrl
sends WM_NEXTDLGCTL to parent dialog window, allowing
it to decide what control to give the focus to.
The visual rendering of the control consisted mostly of getting the
sizes and spacing correct. I could tell from MS Office® color picker
how big things needed to be, but other things were not so obvious.
For example, the control had to allow some vertical room for the
slider arrow, which could extend above and below the spectrum drawing
area:
 |
| Yellow background for clarity. |
Demo App
Here is what demo app looks like:

Note that axis marks and labels are not part of control.
How to use
The following steps assume you want to add
XColorSpectrumCtrl to
a dialog. Steps would be similar for
CFormView or
CPropertyPage.
Step 1 - Add Files
To integrate CXColorSpectrumCtrl into your app, you first need to
add following files to your project:
- CXCD.h
- CXRect.h
- CXToolTipCtrl.h
- XColorSpectrumCtrl.cpp
- XColorSpectrumCtrl.h
- rgbhsl.cpp
- rgbhsl.h
The .cpp files should be set to Not using precompiled header
in Visual Studio. Otherwise, you will get error
fatal error C1010: unexpected end of file while looking for precompiled header directive
Step 2 - Add Placeholder Rect to Dialog Resource
Next add a STATIC or other control to dialog resource, where you want the
XColorSpectrumCtrl to be displayed. The dialog for demo app looks
like this:

Note that this step is not required, if you have some other way to specify
where XColorSpectrumCtrl should be displayed.
Step 3 - Create the Control
You need to do two things here: first,
add
#include statement to dialog class header file:
#include "XColorSpectrumCtrl.h"
and insert variable that looks like:
CXColorSpectrumCtrl m_ColorSpectrum;
Second, add code to
OnInitDialog() function:
CRect rect;
GetDlgItem(IDC_FRAME)->GetWindowRect(&rect);
ScreenToClient(&rect);
GetDlgItem(IDC_FRAME)->ShowWindow(SW_HIDE);
VERIFY(m_ColorSpectrum.Create(AfxGetInstanceHandle(),
WS_CHILD | WS_VISIBLE | WS_TABSTOP,
rect,
m_hWnd,
9001,
RGB(0,255,0)),
CXColorSpectrumCtrl::XCOLOR_TOOLTIP_HTML));
::SetWindowPos(m_ColorSpectrum.m_hWnd, ::GetDlgItem(m_hWnd, IDC_FRAME),
0,0,0,0, SWP_NOMOVE|SWP_NOSIZE);
Step 4 - Add Message Handlers
According to your app's requirements, you may need to add handlers for one
or both of the
XColorSpectrumCtrl registered messages. Here are
handlers used in demo app:
LRESULT CXColorSpectrumCtrlTestDlg::OnSelChange(WPARAM wParam, LPARAM lParam)
{
CString s = _T("");
GetDlgItem(IDC_COLOR_NAME)->SetWindowText(s);
GetDlgItem(IDC_COLOR_RGB)->SetWindowText(s);
s.Format(_T("WM_XCOLORPICKER_SELCHANGE RGB(%d,%d,%d)"),
GetRValue(wParam), GetGValue(wParam), GetBValue(wParam));
if (lParam == 9001)
GetDlgItem(IDC_SELECTION)->SetWindowText(s);
return 0;
}
LRESULT CXColorSpectrumCtrlTestDlg::OnSelendOk(WPARAM wParam, LPARAM lParam)
{
CString s = _T("");
GetDlgItem(IDC_COLOR_NAME)->SetWindowText(s);
GetDlgItem(IDC_COLOR_RGB)->SetWindowText(s);
s.Format(_T("WM_XCOLORPICKER_SELENDOK RGB(%d,%d,%d)"),
GetRValue(wParam), GetGValue(wParam), GetBValue(wParam));
if (lParam == 9001)
GetDlgItem(IDC_SELECTION)->SetWindowText(s);
return 0;
}
Both messages send RGB color as wParam, and
control id as lParam.
If you use XColorHexagonCtrl and XColorSpectrumCtrl together in the same
project, you will notice that the extern variable names of the registered
messages are different for the two controls. However, the actual message
strings that are registered are the same, and so you can use the same handlers
to handle both controls. You can tell which is which by using the control
id returned in lParam.
Revision History
Version 1.1 - 2008 April 4
Version 1.0 - 2008 March 12
Usage
This software is released into the public domain. You are free to use it
in any way you like, except that you may not sell this source code. If you
modify it or extend it, please to consider posting new code here for everyone
to share. This software is provided "as is" with no expressed or implied
warranty. I accept no liability for any damage or loss of business that
this software may cause.

