Introduction
Let's try out one of Visual C#'s most interesting feature, Visual Inheritance. What exactly is it? Now, we do know what is inheritance, right? No, I don't mean the money that you get from your parents/grand parents, I'm talking about class and interface inheritance which saves you the headache of re-typing code and provides the luxury of code reusability. Now wouldn't it be nice if the same feature that applies to classes and their methods could also be applied to the GUI forms that we create, I mean create a base form with our corporate logo so that it appears on all of the firm's screens? Well, such a feature now exists! Yes, you've guessed it, its Visual Inheritance!
Now, let's go ahead and try it out, shall we? For our ease of understanding, we have divided this lab into two parts. In part 1, you create the Base form from which we are going to inherit from. Since we won't be actually implementing it in our project but only be inheriting from it (something like an abstract base class) we will be creating the form as a Class Library. In part 2, we will create a form that will inherit from the base form we created in part 1.
Part 1
- Start Visual Studio .NET by clicking on Start -> Programs -> Microsoft Visual Studio .NET 7.0 -> Microsoft Visual Studio .NET 7.0.
- Click File -> New -> Project.
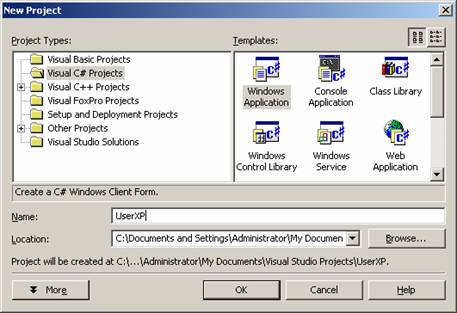
- Select Visual C# Projects. In the right-side pane, select Windows Application, type in the name of the application as 'inSoftBaseForm' and click OK. This would bring up the WinForm IDE (taking too long? Suggestion: go get a cup of coffee!!).
- Right click on project name "inSoftBaseForm" in the Solution Explorer and select Properties.

This is where you right click.
- After you've selected Properties from the context menu that appeared when you right clicked as shown above, a dialog box should appear (like the one shown below). Change the Output type to Class library and click OK. It would take you back to the Form Designer (Win Forms IDE).

Change the Output type to Class Library and click OK.
Why did we do that?
Simple, remember at the beginning of the lab we had briefed you on the approach we will be taking. That is why we will create it as a Class Library instead of a Windows Form since we won't be implementing the form by itself but will just be inheriting from it. We just changed the form Output type property to Class Library so when we compile the form it gives us a Class Library (a DLL) rather than an executable form. We will use this Class Library to inherit our all other forms.
- When back to the Win Form IDE, drag and drop a picture box from the toolbox on to the form.

This is how a PictureBox control looks on the ToolBox.
- Next select the
PictureBox control on the form, and in the Properties window modify its Image property. Click on the button with the ellipse on it.

This is how the property box looks.
- A standard Windows 'Open' dialog box pops up. Go somewhere and select an image file and click Open. The image (inSoft Logo in my case) should appear in the
PictureBox now. Drag and drop the logo to the top left hand corner.

Your form should now look like the one above.
- Next drag and drop a couple of
Buttons from the ToolBox on to the Form.
- Change the
Text property of the first button to About and the next one to Help.

Your form should now look like this.
- Double click the About button. It should open up the Code Window for you. Type in this line of code.
MessageBox.Show("About Box appears here!");
Why did we do that?
In C# the line that we typed in would display a message box on the user's screen displaying the message that the About box would appear in its place. Since we don't want to waste time creating a regular About box we are just inserting a "place holder" for the About box. This message would pop-up every time you click on the About button.
- Switch back to the Form Designer by clicking on the View Designer icon on the Solution Explorer.

Click on the View Designer icon.
- Double click on the Help button. To enter the code window again, type in the following line of code:
MessageBox.Show ("Help appears here!");
Now what exactly we've done is that we've created two buttons and a picture box displaying our fictitious company's logo. This would appear in all the forms that will inherit it. Now the About button would always display information about the company. But the Help button should display help information on the current form, right? That is, if a login screen is inheriting from this base form, and if the user clicks on the Help button on the login screen, it should display help info on the login screen, and if the user clicks on the help button on some data entry screen, it should display help for that particular screen. But we are hard-coding on this base form. How would we achieve this? Simple, ever heard of overriding? Simply override the Button2_Click function in the form that's inheriting it, so that it displays the proper help! But for this to happen, we need to follow a few steps. Starting from the one described below.
- Switch back to the Design View by clicking on the View Designer icon on the Solution Explorer.
- Click once on the About button. In the Properties window, set its
Modifiers property to Private. Private modifier makes sure that the inheritor cannot modify the behavior of this button.

Modify the Modifiers properties to Private
- Now click once on the Help button and change its
Modifiers property to Protected. This would allow the event handler of the Help button to be changed in the inherited forms.
- Phew, finally we are done! That was difficult, wasn't it? But at least it's over. Now we've got to build the Class Library, we do that by clicking on Build and then selecting Build again from the menu. This should build a DLL file - a Class Library with the form that we just created. And believe me, this is the end of part 1.
Part 2
Let's begin the sequel to our Visual Inheritance Lab. Welcome to part 2. As also said earlier, in this part we will create another form which will inherit from the base form we created in the previous part. Sounds interesting, doesn't it? Don't worry, it ain't a lot of work, let's get started.
- Leaving the current project open, click on File -> New -> Project to open another project in the same solution.
A tip!
In Visual Studio .NET, you can have more than a single project open at the same time. Visual Studio .NET offers us a new kind of a file type, Solution. A solution is a collection of projects. These projects could be written in any of the various different languages that are supported by .NET. So a single solution could have C#, VB.NET and JScript projects!! And also Forms, HTML, CSS, Class Libraries!!
- You will be presented with the familiar New Project dialog box. You'll have to select Visual C# Projects on the left pane and Windows Application on the right. Select the Add to Solution radio button. Type in the name as inSoftInheritedForm and click OK.
Why did we do that?
We need to add the new project that we are creating to the existing (the base form) solution. That's the reason we selected the Add to Solution radio button. If the default Close solution was left selected, then the current solution would have closed and a new solution would have been created.
- Note that the Solution Explorer lists out two projects now. Select the inSoftInheritdForm's Form1.cs. Right click and select Delete. Click OK if prompted whether to delete the form permanently.
- To add a reference to the Base Forms Class Library, click on Project -> Add Reference. You will be presented with an Add Reference dialog box. Switch over to the Projects tab. Double click on inSoftBaseForm. Click OK to add the reference.

Double click on inSoftBaseForm and click OK.
- Right click on inSoftInheritedForm in the Solution Explorer. Select Add -> Add Inherited Form.

Select Add Inherited Form
- You will be presented with an Add New Item dialog box. Verify that the inherited form item is selected and click Open.
- You will be presented with an inheritance picker dialog box. Over here select inSoftBaseForm and click OK.
- This should create a new form
Form1 in the inSoftInheritedForm project. This form is derived from the inSoftBaseForm project. Open the Form1 designer if it isn't so.
There you are the form inherits its parents! Looks so much similar, doesn't it?? Note the color difference among the buttons depicting the different access modifiers. Try modifying the properties, and have fun exploring!

