Introduction
Ah! Marching ants! You've gotta love them! They add a sense of quality to your software. You know marching ants? When you select something in Photoshop, Paint Shop Pro or GIMP, the selected area is indicated by an animated dashed line. It looks like there are ants marching along that boundary.
But how on earth do you implement such beasts? This article will show you how to do it.
First Attempt
When I wanted to implement marching ants, my first attempt was very simple. I created an array of SBytes. This array represented the selected area. The array was initialized with 0s. A function AddRectangle() changed values in this array to 1s. The 1s indicated the pixels which belonged to the selected area. To draw the outline of the selected area, I scanned the array from top to bottom and from left to right. At each pixel, I tested whether this pixel was an edge pixel or not. Testing if a pixel was an edge pixel is very simple: if the value of the current pixel was 1 and a neighboring pixel was 0, the pixel was an edge pixel. When an edge pixel was found, I set the value of the array cell to 2.
Now, I had an array with all edge pixels. I converted them to paths. A path consisted of one or more lines (if you select a rectangular area and you subtract another area inside that area, you need two paths, so in this case, we would have 2 paths with 4 lines). I wrote a function that could draw those paths with dashed lines. Using a timer, I drew each path with a different offset, so that the dashes seemed to move. My ants marched.
But I didn't like my solution that much. I wondered how Photoshop and other programs did it. My solution was also slow.
Second Attempt
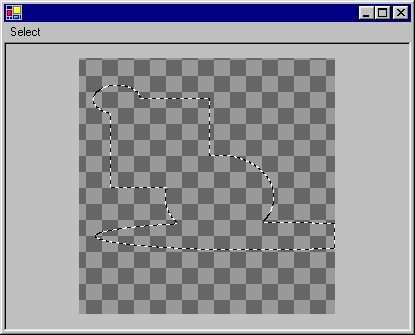
I downloaded the GIMP source code and studied it a bit. I started from scratch and this second solution is what you can download. The screenshot above also shows what to expect. Note that I only show how to implement marching ants, I don't provide a complete program or even a complete control.
Included in the source code is a program called Fotowinkel (fotowinkel.cs). This program creates a form and adds a PaintBox control to it. (If you wanted to create some sort of paint program, you could start using this control.) PaintBox provides scrollbars for the InnerPaintBox control. InnerPaintBox contains a PaintBoxImage which, in turn, contains a Selection object (Selection.cs). PaintBoxImage draws the background and centers the current image (you cannot specify an image, but this is easy to implement). Use the mouse to select rectangular areas. Each selected area will be added to the current selected area and marching ants will indicate the edges.
Selection.cs contains the selection engine, so to speak. The Selection object contains a bitmap, which is the selection mask. When you select a rectangle, the method AddRectangle() will draw a rectangle on the selection mask. GetOutline() is called at the end of the method. GetOutline() scans the selection mask from top to bottom and then again from left to right, searching for the edges of the current selected area. The lines are animated by drawing the lines using different texture brushes. In the constructor of the Selection object, you can see how I create 8 different texture brushes. The method Animate() will change the current brush when it's called. I borrowed this technique from the GIMP.
Some Thoughts
What's the difference between my first attempt and my second? In the first attempt, I have to change the values of the selection mask to indicate what pixels make up the boundary of the selection. This is annoying, because, in practice, you would create a copy of the selection mask when updating the selection outline, which means, more memory (or you could keep an array of the old pixel values, but that would create other problems, such as detecting if an edge pixel already belongs to an edge or not). The advantage of this first technique is that the ants march clockwise, in the second solution definitely not.
Another problem is performance. On my (old) computer, it takes about 2 seconds to update the selection, and we're only talking about a 256x256 selection mask! GDI+ is slow. But using GDI using DllImport is no option because GDI+ uses anti-aliasing.
The demo project allows you to select rectangular areas, but the code is able to handle all kinds of shapes because the engine doesn't know about shapes, it only knows about pixels. If you want to experiment, write a method AddEllipse(Point x, Point y) or something like that and draw an ellipse on the selection mask bitmap. Call GetOutline() and you're done!
A final thought concerns the selection mask bitmap: I use new Bitmap() to create a selection mask, but in reality, this should be a grayscale bitmap.
Update (March 2, 2004)
I updated the source code. To speed up the GetOutline() method, I created a new class called SelectionMask. SelectionMask wraps a Bitmap and provides 4 methods to manipulate that bitmap: Lock(), GetPixel(), SetPixel() and Unlock(). GetPixel() and SetPixel() access the bitmap data directly using unsafe pointers. Wow! This really gives a "turbo boost".
I also added a method AddEllipse(). The demo project now has a menu where you can choose how to select an area: rectangular or elliptical.
License
This article has no explicit license attached to it, but may contain usage terms in the article text or the download files themselves. If in doubt, please contact the author via the discussion board below.
A list of licenses authors might use can be found here.
