Introduction
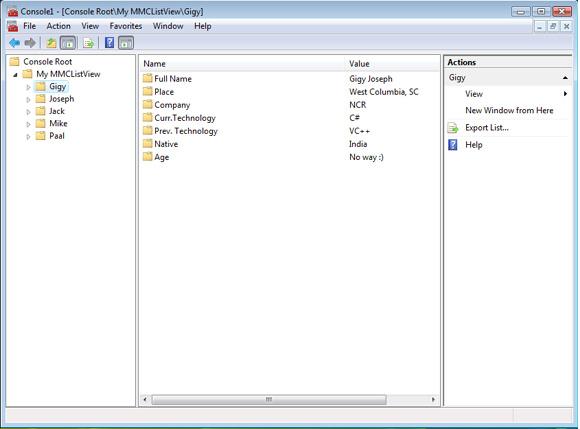
The MMC list view shows a list of result nodes in the results pane. This is the most commonly used view that is particularly suited to snap-ins that are designed to manage a dynamic list of items. The MMC list view supports small icons, large icons, lists, and report views. It also supports multi-select and single select operations on items, and a multiple column view with the ability to sort by column.
Using the code
Please make sure that you have gone through my previous articles, if you are a beginner. This article demonstrates how to create a snap-in that uses an MMC list view. I have started by creating a C# class library. Add a reference to Microsoft.ManagementConsole.
Inherit the main class from the SnapIn class:
[SnapInSettings("{F98E33A4-1DA5-414c-8576-B3582433F8AB}",
  DisplayName = "My Custom MmcListView",
  Description = "My Custom MmcListView")]
public class MMCListViewSnapInClass : SnapIn
Add another class which inherits from SnapInInstaller:
[RunInstaller(true)]
public class MMCListViewSnapInstallerSupport : SnapInInstaller
{
}
Initialize a new instance of the MMCListViewSnapInClass class. Create a root node and set the properties.
MmcListViewDescription lvd = new MmcListViewDescription();
lvd.DisplayName = "My Special MMCListView";
lvd.ViewType = typeof(RootListView);
lvd.Options = MmcListViewOptions.ExcludeScopeNodes;
this.RootNode.ViewDescriptions.Add(lvd);
this.RootNode.ViewDescriptions.DefaultIndex = 0;
In the above code, I have created a message view for the root node and attached the view to the root node. The message view is created as a RootListView class. This is a new class inherited from MmcListView. The new class looks like this:
using System;
using System.Collections.Generic;
using System.Linq;
using System.Text;
using Microsoft.ManagementConsole;
using System.Windows.Forms;
namespace MMCListViewSnapIn
{
class RootListView : MmcListView
{
public RootListView()
{
}
Since this RootListView class is attached to the root node MyMMCListView as a MmcListView, this will get loaded on the content pane when the root node is selected in the MMC tree region.
We can override the OnInitialize to customise the initial view of the content pane.
protected override void OnInitialize(AsyncStatus status)
{
base.OnInitialize(status);
}
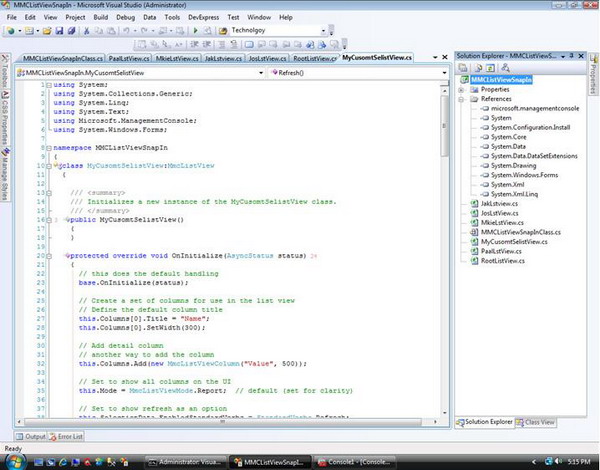
I have added another five more MmcListView derived classes which are basically attached to each child node of the tree. Shown below is the screenshot of the IDE. This may help you sometimes if you miss something on the go.

Let me explain one of the MmcListView derived classes. I am choosing the MyCustomSelistView class.
using System;
using System.Collections.Generic;
using System.Linq;
using System.Text;
using Microsoft.ManagementConsole;
using System.Windows.Forms;
namespace MMCListViewSnapIn
{
class MyCusomtSelistView:MmcListView
{
public MyCusomtSelistView()
{
}
Override the OnInitialize function to set the default setting for the content pane.
protected override void OnInitialize(AsyncStatus status)
{
base.OnInitialize(status);
this.Columns[0].Title = "Name";
this.Columns[0].SetWidth(300);
this.Columns.Add(new MmcListViewColumn("Value", 500));
this.Mode = MmcListViewMode.Report;
this.SelectionData.EnabledStandardVerbs = StandardVerbs.Refresh;
Refresh();
}
public void Refresh()
{
this.ResultNodes.Clear();
string[][] details = { new string[] {"Full Name ", "Gigy Joseph"},
new string[] {"Place", "West Columbia, SC"},
new string[] {"Company", "NCR"},
new string[] {"Curr.Technology", "C#"},
new string[] {"Prev. Technology", "VC++"},
new string[] {"Native", "India"},
new string[] {"Age", "No way :) "},
};
foreach (string[] detail in details)
{
ResultNode node = new ResultNode();
node.DisplayName = detail[0];
node.SubItemDisplayNames.Add(detail[1]);
this.ResultNodes.Add(node);
}
}
I have added two columns, Name and Value. Show all the columns on the UI by setting the Mode to MmcListViewMode.Report. The Refresh function loads data to the list view.
protected override void OnSelectionChanged(SyncStatus status)
{
if (this.SelectedNodes.Count == 0)
{
this.SelectionData.Clear();
}
else
{
this.SelectionData.Update(GetDetails(), this.SelectedNodes.Count > 1,
null, null);
this.SelectionData.ActionsPaneItems.Clear();
this.SelectionData.ActionsPaneItems.Add(
new Microsoft.ManagementConsole.Action("Show Selected",
"Shows list of selected Users.", -
1, "ShowSelected"));
this.SelectionData.ActionsPaneItems.Add(
new Microsoft.ManagementConsole.Action("Say Hello",
"Say Hello.", -1, "Say Hello"));
}
}
We have overridden OnSelectionChanged; this helps to customize the context menu on the action pane. Here, we have added two menu items and actions for those items.
protected override void OnSelectionAction
(Microsoft.ManagementConsole.Action action,
AsyncStatus status)
{
switch ((string)action.Tag)
{
case "ShowSelected":
{
ShowSelected();
break;
}
case "Say Hello":
{
MessageBox.Show("Hello, How are you?");
break;
}
}
}

private void ShowSelected()
{
MessageBox.Show("Selected Item: \n" + GetDetails());
}
private string GetDetails()
{
StringBuilder nodedetails = new StringBuilder();
foreach (ResultNode resultNode in this.SelectedNodes)
{
nodedetails.Append(resultNode.DisplayName + ": " +
resultNode.SubItemDisplayNames[0].ToString() + "\n");
}
return nodedetails.ToString();
}
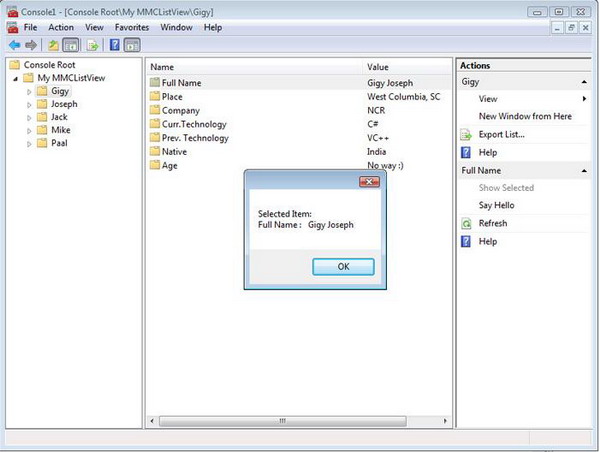
When the user selects the ShowSelected menu item, the ShowSelected() function gets called. This will show up a message box with the selected element's details.

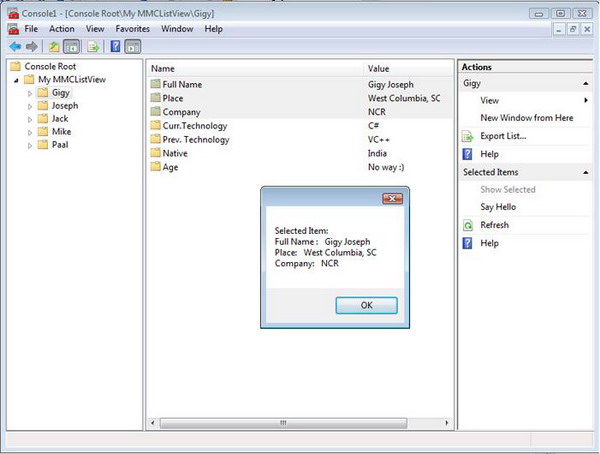
This also allows multi selection:

Selection the menu item Say Hello just pops up a message box. We can override the OnRefresh function as shown below:
protected override void OnRefresh(AsyncStatus status)
{
    MessageBox.Show("Need to implement....");
}
Adding new child elements to the root node happens like this:
public MMCListViewSnapInClass()
{
this.RootNode = new ScopeNode();
this.RootNode.DisplayName = "My MMCListView";
MmcListViewDescription lvd = new MmcListViewDescription();
lvd.DisplayName = "My Special MMCListView";
lvd.ViewType = typeof(RootListView);
lvd.Options = MmcListViewOptions.ExcludeScopeNodes;
this.RootNode.ViewDescriptions.Add(lvd);
this.RootNode.ViewDescriptions.DefaultIndex = 0;
ScopeNode scopeOne = new ScopeNode();
scopeOne.DisplayName = "Gigy";
MmcListViewDescription lvdOne = new MmcListViewDescription();
lvdOne.DisplayName = "Gigy's MMCListView";
lvdOne.ViewType = typeof(MyCusomtSelistView);
lvdOne.Options = MmcListViewOptions.ExcludeScopeNodes;
scopeOne.ViewDescriptions.Add(lvdOne);
scopeOne.ViewDescriptions.DefaultIndex = 0;
this.RootNode.Children.Add(scopeOne);
Points of interest
This technique can be used, for example, to manage different components for online banking solutions.
History
- Initial draft - March 16, 2009.
