Introduction
MMC is a framework that hosts administrative tools called snap-ins on Windows operating systems. Snap-in provides the actual management of the program.
Basically, a managed code MMC 3.0 snap-in is nothing more than an assembly with System.Configuration.Install.Installer support. So, we'll start by creating a new Class Library project in Visual Studio 2008. This sample shows you how to create a "Hello World" snap-in. While this snap-in itself does not have any interesting behavior, this procedure is intended to familiarize you with the basic steps to get a snap-in up and running using the MMC 3.0 SDK. This shows you how to write the snap-in code in a managed language such as C#. If you choose C#, you can start by creating a file called HelloWorldSnapIn.cs. When this code is compiled, it will create a snap-in DLL called HelloWorldSnapIn.dll.
Background
The MMC Snap-In applicaiton is a An MMC Snap-in is a COM in-process server. When you run mmc.exe, what you get is the mmc client. When you add a snap-in, you are working with the server DLL.
Using the code
We start with the step by step of the Snap-In Creation. I am using VS 2008 and Windows Vista as my development environment.
We start with creating a Class Library project in C#.

This is the first screen after creating the project.

Begin by adding the using directives that reference the assemblies that are required for this sample. The first directive is a reference to the MMC 3.0 assembly; the second directive is a reference to the component model assembly that is the source of the RunInstaller attribute. The PermissionSetAttribute allows security actions for a permission set to be applied to code using declarative security.
using Microsoft.ManagementConsole;
using System.ComponentModel;
using System;
using System.Security.Permissions;

[assembly: PermissionSetAttribute(SecurityAction.RequestMinimum, Unrestricted = true)]
Installutil.exe is a command-line utility that ships with .NET. It requires an Installer-derived class to be declared within the target assembly and further requires that the RunInstaller attribute be defined. Derive a class from SnapInInstaller. It automatically discovers registration information in the assembly and registers the discovered snap-ins. Set the RunInstaller attribute to True. This provides an entry point for tools such as Installutil.exe to execute the framework installer code.
[RunInstaller(true)]
public class InstallHelloWorldSupport : SnapInInstaller
{
}
Please do not forget to add a reference to using System.Configuration.Install.
Every snap-in must define a new class that is derived from the SnapIn class. Create a new scope node and assign it to be the root node for the snap-in. Give the root node a display name. Add the attribute SnapInSettingsAttribute. This attribute must be defined for any snap-in that must be featured on the Add/Remove dialog box in the MMC. This attribute defines the GUID for the snap-in, a display name for the snap-in, and a short description of the snap-in. Remember to set the Language of your code snippet using the Language dropdown.
[SnapInSettings("{63154B48-C39C-48aa-9B80-DB0BEC417190}",
DisplayName = "HelloWorld SnapIn Sample",
Description = "Gigy's Hello World SnapIn")]
public class HelloWorlMainSnapIn : SnapIn
{
public HelloWorlMainSnapIn()
{
this.RootNode = new ScopeNode();
this.RootNode.DisplayName = "Hello World";
}
}
We are done with the coding part. If everything is fine, we should be able to see HelloWorldSnapIn.dll in the bin folder. (Of course after a successful Build.)

Full source code:
using System;
using System.Collections.Generic;
using System.Linq;
using System.Text;
using Microsoft.ManagementConsole;
using System.ComponentModel;
using System.Security.Permissions;
using System.Configuration.Install;
namespace HelloWorldSnapIn
{
[RunInstaller(true)]
public class InstallHelloWorldSupport : SnapInInstaller
{
}
[SnapInSettings("{63154B48-C39C-48aa-9B80-DB0BEC417190}",
DisplayName = "HelloWorld SnapIn Sample",
Description = "Gigy's Hello World SnapIn")]
public class HelloWorlMainSnapIn : SnapIn
{
public HelloWorlMainSnapIn()
{
this.RootNode = new ScopeNode();
this.RootNode.DisplayName = "Hello World";
}
}
}
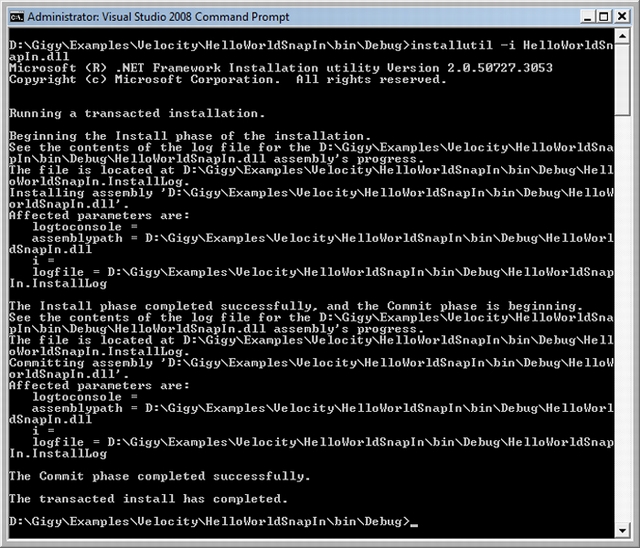
Cd to the bin\Debug folder of your project and installutil.exe the assembly as shown below:
installutil -i HelloWorldSnapIn.dll

Make sure that you run this utility as an Administrator, if you are trying this on Vista. In the registry you should now find a key called HKEY_LOCAL_MACHINE\SOFTWARE\Microsoft\MMC\SnapIns\FX:{63154B48-C39C-48aa-9B80-DB0BEC417190}. The FX: prefix which indicates the managed code our snap-in is built with.

Now it's time to test the snap-in. Open mmc.exe. The MMC 3.0 version looks as follows and has the Action pane on the right.

Now press CTRL-M (or go to File, Add/Remove Snap-in...) and add the "MMC 3.0 to the max" snap-in to the Console Root as shown below. Add the HelloWorld to the Selected snap-ins list.

HelloWorld snap-in is ready to see. This does not have any functionality than showing it on the screen.

MMC 3.0 makes it really easy for managed code developers to create appealing MMC snap-ins to manage their applications. To uninstall it, try this way:
installutil -i HelloWorldSnapIn.dll /uninstall
Points of Interest
I need to create a Customized SnapIn to provide MMC kind of Administrative functionalities for some Online Banking System.
History
- Initial Draft - Feb 27 2009
Reference Articles
