Introduction
Visual Studio Debugger Visualizers are a great addition to the developers debugging toolbox. Their purpose is to provide a custom view of data during a debugging session. Visualizers can be as simple as a string or dataset visualizer or as complex as the Mole For Visual Studio visualizer.
This article will cover developing a simple string visualizer that allows the string to be replaced during the visualizer session. Additionally, necessary steps to debug your visualizer will be covered.
I have recorded three videos that accompany this article. One on authoring debugger visualizers and two on debugging debugger visualizers. I suggest that you view the three videos as an introduction and then read this material. You can view the videos using the two links below.
New SilverLight Videos - These Are The Bomb!
 Great News - I've spent a good bit of time researching how to record, encode, package, upload and consume high quality screen capture videos. These videos are stored and streamed for
 free at Silverlight.Live.com.
I will post an article soon on this whole process. I will give you the Silverlight player, encoding profile with full instructions, including the different ways your videos can be consumed on your blogs and here on Code Project. Speaking of here, there are three videos below that you can watch now!

First. You must have Silverlight 1.0 installed on your computer. Takes about a minute or so.
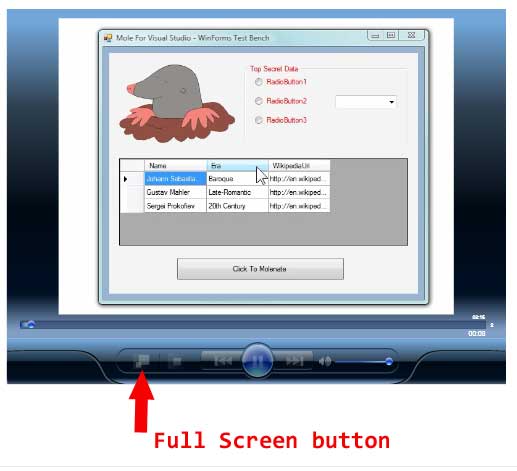
Next, when you click on the below links, your browser will open and display the video. The player will resize as you resize your browser. You can also press the Full Screen button and the video will go full screen.
Please leave comments at the bottom of the article so that I know how it worked for you so that I can make it better for the next developer.
 Authoring Debugger Visualizers SilverLight Video
 Debugging Debugger Visualizers SilverLight Video
 Debugging Debugger Visualizers Two SilverLight Video
Create Your Own Screen Capture Videos
Want to learn how to create you own screen capture videos? Then read my Code Project article, Creating, Encoding and Delivering Silverlight Streaming Screen Capture Videos. Very detailed and download includes the above Silverlight video player and necessary encoding preset profile. The article also has two videos that cover the process.
The first article I read about visualizers was Creating Debugger Visualizers with Visual Studio 2005 by Julia Lerman. She does an outstanding job of getting you started. Another good starting point is the MSDN Visualizer Architecture article. Also there many articles here on Code Project and the Internet covering visualizers.
Launching A Visualizer During Debugging Session
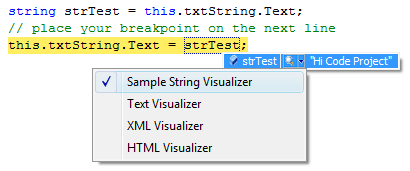
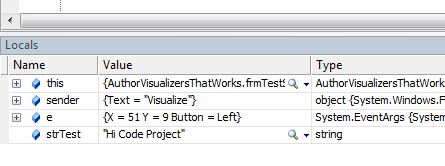
Visualizers are very easy to start. When debugging and at a breakpoint, hover your mouse over the object you want to visualize. If a visualizer is installed on your system which can visualize that object Type, the little magnifying glass will appear in the datatip. You can also start a visualizer from the Watch Window.
You can click the magnifying glass to open the default visualizer for that object Type. Or you can click the down arrow and select a visualizer to use. The check mark indicates the last visualizer used for the selected object type.

Using the data tip.

Using the watch window. Notice the magnifying glass in the Value column.
Visualizers 101
Basically there are four partners, running in two processes, that work together in the visualizer world.
Debugger Side
- Visual Studio Debugger - provides UI to select a visualizer to open.
- Visualizer UI - runs within the VS debugger process.
Debuggee Side
- Your Program - the program you are debugging. This process has the visual tree we want to visualize.
- Visualizer Object Source - runs within your program�s process.
Visual Studio plays the middle man handling communications between the two processes. The bottom line is, your visualizer UI has no data, until it makes a request to the VisualizerObjectSource. All data which moves between the two processes must be serialized. This is important to remember when building your data structures. Both sides of the conversation are active throughout the visualizer�s life. This allows your UI to make repeated requests to the data object whenever it needs more data to display. The communications plumbing Microsoft provided is incredibly fast, even with all the serialization and deserialization going on.
If you have to move large amounts of data between the debuggee and debugger processes, consider using .NET custom serialization for your data classes rather than relying on the default .NET serialization.
Visualizer Project
If you are used to writing executables, this is going to blow your mind. Your visualizer complies into one class library .DLL, part of which runs in one process and the other part is running in the other process. The classes from the Debugger process communicate through Visual Studio to classes in the Debuggee process.
Managing The Visualizer Development Process
One decision you will need to make is how you want to manage getting the debugger visualizer build output into the correct directory for debugger visualizers during the development cycle. You have many choices. The easiest method, is to simply change the output directory for the visualizer project to one of the below directories. You can also use the after build scripts to copy the file. Or, you can manually copy the visualizer dll after each build. Your choice, take your pick. Just remember, before shipping your visualizer code, to put the output directory back to the default \bin directory. This will help developers who are using your visualizer source code and reduce their confusion.
If you are developing on Vista and are running with Elevated Security enabled, you must install the visualizer in the following directory.
- VS Install path\Common7\Packages\Debugger\Visualizers
All others copy the visualizer file to either:
- My Documents\Visual Studio 2005\Visualizers {VS2005}
- My Documents\Visual Studio 2008\Visualizers {VS2008}
If you are developing an ASP.NET debugger visualizer and you are running your ASP.NET web site under IIS, you must give the account that the ASP.NET web site is running under, Read and Read Execute permissions on the above directory you are using for your visualizer dll.
Sample Test Bench Application

This is the UI for the frmTestStringVisualizer.cs file.
The solution has three projects. One VB.NET test bench UI (AuthoringVisualizers.vbproj), one C# test bench UI (AuthorVisualizersThatWorks.csproj) and one Visualizer (SampleStringVisualizer.vbproj).
The reason for two UI projects is because when I started out writing the test bench application, I discovered that the VB.NET test bench application won�t allow the visualizer to replace the data. I spent two hours trying to get this to work. I even downloaded another visualizer, authored by another developer, just to test my VB.NET UI program, just in case my visualizer was not coded correctly. It turns out that VB.NET WinForm applications will not allow the debugger visualizer to use the ReplaceData or ReplaceObject methods. No exceptions are returned. The data just does not get updated. So, I wrote a C# WinForm application for this test project.
Lets have a look at the code in the test bench UI.
namespace AuthorVisualizersThatWorks
{
public partial class frmTestStringVisualizer : Form
{
public frmTestStringVisualizer()
{
InitializeComponent();
}
private void btnVisualize_Click(object sender, EventArgs e)
{
string strTest = this.txtString.Text;
this.txtString.Text = strTest;
}
}
}
This is the place where you�ll place your breakpoint and when debugging Visual Studio will pause here. Then hold the mouse cursor over the strTest variable and launch the Sample String Visualizer.
SampleStringVisualier
<Assembly: System.Diagnostics.DebuggerVisualizer( _
    GetType(SampleStringVisualizer.StringVisualizer), _
    GetType( _
    SampleStringVisualizer.StringVisualizerObjectSource), _
    Target:=GetType(System.String), _
    Description:="Sample String Visualizer")>

Public Class StringVisualizer
  Inherits DialogDebuggerVisualizer

  Protected Overrides Sub Show(ByVal windowService _
    As _
    Microsoft.VisualStudio.DebuggerVisualizers.IDialogVisualizerService, _
    ByVal objectProvider As _
    Microsoft.VisualStudio.DebuggerVisualizers.IVisualizerObjectProvider)

    Using frm As New frmStringVisualizer
      frm.ObjectProvider = objectProvider
      frm.StringToVisualize = CType( _
         objectProvider.GetObject, String)
      windowService.ShowDialog(frm)
    End Using

  End Sub

End Class
The above code is the visualizer class. There are two things that make a class a visualizer. The DebuggerVisualizer attribute on the assembly and the class that derives from DialogDebuggerVisualizer.
There are four parameters we are passing in the constructor of the attribute. The Type of the visualizer class, the Type of the visualizer object source class, the target Type and the description of the visualizer. The description property value appears in the data tip of the visualizer in the Visual Studio debugger.
If you are not supplying your own visualizer object source, then use the default one supplied by Microsoft. The name of that type is, �Microsoft.VisualStudio.DebuggerVisualizers.VisualizerObjectSource.�
This class is the entry point for the visualizer. Visual Studio calls the Show method when the visualizer is started. The Show method is where you can launch your visualizer UI and pass the required information to the UI.
If your visualizer does not need access to the methods of the IVisualizerObjectProvider, then you do not need to pass this class to the UI. In this visualizer, I have decided to allow the visualizer to replace the text that is pass to it and I want that code to execute in the visualizer UI form, so I�m passing the IVisualizerObjectProvider instance to the form.
Notice that we are retrieving the object that was hovered over in the Visual Studio debugger when the visualizer was started. We are accomplishing this by using the objectProvider.GetObject method and then casting the result of that call as a string. The GetObject method is actually calling back to the debuggee side process. This call is handled by the visualizer object source, GetData method which serializes the target object and passes it to the debugger side as the result of the GetObject method.
Even in a very complex visualizer like Mole, the visualizer code here is very simple. Most of heavy work takes place in the visualizer UI and the visualizer object source.
SampleStringVisualizer - StringVisualizerObjectSource
Imports Microsoft.VisualStudio.DebuggerVisualizers
Imports System.Runtime.Serialization.Formatters.Binary

Public Class StringVisualizerObjectSource
  Inherits VisualizerObjectSource

#Region " Declarations "

  Private Shared _objBinaryFormatter As New _
      BinaryFormatter

#End Region

#Region " Overriden Methods "

  Public Overrides Sub GetData(ByVal target As _
      Object, ByVal outgoingData As System.IO.Stream)

    StringVisualizerObjectSource.Serialize( _
        outgoingData, target)

  End Sub

#End Region

#Region " Helper Methods "

  Public Shared Sub DebugVisualizer(ByVal obj As _
      Object)

    Dim vdh As VisualizerDevelopmentHost = New _
        VisualizerDevelopmentHost(obj, GetType( _
        SampleStringVisualizer.StringVisualizer), _
        GetType( _
        SampleStringVisualizer.StringVisualizerObjectSource))
    vdh.ShowVisualizer()

  End Sub

  Public Overloads Shared Function Deserialize( _
      ByVal incomingData As System.IO.Stream) As Object
    Return _objBinaryFormatter.Deserialize( _
        incomingData)

  End Function

  Public Overloads Shared Sub Serialize(ByVal _
      serializationStream As System.IO.Stream, _
      ByVal target As Object)
    _objBinaryFormatter.Serialize( _
        serializationStream, target)

  End Sub

#End Region

End Class
The above is the visualizer object source class. The visualizer object source class must derive from VisualObjectSource. There are several methods that the developer can override. In the above code, we are only overriding the GetData method. This very simple visualizer does not require a custom visualizer object source. I�ve done this for instructional purposes only.
The purpose of the GetData method is to allow the visualizer developer to write custom code to package up the target object. Remember this method is called when the debugger side calls the GetData method. In the above example, we are simply serializing and returning the target object.
Each visualizer has different needs. One requirement of visualizers is that the target object must be serializable. However, you can get around this limitation by overriding the GetData method and repacking your target object into a serializable class object.
There are several helper methods in this class. In fact, you can use this class as a template for your debugger visualizer object source classes.
The DebugVisualizer method is used to initiate debugging of the visualizer. See the Debugging Visualizers section at the bottom of this article for an explanation.
The Deserialize and Serialize methods provide a common interface for the debugger and debuggee side code to perform these operations.
SampleStringVisualizer UI - frmStringVisualizer

The above image shows what the visualizer UI looks like. A label displays the number of characters in the string and a TextBox allows the developer to edit the string text. If the string object can be replaced by the visualizer, the Replace Text Button will be enabled. Lets have a look at the visualizer UI code.
Imports Microsoft.VisualStudio.DebuggerVisualizers
Public Class frmStringVisualizer
#Region " Declarations "
Private _objObjectProvider As _
IVisualizerObjectProvider
#End Region
#Region " Properties "
Public Property ObjectProvider() As _
IVisualizerObjectProvider
Get
Return _objObjectProvider
End Get
Set(ByVal Value As IVisualizerObjectProvider)
_objObjectProvider = Value
End Set
End Property
Public Property StringToVisualize() As String
Get
Return Me.txtString.Text
End Get
Set(ByVal Value As String)
Me.txtString.Text = Value
End Set
End Property
#End Region
#Region " Methods "
Private Sub btnClose_Click(ByVal sender As _
System.Object, ByVal e As System.EventArgs) _
Handles btnClose.Click
Me.Close()
End Sub
Private Sub btnReplaceText_Click(ByVal sender As _
System.Object, ByVal e As System.EventArgs) _
Handles btnReplaceText.Click
Using ms As New System.IO.MemoryStream
StringVisualizerObjectSource.Serialize( _
ms, Me.StringToVisualize)
ObjectProvider.ReplaceData(ms)
ms.Close()
End Using
Me.Close()
End Sub
Private Sub frmStringVisualizer_Load(ByVal sender _
As System.Object, ByVal e As _
System.EventArgs) Handles MyBase.Load
Me.btnReplaceText.Enabled = _
Me.ObjectProvider.IsObjectReplaceable
If Me.btnReplaceText.Enabled Then
Me.ToolTip1.SetToolTip(Me.btnReplaceText, _
"Click to replace the original text with what you " _
& "have entered in the above textbox.")
Else
Me.ToolTip1.SetToolTip(Me.btnReplaceText, _
"The source object does not support replacement.")
End If
End Sub
Private Sub txtString_TextChanged(ByVal sender As _
Object, ByVal e As System.EventArgs) Handles _
txtString.TextChanged
Me.lblStringLength.Text = String.Format( _
"{0} characters", _
Me.txtString.Text.Trim.Length)
End Sub
#End Region
End Class
This code is self-explanatory for the most part. The two properties provide a public interface for passing required data and the ObjectProvider instance. These values as passed to the form in the StringVisualizer.Show method.
Have a look at the form load event handler, frmStringVisualizer_Load. The IVisualizerObjectProvider ObjectProvider exposes the IsObjectReplaceable property so developers can know in advance if the target object can be replaced. In the above code, I'm using the result of this property to either Enable or Disable the Replace Text button.
The btnReplaceText_Click event handler uses the ObjectProvider.ReplaceData method to replace the original target string value with the text in the TextBox. Notice how the helper method, StringVisualizerObjectSource.Serialize is used here to serialize the text for passing back to the debuggee side.
I have left the comments in the event handler to show an alternate method of replacing the data. You can also use the ObjectProvider.ReplaceObject method. This method is simpler, in that it takes care of serializing the object for you. I have provided both methods for instructional purposes.
Debugging Visualizers
Public Class StringVisualizerObjectSource
  Inherits VisualizerObjectSource
...
...

  Public Shared Sub DebugVisualizer(ByVal obj As _
      Object)

    Dim vdh As VisualizerDevelopmentHost = New _
        VisualizerDevelopmentHost(obj, GetType( _
        SampleStringVisualizer.StringVisualizer), _
        GetType( _
        SampleStringVisualizer.StringVisualizerObjectSource))
    vdh.ShowVisualizer()

  End Sub
...
...
End Class
The source code has complete comments on how to use the above StringVisualizerObjectSource.DebugVisualizer method. These comments are repeated below. Also, watch the Debugging Debugger Visualizer video for a complete walk through of this process.
The DebugVisualizer function makes debugging a Visualizer a snap. Follow these simple steps to debug your visualizer.
- The project used to start this Visualizer will need to reference
Microsoft.VisualStudio.DebuggerVisualizers ( VS2005 use version 8 ) ( VS2008 use version 9 )
- The project used to start this visualizer will need a reference to the Visualier project. Ensure that you set Copy Local to True.
- Set desired breakpoints inside your Visualizer project
- Call this
DebugVisualizer method from the other project
- Please see the following post if you have difficulties during debugging: System invalidcastexception unable to cast object of type x to type x
In your source test bench project, typically in the same location that you would normally place a breakpoint to launch the visualizer, place the following call:
SampleStringVisualizer.StringVisualizerObjectSource.DebugVisualizer(strTest);
When you now run the test bench project (or a real project) and when the above line of code executes, the visualizer will be started and when any breakpoints are reached in the visualizer project, Visual Studio will break and you can debug your visualizer just like any other program.
All this magic happens because the DebugVisualizer method calls the VisualizerDevelopmentHost method. This is supplied by Microsoft and gets around the normal difficulties when debugging across two processes. You can read the MSDN documentation on the VisualizerDevelopmentHost here.
Please Read This: After you are done debugging your visualizer, you MUST remove the two above references and the call to the DebugVisualizer method. If you don�t and then try to open the debugger visualizer using the normal methods, you will start having weird exceptions and get bummed out. Trust me, I�ve been down that muddy road called, �what is going on highway?�
Summary
That is not very much code is it? Developers, you can write your own visualizers.
There are plenty of example visualizers here on Code Project and articles on the Internet. The MSDN documentation is very good also.
I hope you can learn from this article, the two videos and the source code download.
History
- 22 Jan 2008: Initial Release
