Send Auto Notification Using Windows Service
4.10/5 (15 votes)
This tip describes how to send auto email using Windows service
Introduction
Microsoft Windows services, formerly known as NT services, enable you to create long-running executable applications that run in their own Windows sessions. These services can be automatically started when the computer boots, can be paused and restarted and do not show any user interface. These features make services ideal for use on a server or whenever you need long-running functionality that does not interfere with other users who are working on the same computer.
A Windows service is created using development tools such as Microsoft Visual Studio or Embarcadero Delphi. In order to be a Windows service, a program needs to be written in such a way that it can handle start, stop, and pause messages from the Service Control Manager. Service Control Manager is a component of Windows which is responsible for starting and stopping services.
Using the Code
- Open Visual Studio
- Go to file->new->project
- Select Windows service
- Right click on Service1.cs and select properties
-
In the properties window, click on add Installer:

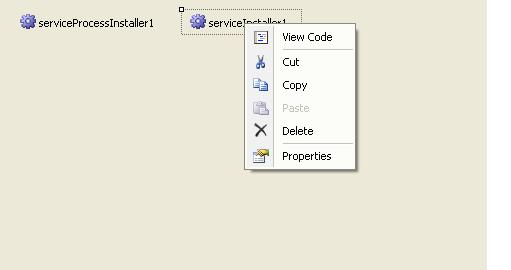
- Right click on
serviceInstaller1, select properties - Change
DisplayName,ServiceNametoSeraMailService - StartType to Automatic

- Right click on
serviceProcessInstaller1then select Properties - Change Account to
LocalSystem - Right click on Service1.cs Design select ViewCode

- In the
OnStartmethod, type the following code:public void GetMail(object sender, System.Timers.ElapsedEventArgs args) { NetworkCredential cred = new NetworkCredential("email@lafarge.com", "Password"); MailMessage msg = new MailMessage(); msg.To.Add("email@apsissolutions.com"); msg.Subject = "Welcome JUBAYER"; msg.Body = "You Have Successfully Entered to Sera's World!!!"; msg.From = new MailAddress("email@apsissolutions.com"); // Your Email Id SmtpClient client = new SmtpClient("smtp.gmail.com", 587); SmtpClient client1 = new SmtpClient("smtp.mail.yahoo.com", 465); client.Credentials = cred; client.EnableSsl = true; client.Send(msg); }To keep the method running, we add time interval.
Add this line before
onloadmethod:System.Timers.Timer createOrderTimer;
In the
onStartmethod, type this code:createOrderTimer = new System.Timers.Timer(); createOrderTimer.Elapsed += new System.Timers.ElapsedEventHandler(GetMail); createOrderTimer.Interval = 180000;//Set Three minutes intervals createOrderTimer.Enabled = true; createOrderTimer.AutoReset = true; createOrderTimer.Start();
The full code is as given below:
System.Timers.Timer createOrderTimer;
public Service1()
{
InitializeComponent();
}
protected override void OnStart(string[] args)
{
createOrderTimer = new System.Timers.Timer();
createOrderTimer.Elapsed += new System.Timers.ElapsedEventHandler(GetMail);
createOrderTimer.Interval = 500;
createOrderTimer.Enabled = true;
createOrderTimer.AutoReset = true;
createOrderTimer.Start();
}
public void GetMail(object sender, System.Timers.ElapsedEventArgs args)
        {
            NetworkCredential cred = new NetworkCredential("email@lafarge.com", "Password");
            MailMessage msg = new MailMessage();
            msg.To.Add("email@apsissolutions.com");
            msg.Subject = "Welcome JUBAYER";

            msg.Body = "You Have Successfully Entered to Sera's World!!!";
            msg.From = new MailAddress("email@apsissolutions.com"); // Your Email Id
            SmtpClient client = new SmtpClient("smtp.gmail.com", 587);
            SmtpClient client1 = new SmtpClient("smtp.mail.yahoo.com", 465);
            client.Credentials = cred;
            client.EnableSsl = true;
            client.Send(msg);
        }
Now build the service using Ctrl+Shift+B.
In the command mode, type the code to install InstallUtil.exe.
C:\WINDOWS\Microsoft.NET\Framework\v2.0.50727\InstallUtil.exeTo install the service, use the command:
C:\WINDOWS\Microsoft.NET\Framework\v2.0.50727>InstallUtil.exe
"C:\Documents and
Settings\Administrator\My Documents\Visual Studio 2008\Projects\SeraMailService\
SeraMailService\bin\Debug\SeraMailService.exe"
Type services.msc in the run window and enter to see all services. Right click on the service, then run the service.
To uninstall the service, use this code:
C:\WINDOWS\Microsoft.NET\Framework\v2.0.50727>InstallUtil.exe /u
"C:\Documents and Settings\Administrator\My Documents\Visual Studio 2008\
Projects\SeraMailService\SeraMailService\bin\Debug\SeraMailService.exe"
