
Basics of Node.js for MEAN Stack Development
4.33/5 (5 votes)
This is just an introduction of Node.js.
Introduction
- This is just an introduction of Node.js.
- In other words 'N' of the MEAN Stack.
- This is the second part of the series of articles which I will write about the MEAN.
- Here is the first part of this article MEAN Stack Development with MongoDB.

What is Node.js ?
- Node.js is a platform built on Chrome's JavaScript runtime for easily building fast, scalable network applications.
- It uses an event-driven, non-blocking I/O model that makes it lightweight and efficient.
- It's perfect for data-intensive real-time applications that run across distributed devices.
How to Install Node.js on Windows ?
Step 1 :
- Installing Node.js on a Windows machine is a simple task that can be easily accomplished using the standalone installer.
- Just go to Node.js download page and download the right .msi file (32-bit or 64-bit ).
- I have downloaded the 64-bit version.

Step 2 :
- After downloading the installer, just double click it.
- If you get any security dialog boxes, just click on the Run button and the installation wizard should start.
- You will be prompted with an installation screens similar to the following screenshots.


Congratulations !. You have successfully installed the Node.js.
How to Run Node.js ?
Step 1 :
- You have to open the Nods.js Command Line Interface (CLI).
- Just go to the Nods.js installed folder and run the Node application as shown below.

- This will start the Node.js CLI, which will wait for a JavaScript input.
Step 2 :
- To test the Node.js installation, run the following command on CLI.
console.log('Node is up and running!');

- Congratulations ! You have just created your fist Node.js application.
Step 3 :
- To stop the CLI, press CTRL + D
What is Node Package Manager (NPM) ?
- Node.js is a platform, which means its features and APIs are kept to a minimum.
- To achieve more complex functionality, it uses a module system that allows you to extend the platform.
- The best way to install, update, and remove Node.js modules is using the NPM.
- Conveniently, NPM is installed during the Node.js installation process.
What are the Key Features of NPM ?
- A registry of packages to browse, download, and install third-party modules.
- A Command Line Interface (CLI) tool to manage local and global packages.
What are the Installation modes on NPM ?
- It is important to remember that NPM has two installation modes.
- Which are Local mode and Global mode.
Local Mode
- The default local mode is used more often and installs the third-party packages in a local node_modules folder placed inside your application folder.
- It has no effect system-wise, and is used to install the packages your application needs, without polluting your system with unnecessary global files.
Global Mode
- The global mode is used to install packages you want Node.js to use globally.
- Usually these are CLI tools, such as Gulp.
- Most of the time, the package author will specifically instruct you to install the package globally. Therefore, whenever in doubt, use the local mode.
- The global mode will usually install the packages in the C:\Users\%USERNAME%\AppData\Roaming\npm\ node_modules folder for Windows-based systems, making it available to any Node.js application running on the system.
How to Install a package using NPM ?
Step 1 :
- Once you find the right package, you'll be able to install it using the npm install command as follows.
Local Mode :
- Run 'Command Prompt' with “Administrative Privileges”.
- Go to your Node.js App's root folder.
npm install <Package Unique Name>
e.g.
D:\Freelance Work\My Blog\Mean Introduction\NodeJs\Test>npm install express

- The preceding command will install the latest stable version of the Express package in your local node_modules folder as follows.

- When a package has dependencies, NPM will automatically resolve those dependencies, installing the required packages in a node_modules folder inside the package folder as follows.

Global Mode :
- Run 'Command Prompt' with “Administrative Privileges”.
- Installing a module globally is similar to its local counterpart, but you'll have to add the –g flag as follows.
npm install –g <Package Unique Name>
e.g.
D:\Freelance Work\My Blog\Mean Introduction\NodeJs\Test>npm install -g express

- The preceding command will install the latest stable version of the Express package in your Roaming folder as follows.
- Note that the "AppData" folder is Hidden by default.

How to Install a package using NPM ?
- To remove an installed package, you have to navigate to your application folder and run the following command according to the mode.
Local Mode :
npm uninstall < Package Unique Name>
e.g.
D:\Freelance Work\My Blog\Mean Introduction\NodeJs\Test>npm uninstall express
Global Mode :
npm uninstall –g < Package Unique Name>
e.g.
D:\Freelance Work\My Blog\Mean Introduction\NodeJs\Test>npm uninstall –g express
How to Update a package using NPM ?
- To update a package to its latest version, issue the following command according to the mode.
Local Mode :
npm update < Package Unique Name>
e.g.
D:\Freelance Work\My Blog\Mean Introduction\NodeJs\Test>npm update express
Global Mode :
npm update –g < Package Unique Name>
e.g.
D:\Freelance Work\My Blog\Mean Introduction\NodeJs\Test>npm update –g express
What is a package.json file ?
- The package.json file is basically a JSON file that contains the different attributes you'll need to describe about your application properties.
- Your application will need to use several packages, and so you'll need a better way to manage these package dependencies.
- For this purpose, NPM allows you to use a configuration file named package.json in the root folder of your application.
- In your package.json file, you can define various metadata properties of your application, including properties such as the name, version, and author of your application.
- This is also where you define your application dependencies.
- Let's say our application is using the Express and Gulp packages.So then we will have a package.json file as follows.
{
"name" : "MEAN App",
"version" : "0.0.1",
"author" : "Sampath Lokuge",
"dependencies" : {
"express" : "latest",
"gulp" : "latest"
}
}
Important Note :
- Your application name and version properties are required.
- If you remove these properties then NPM will not work properly.
- The "latest" keyword to tell NPM to install the latest versions of the packages.
How to Create a package.json file ?
- Go to your Node.js App's root folder.
npm init
e.g.
D:\Freelance Work\My Blog\Mean Introduction\NodeJs\Test>npm init
- NPM will ask you a few questions about your application and will automatically create a new package.json file for you.
- A sample screenshot as follows.

How to Install the package.json dependencies ?
install :
- If you need to install Gulp,then change the package.json file's dependencies section as follows.
"dependencies": {
"express": "^4.11.2",
"gulp": "latest"
}
- In the preceding code example, I have used the "latest" keyword to tell NPM to install the latest versions of the Gulp package.
- Navigate to your application's root folder and use the "npm install" command as follows.
npm install
e.g.
D:\Freelance Work\My Blog\Mean Introduction\NodeJs\Test>npm install
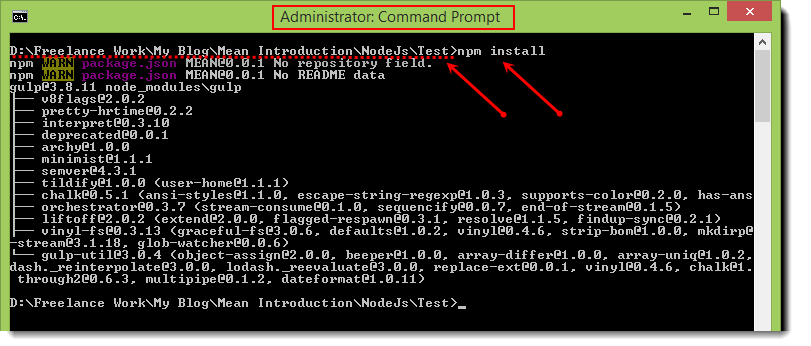
- NPM will automatically detect your package.json file and will install all your application dependencies.
- You can find out them under a local "node_modules" folder.
update :
- An alternative and sometimes better approach to install your dependencies is to use the "npm update" command.
- This will install any missing packages and will update all of your existing dependencies to their specified version.
npm update
e.g.
D:\Freelance Work\My Blog\Mean Introduction\NodeJs\Test> npm update
How to Update the package.json file ?
- Another great feature of the npm install command is the ability to install a new package and save the package information as a dependency in your package.json file.
- This can be accomplished using the --save optional flag when installing a specific package.
- For example, to install the latest version of Express and save it as a dependency, you can issue the following command.
npm install express --save
e.g.
D:\Freelance Work\My Blog\Mean Introduction\NodeJs\Test> npm install express --save
- In the preceding command will install the latest version of Express and will add the express package as a dependency to your package.json file.
{
"name": "MEAN",
"version": "0.0.1",
"dependencies": {
"express": "^4.11.2",
},
}
References
Conclusion
- In this article, You learned how to install Node.js and usage of the Node.js CLI.
- You learned about NPM and discovered how to use it to download and install Node.js packages.
- You also learned how to easily manage your application dependencies using the package.json file.
- In the next article,we'll discuss the basics of Express.js.
- I hope this helps to You.Comments and feedback greatly appreciated.