Introduction
This article provides a base class that helps developers build customized design-time extensions for components and controls through Smart Tag designer panels.
How to Use this Helper (Base) Class
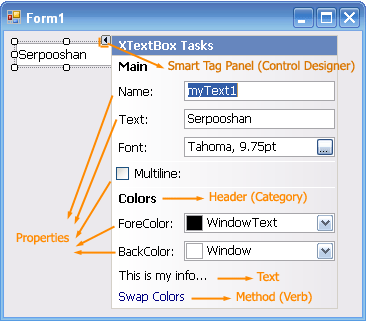
You can easily define your custom Smart Tag panels containing your action list items (Properties, Methods (Verbs), and Texts). Here is a sample control which derives from the TextBox control and uses a custom designer (mySmartTagActionList). The items are added in the AddActionItems() method. Any property or method you want to add should be defined in your SmartTagActionList class which is derived from the SmartTagActionListBase class.
Here are the required steps to create your custom control designer:
- Define your control (or component) class (e.g.,
XTextBox) - Define a
DesignerActionList class which inherits from SmartTagActionListBase. This part of the code should also be inserted to its body:
Public Class mySmartTagActionList1
Inherits SmartTagActionListBase
Private m_Control As XTextBox
Sub New(ByVal component As IComponent)
MyBase.New(component)
m_Control = CType(component, XTextBox)
End Sub
End Class
where XTextBox is the type (or class name) of your control. Here, the m_Control variable is used to cache a reference to the associated control of this designer for later uses.
You may also use Me.AutoShow = True in this constructor routine to auto-expand (auto-show) it whenever the user drags your control into the form.
Define the properties/methods you want (e.g., BackColor, ForeColor, and IsMultiline, in the below sample). Some properties are already defined in the base class (SmartTagActionListBase) such as: Name, Text, Font, RightToLeft.Override the AddActionItems() method to add your Smart Tag panel items (ActionList items). You may use the AddActionProperty, AddActionMethod, AddActionHeader, and AddActionText methods to do this easily (see the sample code).Add a Designer attribute to your control class like this:
<Designer(GetType(SmartTagControlDesigner(Of mySmartTagActionList)))>
where the mySmartTagActionList is the name of your SmartTagActionList class.
Note: if you want to define a designer for a component (not a control), just use SmartTagComponentDesigner instead of SmartTagControlDesigner:
<Designer(GetType(SmartTagComponentDesigner(Of mySmartTagActionList)))<
The Sample Code
Here is a sample control which uses a custom SmartTagPanel Designer:
Imports System.ComponentModel
<Designer(GetType(SmartTagControlDesigner(Of mySmartTagActionList)))> _
Public Class XTextBox
Inherits TextBox
End Class
Public Class mySmartTagActionList
Inherits SmartTagActionListBase
Private m_Control As XTextBox
Sub New(ByVal component As IComponent)
MyBase.New(component)
m_Control = CType(component, XTextBox)
End Sub
Public Property BackColor() As Color
Get
Return m_Control.BackColor
End Get
Set(ByVal value As Color)
Me.SetPropertyByName(m_Control, "BackColor", value)
End Set
End Property
Public Property ForeColor() As Color
Get
Return m_Control.ForeColor
End Get
Set(ByVal value As Color)
Me.SetPropertyByName(m_Control, "ForeColor", value)
End Set
End Property
Public Property IsMultiline() As Boolean
Get
Return m_Control.Multiline
End Get
Set(ByVal value As Boolean)
Me.SetPropertyByName(m_Control, "Multiline", value)
End Set
End Property
Public Sub SwapColors()
Dim c As Color = Me.ForeColor
Me.ForeColor = Me.BackColor
Me.BackColor = c
RefreshDesigner()
End Sub
Public Overrides Sub AddActionItems()
AddActionHeader("Main")
AddActionProperty("Name", "Name:", "Main", "")
AddActionProperty("Text", "Text:", "Main", "")
AddActionProperty("Font", "Font:", "Main", "")
AddActionProperty("IsMultiline", "Multiline:", "", "")
AddActionHeader("Colors")
AddActionProperty("ForeColor", "ForeColor:", _
"Colors", "Sets the ForeColor")
AddActionProperty("BackColor", "BackColor:", _
"Colors", "Sets the BackColor")
AddActionText("This is my info...", "Colors")
AddActionMethod("SwapColors", "Swap Colors", _
"Colors", "Swap ForeColor/BackColor", True)
End Sub
End Class
Notes
You may see this article: Creating Property Editors in Design Time for VS.NET Easily (UITypeEditor Helper), to create UITypeEditor's easily. An 'Editor' is related to a property, but a 'Designer' is related to a control or component (a class)! By means of UITypeEditors, you can provide a custom editor window (e.g., a dropdown window) to edit each property of a control. You may mix both of the 'Designer' and 'Editor' attributes to achieve better design-time extensions for components and controls.

