Introduction
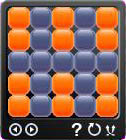
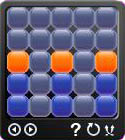
I’ve been enjoying <st1:place w:st="on">Vista for a little while now, and I’ll admit that I enjoy the simplicity of the SideBar gadgets. So, to kick off the Code Project’s gadget competition, I thought I’d share the basic steps needed to create, run, and deploy a gadget. I've adapted a game I had growing up called Lights Out. The goal is to turn every light out starting with a given "pattern." Each button pressed toggles the lit state of that button as well as the four buttons to the top, left, right, and bottom of the button pressed.
Gadget Setup
Gadgets are really nothing more than a combination of XML, HTML, and scripts that are hosted inside the sidebar instead of a browser. Gadgets are easily created by following a couple very simple conventions. First, every gadget requires a folder to store all content files. Gadget folders must be created in the user's "Windows Sidebar" folder, and gadget folder names are required to end with ".gadget" which translates to the following for the Lights Out gadget in this example:
C:\Users\<user name>\AppData\Local\Microsoft\Windows Sidebar\LightsOut.gadget\
<st1:place w:st="on">Vista uses a manifest file named "gadget.xml" to load and display the gadget. The manifest contains basic information like author, version, drag and icon images, and, most importantly, the name of the HTML file to load when the gadget is added to the sidebar or desktop. Here's an example manifest describing the Lights Out gadget.
="1.0"="utf-8"
<gadget>
<name>Lights Out</name>
<namespace>microsoft.windows</namespace>
<version>1.0.0.0</version>
<author name="Microsoft Corporation">
<logo src="icon.png" />
</author>
<copyright>© 2006</copyright>
<description>Lights Out - A classic puzzle game</description>
<icons>
<icon height="48" width="48" src="icon.png" />
</icons>
<hosts>
<host name="sidebar">
<base type="HTML" apiVersion="1.0.0" src="LightsOut.html" />
<permissions>Full</permissions>
<platform minPlatformVersion="1.0" />
<defaultImage src="drag.png" />
</host>
</hosts>
</gadget>
Interaction and the Gadget API
The actual "guts" of a gadget are handled by standard javascripts or vbscripts, and the Gadget API. That’s great news for those who already know a scripting language since there’ll be virtually no ramp up time for you. In this example, all of the Lights Out UI is built with standard javascripts; nothing special at all. Rather than outline how Lights Out works, which isn’t terribly interesting, let's take a look at how javascript (or any IE supported scripting language) integrates with the Gadget API.
function loadSettings()
{
System.Gadget.onSettingsClosing = settingsClosing;
if (System.Gadget.Settings.read("SettingExist") == true)
{
var index = System.Gadget.Settings.read("currentPuzzle");<BR> InitializeLayout(index);
ShowCurrent();
}
self.focus;
document.body.focus();
}
function settingsClosing()
{
...
}
The code for the Gadget API can be run inline with your script as if it's an extension of the javascript or vbscript languages. The good news is that it makes writing gadget scripts very easy. The cost of ease, however, is that you can't develop the gadget is Windows XP. I ended up using XP for writing the initial script and drafting the images, then switching to Vista to finalize the settings and layout.
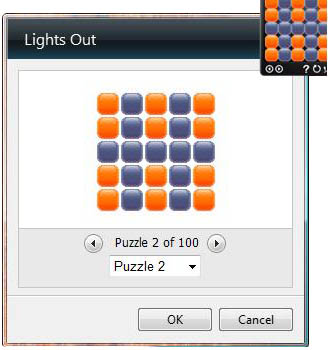
The most important aspect of the API in this example is the way events are handled. The settings page close event, for example, is easily registered by setting the onSettingsClosing event property to a function within your script. This model is very useful for responding to events such as the settings page opening or closing, or the entire gadget being docked or undocked. In this Lights Out example, the settings page allows the user to visually select a level to play. If the user clicks the OK button, the main UI's script responds to the onSettingsClosed event in order to read the newly changed settings and load the appropriate level.
On a side note, this gadget could have used a Flyout just as easily as a settings page. I just felt like using settings for this example since it's more commonly used.
Settings
The settings API contains for methods for storing runtime settings, and seems to work much like a standard .NET hashtable. The System.Gadget.Settings namespace contains for methods for settings management,
read(<setting name>)
readString(<settingName>)
write(<setting name>, <setting value>)
writeString(<setting name>, <setting value>)
The down side to the settings is that they’re not persisted when the gadget is closed. Persisted settings are possible, but beyond the scope of this introductory article. Here's a sample of the settings page, also built on standard HTML and javascript.
I hope you see now that a little HTML, javascript, and maybe some CSS are all you need to play with the Side Bar. It's reall is almot too simple.
Package and Deploy
The last step to creating a gadget is packaging it for deployment because, of course, you'll want to share your amazing creating with everyone. This is arguably the easiest step of the entire process. To create an installable gadget package you only need to do the following:
- Create a new zip file
- Add all the contents in your .gadget folder (but not the folder itself)
- Change the .zip extension to .gadget
That's it! It's just a renamed zip file. Users simply execute the .gadget file, and Vista handles the rest of the installation including creating the correct folder, copying all the files, and adding a new instance of the gadget to the side bar (For those of you running Vista, the LightsOut.gadget file insize the source code download is fully functional).
There you have it! Creating gadgets is quick, easy, and requires almost no new learning. For those interested, I spend about 70% of the time for the Lights Out gadget creating the images. That’s saying quite a lot if you ask me.

