Introduction
My first intention was to build a Windows Control like
that one you can see in Windows Task Manager which goes with Windows2000.
Considering that is the really simple control, I decided to add a few things to
improve it a little bit. You can use this control to visually track down any
variable in your program linking it with control's Value property.
Added Properties
I wrote a few properties to provide additional
capabilities of the control:
- Value
- Maximum
- Minimum
- UpperRange
- LowerRange
- RefreshingTime
- Grid
Value property can be
set between Maximum and Minimum properties. When Value is out of normal range, defined with LowerRange and UpperRange properties, control draws it in a
defferent color. RefreshingTime property sets
a frequency of redrawing the control giving four possible values of choice.
Grid property gives you opportunity to change
the density of the grid lines.
Drawing The Control
The code required for drawing the control is located in
two methods:
Protected Overrides Sub OnPaintBackground(ByVal pevent As _
                                       System.Windows.Forms.PaintEventArgs)
Protected Overrides Sub OnPaint(ByVal e As System.Windows.Forms.PaintEventArgs)
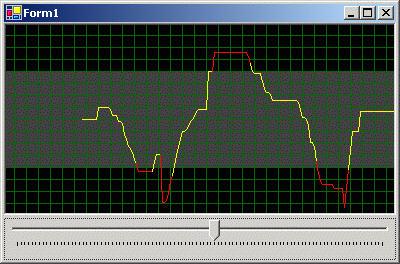
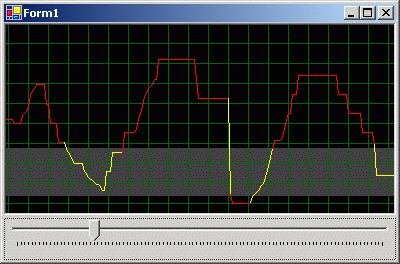
I used OnPaintBackground to draw normal range area gaining
effect that you can see on two pictures above. In OnPaint the control draws grid lines, value (changes
the color when value is out of normal range defined with LowerRange and UpperRange properties) and control's border as
showed in next segments of code:
For i = 1 To CInt(Me.Height / mGrid)
e.Graphics.DrawLine(Pens.DarkGreen, 0, i * mGrid, Me.Width, i * mGrid)
Next i
For i = 1 To CInt(Me.Width / mGrid)
e.Graphics.DrawLine(Pens.DarkGreen, i * mGrid - mover, 0,
i * mGrid - mover, Me.Height)
Next i
For i = 1 To values.Count - 1
If CInt(values(i)) Me.UpperRange Or CInt(values(i)) Me.LowerRange Then
e.Graphics.DrawLine(Pens.Red, Me.Width - intDivision * (values.Count - i), _
CInt(Me.Height * (Me.Maximum - CInt(values(i))) / (Me.Maximum - Me.Minimum)), _
Me.Width - intDivision * (values.Count - i + 1), _
CInt(Me.Height * (Me.Maximum - CInt(values(i - 1))) / (Me.Maximum - Me.Minimum)))
Else
e.Graphics.DrawLine(Pens.Yellow, Me.Width - intDivision * (values.Count - i), _
CInt(Me.Height * (Me.Maximum - CInt(values(i))) / (Me.Maximum - Me.Minimum)), _
Me.Width - intDivision * (values.Count - i + 1), _
CInt(Me.Height * (Me.Maximum - CInt(values(i - 1))) / (Me.Maximum - Me.Minimum)))
End If
Next i
ControlPaint.DrawBorder3D(e.Graphics, 0, 0, Width, Height, Border3DStyle.Sunken)
To redraw the control in certain interval of time I used
a thread and started it in the constructor of the control using thread's Start method. You have to declare thread's delegate
ThreadStart and thread's method where you
specify the program code executed by a thread:
To fully enable double-buffering, you must set the UserPaint, AllPaintingInWmPaint, and DoubleBuffer control style bits to true.
Double-buffering prevents flicker caused by the redrawing of the control. The
best place to do that is the constructor of the class. Setting ResizeRedraw control style to true ensures that the
control is redrawn when it is resized.
Private otter As New ThreadStart(AddressOf MyThreadProc)
Private oThread As New Thread(otter)
MyThreadProc calls
control's Invalidate method and thread's Sleep method with RefreshingTime control's property as an argument.
Everything happens in Do While Loop.
Design-Time Attributes
Because components can be displayed in a designer, such
as Visual Studio .NET, they require attributes that provide metadata to
design-time tools. Every property which I added to the control has a few
attributes in order to better describe a component to the user. To simplify
finding the added properties of the control you should specify the category in
which the property (or event) will be displayed in a visual designer. You can do
that with Category("name_of_the_category")
attribute in a definition of the property. Description("text") attribute describes meaning of
the property. DefaultValue("value") defines
default value of the property, and if you change it in Properties Window it will
become bold. These are only basic attributes which are necessary for describing
a real professional component.
Demo Application
To show how the control behaves on the form you can open
new Windows Application Project, add it to the ToolBox (Tracker.dll) and
double-click icon in the ToolBar with name Tracker (  ). You can
move the control, resize it in Visual Designer in VS.NET and change its
properties in the Properties Window.
). You can
move the control, resize it in Visual Designer in VS.NET and change its
properties in the Properties Window.
For a practical purpose of this demo I added only a TrackBar on the form and adjusted its property Maximum to the same value
as Tracker's property Maximum. After that only one line of the code in
the TrackBar's Scroll event is necessary (by double-clicking the TrackBar):
Me.Tracker1.Value = Me.TrackBar1.Value
Run the application and good luck !
Comment
I have created this control in VB.NET Standard Edition which comes without
Component Designer. It's good idea to add a test project
(Windows Application) to existing solution in order to test control's behaviour
on the form. As soon as you compile your control, all changes are visible in design mode of your test form. I have tested the control only in Windows2000, and there is no reason that it shouldn't be working in other versions of Windows starting with Win98 as indicated in Microsoft .NET documentation.

