Introduction:
In this article, I will explain how to select multiple DropDownList values when the DropDownList is one of the columns of the DataGrid. I am using Northwind database in this example which is the default database in SQL Server.
Adding DropDownList to DataGrid:
Okay, adding DropDownList to DataGrid is straightforward. Read the following steps:
- Drag and drop
DataGrid onto the webform.
- Right click on
DataGrid -> select Property Builder.
- In Property Builder, select Columns.
- Add two bound columns and one template column. (Remember to add bound columns first and than the template column.) Uncheck Create columns automatically.
- Now, in the same window, click on the bound column appearing on the right window and set its header text to "Category ID" and
DataField to "CategoryID". Click on the second bound column appearing in the right window and set header text to "Category Name" and DataField to "CategoryName".
Remember that header text is just the pure plain text which can be anything. DataField on the other hand is the name of the column in the database, so it must be the exact same name as of the column in database.
Now, it's time to add the DropDownList. Simple right click on DataGrid and select the option Edit template. In the item template, just drag and drop a DropDownList in item template.
Also, add one HTML Button control anywhere on the form.
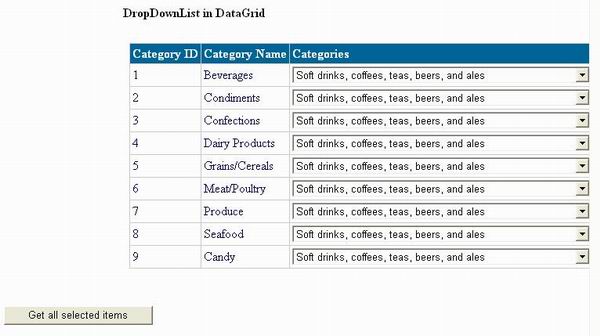
Once you have done all these steps, your DataGrid should look something like this:
Populating DataGrid with Data:
Populating DataGrid is straight forward, just make the data source run a query and bind the source to the DataGrid.
private void Page_Load(object sender, System.EventArgs e)
{
  if(!Page.IsPostBack)
  {
    BindData();
    PopulateList();
  }
}

public void BindData()
{
  SqlDataAdapter ad = new SqlDataAdapter("SELECT * FROM Categories",myConnection);
  DataSet ds = new DataSet();
  ad.Fill(ds,"Categories");
  myDataGrid.DataSource = ds;
  myDataGrid.DataBind();
}
In the code above, I have used Ad-Hoc query, a query in string format. You should never execute your query like this, and always use stored procedures for security purposes.
Populating DropDownList from database:
You can always populate your DropDownList by using its Collections property, but to make things interesting, I am going to populate the DropDownList with the data coming from the database column.
public DataSet PopulateList()
{
  SqlDataAdapter ad = new
    SqlDataAdapter("SELECT Description FROM Categories", myConnection);

  DataSet ds = new DataSet();
  ad.Fill(ds,"Categories");
  return ds;
}
As you see in the above code, the method PopulateList is returning a DataSet. This DataSet is used by the DropDownList to populate itself. Let's see how DropDownList named "ddlList" uses this DataSet to populate itself.
In the aspx page HTML, find the line where DropDownList is declared, and add properties to it.
<asp:DropDownList id="ddlList" runat="server"
    DataSource="<%# PopulateList %>" DataTextField="Description"
    DataValueField="Description" >
After this, your DropDownList will be populated with the data coming from "Description" column of the NorthWind database.
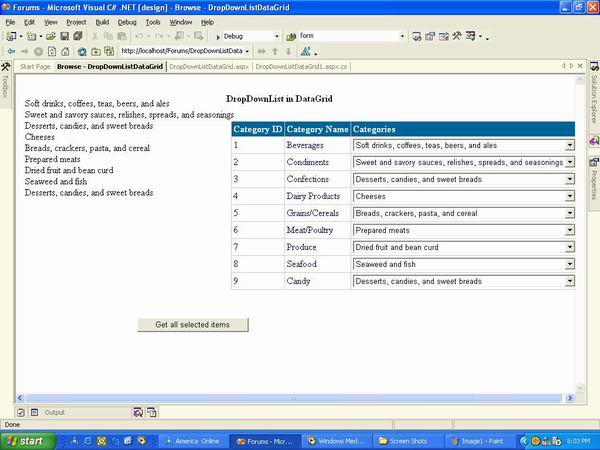
Here is a picture of the complete WebForm:
Button Click Event Code:
Remember that we added a HTML Button control. In the Click event of the Button, write this code:
private void Button1_Click(object sender, System.EventArgs e)
{
  string name = null;
  foreach(DataGridItem dgi in myDataGrid.Items)
  {
    DropDownList dl = (DropDownList)(dgi.Cells[2].Controls[1]);
    if(dl.SelectedValue != null)
    {
      name+= dl.SelectedValue;
      name+="<BR>";
    }
  }
  Label2.Text = name;
}
Okay and that's it. After making your selection from the DropDownList, press button and it will bind your selection with a Label control on the WebForm.
In this code, we are using "DataGridItem" dgi whose purpose is to iterate through the DataGrid items. Next, we make a new DropDownList "dl" and place the value of the DropDownList which is in DataGrid cell [2] (cells start with 0) in it. We check using "if" condition that if the selected value is not null, we concatenate it in the string variable name and display name afterwards.
That's it! Happy coding :D

