Contents
If you want to use WF 4.0 in a WPF based Desktop application, you must ensure data exchange between the workflow and WPF controls. In this article (wrote in tutorial form), I would like to discuss some tips of data exchange implementations; first of all, «direct» data binding between WPF and WF. I hope that your feedback will help me improve and extend the proposed solutions.
This tutorial demonstrates the creation of simple WPF/WF applications with «direct» data binding between the WPF window and the WF variables, in six steps. The resulting application code is available in the download link above.
- Create a “WpfApplication1” project using the WPF Application template.
- Add the “ActivityLibrary1” project using the Workflow Activity Library template.
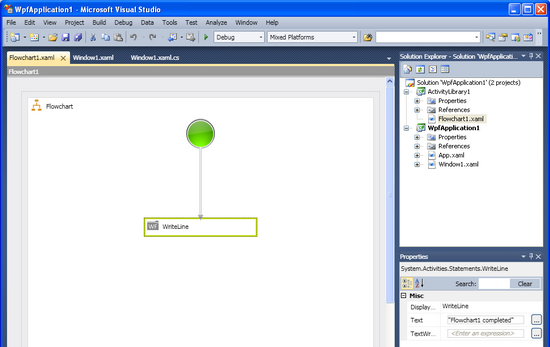
- Add “Flowchart1.xaml” to ActivityLibrary1 using the “Add>New Item…” menu and a Workflow Flowchart template. Add a “
WriteLine” activity with Text="Flowchart1 completed" to Flowchart1 using Workflow Designer:
- Add
System.Activities and ActivityLibrary1 references to “WpfApplication1”. Add a WorkflowInstance member to Window1.xaml.cs:
WorkflowInstance _instance;
- Add a
StackPanel with a "Run Flowchart1" button to Window1.xaml:
<StackPanel>
     <Button Content="Run Flowchart1"
       HorizontalAlignment="Left" Name="button1"
       Margin="20" Click="button1_Click" />
</StackPanel>
- Add a click event handler to Window1.xaml.cs:
private void button1_Click(object sender, RoutedEventArgs e)
{
     _instance = new WorkflowInstance(new Flowchart1());
     _instance.Run();
}
Compile and start a solution WpfApplication1. Now we can start a workflow instance using a button click and check the “Flowchart1 completed" text in the output window. We completed here a simple but important preparation for the more interesting thing!
- Add a “
variable1” string variable with a "MyVariable" default value to the Flowchart1 workflow in the workflow designer.
- Create an interface
IContextProvider in ActivityLibrary1 using the “Add>Class” menu and the interface template
.
using System.Activities;

namespace ActivityLibrary1
{
    public interface IContextProvider
    {
        WorkflowDataContext WorkflowContext { get; set; }
    }
}
- Add a
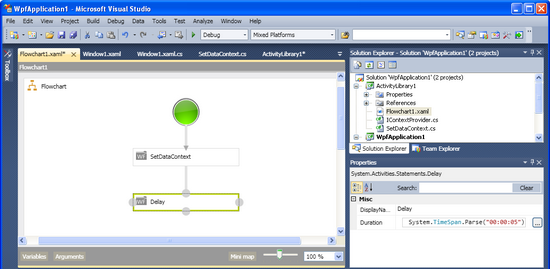
SetDataContext workflow element to ActivityLibrary1 using “Add>New Item…” and the Workflow > Workflow Element template. Set it as the first activity in Flowchart1. Note: It is very important that the SetDataContext activity does not have arguments. Only in this case will it have the same context as the workflow.
public class SetDataContext: CodeActivity
{
    protected override void Execute(CodeActivityContext context)
    {
        IContextProvider rootDataContext = context.GetExtension<icontextprovider>();

        rootDataContext.WorkflowContext = context.DataContext;
    }
}
- Add a 5 sec delay activity to
Flowchart1 after SetDataContext:
- Add a “
_workflowContext” member to Window1.xaml.cs:
WorkflowDataContext _workflowContext;
- Add the
IContextProvider interface to our Window1 class – we will store the workflow context in it: Note: we need a Dispatcher to set Window1.DataContext from the SetDataContext activity because a workflow will not be run on a GUI thread.
public partial class Window1 : Window, IContextProvider
public WorkflowDataContext WorkflowContext
{
    get { return _workflowContext; }
    set
    {
        this.Dispatcher.BeginInvoke(DispatcherPriority.Normal,
            (Action)delegate() { this.DataContext = value; });

        _workflowContext = value;
    }
}
Note: we can use the DataContext of the child activities in the same way.
- Add a workflow instance
OnCompleted event handler to button1_Click. Remove Window1.DataContext in it. After the workflow is completed, the context will be disposed and cannot be used in WFP!
_instance.OnCompleted = delegate(WorkflowCompletedEventArgs we)
{
     this.Dispatcher.Invoke(DispatcherPriority.Normal,
         (Action)delegate() { this.DataContext = null; });
};
- Add a
IContextProvider implementation (Window1) to Extensions before the instance is run for providing access to this interface from the workflow activities:
__instance.Extensions.Add(this);
- Add a
TextBox to Window1.xaml. Add a binding to the text with variable1: Now, after starting the workflow, it will set the “MyVariable” text in the TextBox. After a 5 sec delay, the workflow will be completed, DataContext of Window1 will be removed, and the TextBox will be again empty.
<TextBox Margin="20" Text="{Binding variable1, UpdateSourceTrigger=PropertyChanged}"
         HorizontalAlignment="Left"  Name="textBox1" VerticalAlignment="Top"/>
Now after starting the workflow, it will set the “MyVariable” text in the TextBox. After a 5 sec delay, the workflow will be completed, the DataContext of Window1 will be removed, and TextBox will be empty again.
Okay, but maybe we want to control the workflow from the WPF window. In this case, we need to supply some events in the GUI:
- Add a “
ReadBookmark” activity to ActivityLibrary1 using “Add>New Item…” and the Workflow Element Template. Add a string “Command” input argument. Set the input command as the result of the activity in the Continue() method. Build ActivityLibrary1.
public class ReadBookmark<t> : NativeActivity<t>
{
public InArgument<string> Command { get; set; }
protected override void Execute(ActivityExecutionContext context)
{
context.CreateNamedBookmark(Command.Get(context),
new BookmarkCallback(this.Continue));
}
void Continue(ActivityExecutionContext context,
Bookmark bookmark, object obj)
{
this.Result.Set(context, Command.Get(context));
}
}
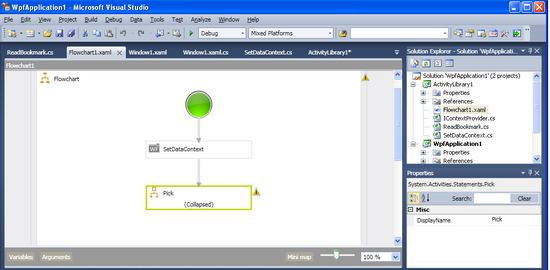
- Add a Pick activity to
Flowchart1 with a PickBranch instead of a 5 sec delay. Add ReadBookmark activities as a trigger to PickBranch. Set the Command argument of ReadBookmark to a value “stop".
- Now, the workflow will wait and resume the “stop” bookmark to continue. We can resume this bookmark with a new
Window1 button “Stop Flowchart1”:
<Button Content="Stop Flowchart1"
   HorizontalAlignment="Left" Margin="20"
   Name="button2" VerticalAlignment="Top"
   Click="button2_Click" />
private void button2_Click(object sender, RoutedEventArgs e)
{
     _instance.ResumeBookmark("stop", null);
}
- For the control workflow state, add a
_isWorkflowStarted bool member to Window1.xaml.cs. Set _isWorkflowStarted to true before the workflow is started:
_isWorkflowStarted = true;
_instance.Run();
And, false when the workflow is completed:
_instance.OnCompleted = delegate(WorkflowCompletedEventArgs we)
{
     this.Dispatcher.Invoke(DispatcherPriority.Normal, (Action)delegate()
     {
          this.DataContext = null; });
      _isWorkflowStarted = false;
};
- Add a window closed event handler and terminate the workflow in it, if workflow has started:
private void Window_Closed(object sender, EventArgs e)
{
     if (_instance!=null && _isWorkflowStarted==true)
         _instance.Terminate("Main Window closed");
}
Now, after starting the workflow ,we see the “MyVariable” text. After this, click the Stop button. The “stop” bookmark will be resolved and flowchart1 will be completed. The DataContext of Window1 will be removed and TextBox will be empty again.
Now, we will carefully enable the state of the buttons:
- Set the initial
IsEnabled state of the stop button to false.
<Button Content="Stop Flowchart1" IsEnabled="False">
- Add the
UpdateUIState() method to the IContextProvider interface.
public interface IContextProvider
{
   WorkflowDataContext WorkflowContext { get; set; }
   void UpdateUIState();
}
- Add an implementation of
UpdateUIState() to the Window1 class. Set the stop button IsEnabled property to depend on the created workflow bookmarks:
public void UpdateUIState()
{
   this.Dispatcher.BeginInvoke(DispatcherPriority.Normal, (Action)delegate()
   {
       button2.IsEnabled = false;
       foreach (BookmarkInfo bookmark in _instance.GetAllBookmarks())
       {
           switch (bookmark.BookmarkName)
           {
               case "stop":
                   button2.IsEnabled = true;
                   break;
           }
        }
    });
}
- Add the “
UpdateUI” activity to ActivityLibrary1 using “Add>New Item…” and the Workflow Element Template. Build ActivityLibrary1.
public class UpdateUI: CodeActivity
{
   protected override void Execute(CodeActivityContext context)
   {
      IContextProvider rootDataContext = context.GetExtension<IContextProvider>();
      rootDataContext.UpdateUIState();
   }
}
- Add the
UpdateUI code activity to Flowchart1 after a Pick activity:
- Update UI using
ReadBookmark.Execute:
IContextProvider rootDataContext = context.GetExtension<IContextProvider>();
rootDataContext.UpdateUIState();
- Disable
button1 when workflow starts and enable it if the workflow has completed.
private void button1_Click(object sender, RoutedEventArgs e)
{
button1.IsEnabled = false;
_instance.OnCompleted = delegate(WorkflowCompletedEventArgs we)
{
this.Dispatcher.Invoke(DispatcherPriority.Normal, (Action)delegate()
{
this.DataContext = null;
button1.IsEnabled = true;
});
_isWorkflowStarted = false;
}
};
Now after application starts, the button stop is disabled. Only when the workflow is started and the bookmark “stop” is created, will the stop button be enabled. Great!
Of course, we can create some GUI direct in our workflow:
- Add the WpfCustomControlLibrary1 project using the “Add>New Project .. ” menu and the Window WPF Custom Control Library template. Add “WorkflowWindow” using the “Add>New Item…” and the WPF Window template. Add a reference to
System.Activities to the WpfCustomControlLibrary1 project. Add a “Workflow” property to “WorkflowWindow”:
public WorkflowInstance Workflow { get; set; }
- Add a
StackPanel with a TextBox to “WorkflowWindow.xaml” with binding to variable1:
<TextBox Margin="20" Text="{Binding variable1}" HorizontalAlignment="Left"/>
Note: to avoid conflicts between Workflow and WPF code we make separate projects.
Note: We use the dialog window for simplicity; for real applications, WPF controls can be used, of course.
- Add a “Close” button to “WorkflowWindow.xaml”. Close the window by clicking this button. Add a Closed handler to “WorkflowWindow.xaml”. Resume the “close” bookmark on window close:
void OnClosed(Object sender, EventArgs e)
{
    Workflow.ResumeBookmark("close", null);
}
<Button Content="Close" Margin="20"
   HorizontalAlignment="Left" Click="button1_Click" />
private void button1_Click(object sender, RoutedEventArgs e)
{
    Close();
}
- Add a workflow instance to the extensions on workflow start in the
button1_Click() method of Window1.cs:
_instance.Extensions.Add(_instance);
- Add a reference to
WpfCustomControlLibrary1 in ActivityLibrary1.
- Create an “
OpenWindow” WorkflowElement in ActivityLibrary1 using “Add>New Item …” and the Workflow>Workflow Element template. It will create a WorkflowWindow, set its Workflow property to the workflow instance, set the WorkflowWindow DataContext to the workflow context, and show the window as a dialog:
public class OpenWindow: CodeActivity
{
    protected override void Execute(CodeActivityContext context)
    {
        IContextProvider rootDataContext = context.GetExtension<IContextProvider>();
        WorkflowInstance instance = context.GetExtension<WorkflowInstance>();
        Application.Current.Dispatcher.BeginInvoke(
                    DispatcherPriority.Normal, (Action)delegate()
        {
            WorkflowWindow1 window = new WorkflowWindow1();
            window.DataContext = rootDataContext.WorkflowContext;
            window.Workflow = instance;
            window.ShowDialog();
        });
    }
}
- Add an “Open” button to Window1.xaml. Resume the “open” bookmark on the “open” button click. Update the button in
UpdateUIState():
<Button Content="Open" IsEnabled="False"
   HorizontalAlignment="Left" Margin="20"
   Name="button3" Click="button3_Click" />
private void button3_Click(object sender, RoutedEventArgs e)
{
    _instance.ResumeBookmark("open", null);
}

public void UpdateUIState()
{
   this.Dispatcher.BeginInvoke(DispatcherPriority.Normal, (Action)delegate()
   {
      button2.IsEnabled = false;
      button3.IsEnabled = false;
      foreach (BookmarkInfo bookmark in
               _instance.GetAllBookmarks(new TimeSpan(0, 0, 1)))
      {
         switch (bookmark.BookmarkName)
         {
             case "stop":
                button2.IsEnabled = true;
                break;
             case "open":
                button3.IsEnabled = true;
                break;
         }
     }
   });
}
- Add a
_command string variable to Flowchart1workflow. Add a PickBranch with the ReadBookmark activity as the Trigger to the Pick activity using the workflow designer. Set ReadBookmark.Command to “open”. Set ReadBookmark.Result to _command.
<p:Pick>
<p:PickBranch>
<p:PickBranch.Trigger>
<a:ReadBookmark x:TypeArguments="x:String"
Command="["stop"]"
Result="[_command]" />
</p:PickBranch.Trigger>
</p:PickBranch>
<p:PickBranch>
<p:PickBranch.Trigger>
<a:ReadBookmark x:TypeArguments="x:String"
Command="["open"]" Result="[_command]" />
</p:PickBranch.Trigger>
</p:PickBranch>
</p:Pick>
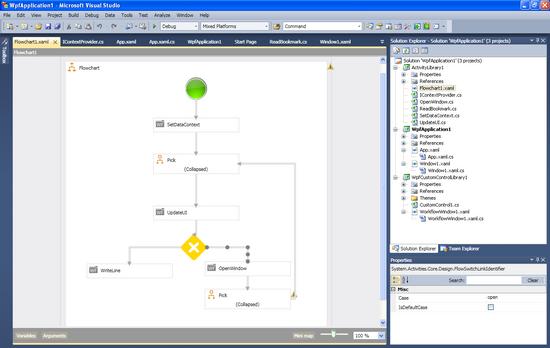
- Add a
FlowSwitch with the expression “_command” and two cases to Flowchart1. If the _command variable is “open”, then switch to the OpenWindow activity. In the default case (_command variable is “stop”), switch to the WriteLine activity with Text="Flowchart1 completed”.
- Add a
Pick activity to Flowchart1 after the OpenWindow activity. Add a PickBranch activity with ReadBookmark activities as Trigger. Set the Command argument of ReadBookmark to the value “close" and save the result in the _command variable. Add a FlowStep from this activity to the first Pick activity in Flowchart1.
Now, on the Open button click, we can open a WPF window from the workflow and change variable1 in this window.
Advanced error handling lets you quickly find and correct system errors. Full error handling depends on the requirements (use cases) of the concrete application, but this minimal error handling has to be implemented:
- We use
Application.Current.Dispatcher to invoke the necessary methods on the GUI thread. We can handle all unhandled Dispatcher exceptions in a special handler:
void Dispatcher_UnhandledException(object sender,
DispatcherUnhandledExceptionEventArgs e)
{
}
- Unhandled exceptions from the workflow can be handled in
OnUnhandledException:
_instance.OnUnhandledException = delegate(WorkflowUnhandledExceptionEventArgs we)
{
};

