Introduction
Data validation is an Excel feature that you can use to define restrictions on what data can or should be entered in a cell. For example, you may want to restrict data entry to a certain range of numbers or limit choices by using a list. This tip presents how to add data validation to a cell programmatically using free Excel API with C#.
This Excel library provides a class named CellRange which contains DataValidation property, enabling programmers to handle validation in a specific cell or range directly. Following sections will demonstrate:
- How to add a numeric validation
- How to create a list validation
- How to handle a data validation alert
Using the Code
Part 1 - Restrict Data Entry to a Decimal Number Within Limits
Initialize an object of Workbook class and get the first sheet to write data.
Workbook wb = new Workbook();

Worksheet sheet = wb.Worksheets[0];
Input same text in the cell B9 and format the cell.
sheet.Range["B9"].Text = "Input Number:";
sheet.Range["B9"].Style.Font.IsBold = true;
sheet.Range["B9"].Style.KnownColor = ExcelColors.Turquoise;
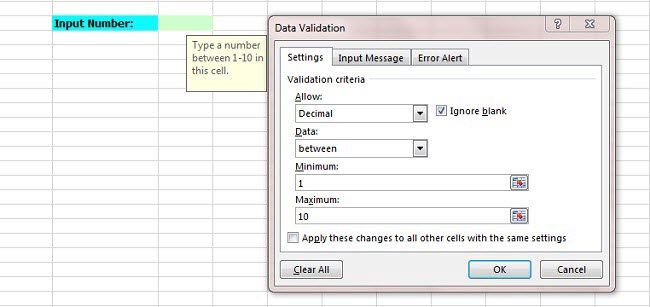
Add numeric validation to C9 by setting the allowed data type as decimal, setting the data range and comparison operator. In order to let users know what kind of data should be entered in the cell, you can choose to show an input message when the user selects the cell.
sheet.Range["C9"].DataValidation.AllowType = CellDataType.Decimal;
sheet.Range["C9"].DataValidation.Formula1 = "1";
sheet.Range["C9"].DataValidation.Formula2 = "10";
sheet.Range["C9"].DataValidation.CompareOperator = ValidationComparisonOperator.Between;
sheet.Range["C9"].DataValidation.InputMessage = "Type a number between 1-10 in this cell.";
sheet.Range["C9"].Style.KnownColor = ExcelColors.LightGreen1;
Output

Part 2 - Restrict Entry to Predefined Items in a List
Insert some data in the cell B2 and format the cell.
sheet.Range["B2"].Text = "Department:";
sheet.Range["B2"].Style.Font.IsBold = true;
sheet.Range["B2"].Style.KnownColor = ExcelColors.Turquoise;
To create an in-cell dropdown list, we need to input some data in source that will be displayed as items, then set IsSuppressDropDownArrow property as false to show arrow button which, when clicked, will display the dropdown list.
sheet.Range["C2"].DataValidation.Values = new string[]{ "Sales", "HR", "R&D", "Finance" };
sheet.Range["C2"].DataValidation.IsSuppressDropDownArrow = false;
sheet.Range["C2"].Style.KnownColor = ExcelColors.LightGreen1;
Output

Part 3 - Custom Data Validation Alert
Once the data validation is applied, people are not allowed to enter data in a cell that doesn’t match validation in the cell. If they do, they’ll see a data validation error alert.

Instead of showing the default error alert, we could also custom the error alert through the following method:
sheet.Range["C2"].DataValidation.AlertStyle = AlertStyleType.Warning;
sheet.Range["C2"].DataValidation.ShowError = true;
sheet.Range["C2"].DataValidation.ErrorTitle = "Error001";
sheet.Range["C2"].DataValidation.ErrorMessage = "Please select an item from list!";

Conclusion
This article only gives examples for numeric and list validation, if interested, you can download this project (not including the DLL file) and create validations to restrict data entry to a date/time within a time frame, restrict data entry to text of a specified length, etc.
