This is part II of article about Drupal and Android integration. In the Part I,
I wrote about principles of communication and how to implement Drupal module. In this part of article i'll describe how to implement Android application.
3. Android application
We finished with Drupal configuration and server-side code, and now we create Android client application. It will be an app first asking user to enter username and password and press "Ok" button. If login is succeeded, app show user an activity, where he can enter page title and body, make photo, and post it to the server. XML-RPC is not supported on Android out-of-box, but there is a good library from Redstone. (http://xmlrpc.sourceforge.net/). Redstone's license is commercial friendly, so you can use this library in your commercial applications for free. I modified it to work it properly on Android. And you can download code with my modifications (link is given in the end of article).
Redstone XML-RPC contains many classes, but to start using it, you need to know a few of them. XmlRpcClient acts as XML-RPC client, sending requests to server. It takes url of endpoint to connect to. For example: http://yoursite.com/?q=android.
XmlRpcStruct is XML-RPC named values structure, where each member has it's name and value. Similar to Map. Many XML-RPC method arguments and return values are passed in this structure.
All Drupal conversations will be implemented in DrupalConnect class. This class will contain methods for authentication, logout, post page, delete page and upload photo. For photo uploads, i created http client. It's more lightweight, than standard Android clients, and supports upload progress reporting. You can find it in my source code for Android app. DrupalConnect is made as singlton pattern, because there is only one connection per app, and it must be available from many places.
Define urls. Please, replace URLBASE value with your Drupal website address.
final static private String URLBASE = "http://192.168.1.9/drupal";
final static private String XMLRPC = URLBASE + "/?q=androidrpc";
final static private String PHOTOUPLOAD = URLBASE + "/?q=photoupload";
Now, implement the login method:
public void login(String username, String password) throws IOException, XmlRpcException, XmlRpcFault {
if (isAuthenticated())
logout();
XmlRpcClient xmlrpc = new XmlRpcClient(XMLRPC, false);
XmlRpcStruct res = (XmlRpcStruct) xmlrpc.invoke("user.login", new Object[] { username, password });
sessid = res.getString("sessid");
session_name = res.getString("session_name");
}
First, we check if already authenticated, and if so, perform logout.
Next, create XmlRpcClient. First argument is endpoint url, second - whether to stream messages. Message streaming not compatible with all
server-side implementations, so set it to false.
The actual remote method invocation performed by xmlrpc.invoke.
First argument is a method name, and second is array of arguments - if this case, it's username and password. invoke method can have many return types.
In the case of user.login method, it will be XmlRpcStruct structure containing info about session and logged in user (email, UID, etc).
Drupal session defined by the two members of returned structure: sessid and session_name. Save them to be used in all subsequent remote calls,
to identify our session. As we defined login method, we also must define logout.
public void logout() throws MalformedURLException, XmlRpcException, XmlRpcFault {
if (!isAuthenticated())
return ;
try {
XmlRpcClient xmlrpc = new XmlRpcClient(XMLRPC, false);
xmlrpc.setRequestProperty("Cookie", getSessionCookieString());
xmlrpc.invoke("user.logout", new Object[] { });
}
catch (Exception ex) {
ex.printStackTrace();
}
sessid = null;
session_name = null;
}
First, check if we are authenticated. If no, just return. Next, create XmlRpcClient. Please, take a look at setRequestProperty
method call. This method sets additional http header that will be sent with XML-RPC request. We set Cookie identifying Drupal session.
We created login and logout methods. And now we make postPage method.
@SuppressWarnings("unchecked")
public int postPage(String title, String body) throws IOException, XmlRpcException, XmlRpcFault {
if (!isAuthenticated()) {
throw new IllegalStateException("Session is not open.");
}
XmlRpcClient xmlrpc = new XmlRpcClient(XMLRPC, false);
xmlrpc.setRequestProperty("Cookie", getSessionCookieString());
XmlRpcStruct params = new XmlRpcStruct();
params.put("type", "page");
params.put("title", title);
params.put("body", body);
XmlRpcStruct res = (XmlRpcStruct) xmlrpc.invoke("node.create", new Object[] { params });
return Integer.parseInt(res.get("nid").toString());
}
And again, first check if user is authenticated. Then create XML-RPC client and setup session cookie. Next, create structure defining node params.
type = "page", title and body. And perform the remote call. Remote call returns structure,
where we need "nid" member - it's page node identifier, that will be used, for example, to remove page or update it.
Create deletePage method.
public boolean deletePage(int nid) throws IOException, XmlRpcException, XmlRpcFault {
if (!isAuthenticated()) {
throw new IllegalStateException("Session is not open.");
}
XmlRpcClient xmlrpc = new XmlRpcClient(XMLRPC, false);
xmlrpc.setRequestProperty("Cookie", getSessionCookieString());
XmlRpcStruct params = new XmlRpcStruct();
params.put("nid", ""+nid);
return (Boolean) xmlrpc.invoke("node.delete", new Object[] { params });
}
Method start is the same, as previous. Remote method params is structure, that contains only page nid. And return type of remote method is boolean,
indicating, whether page is deleted or not.
Now, create
uploadPhoto method, for photo uploads.
public void uploadPhoto(PhotoParams params, HttpProgressListener listener) {
if (!isAuthenticated()) {
throw new IllegalStateException("Session is not open.");
}
HttpMultipartClient httpClient = new HttpMultipartClient(PHOTOUPLOAD, listener);
httpClient.addHeader("Cookie", getSessionCookieString());
httpClient.addField("form_id", "photoupload_upload_file");
httpClient.addField("op", "Upload");
httpClient.addField("nid", ""+params.nid);
httpClient.addFile("files[image]", "image/jpeg", params.fileName, params.file);
httpClient.post();
}
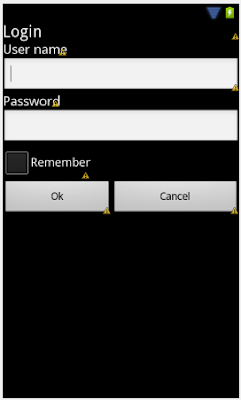
It's all done with DrupalConnect class. Now, create login activity. It will contain two EditText controls for login and password,
remember check box, used to remember last succesful login data, login and cancel buttons.
In the LoginActivity class, first define the UI control variables.
private EditText editUsername;
private EditText editPassword;
private CheckBox checkRemember;
private Button buttonOk;
private Button buttonCancel;
In the onCreate method, get UI controls, setup button handlers.
@Override
public void onCreate(Bundle savedInstanceState) {
super.onCreate(savedInstanceState);
setContentView(R.layout.activity_login);
editUsername = (EditText) findViewById(R.id.editUsername);
editPassword = (EditText) findViewById(R.id.editPassword);
checkRemember = (CheckBox) findViewById(R.id.checkRemember);
buttonOk = (Button) findViewById(R.id.buttonOk);
buttonOk.setOnClickListener(new OnClickListener() {
@Override
public void onClick(View v) {
onButtonOk();
}
});
buttonCancel = (Button) findViewById(R.id.buttonCancel);
buttonCancel.setOnClickListener(new OnClickListener() {
@Override
public void onClick(View v) {
onButtonCancel();
}
});
PrefsHelper.setup(this, "AndroidDrupal");
loadAuthData();
}
Now, define the "Ok" button handler.
public void onButtonOk() {
final String username = editUsername.getText().toString();
final String password = editPassword.getText().toString();
StringBuilder errors = null;
if (username.trim().length() == 0 || !username.matches("\\w+")) {
if (errors == null)
errors = new StringBuilder();
errors.append("Invalid user name\n");
}
if (password.trim().length() == 0 || !password.matches("\\w+")) {
if (errors == null)
errors = new StringBuilder();
errors.append("Invalid password\n");
}
if (errors != null) {
GUIHelper.showError(this, errors.toString());
return ;
}
final ProgressDialog dlg = ProgressDialog.show(this, "Logging in",
"Logging in. Please wait.", true, true);
(new AsyncTask<Void, Void, String>() {
@Override
protected String doInBackground(Void... params) {
try {
DrupalConnect.getInstance().login(username, password);
return "OK";
}
catch (Exception ex) {
return ex.getMessage();
}
}
@Override
protected void onPostExecute(String result) {
dlg.dismiss();
if (result.equals("OK")) {
saveAuthData();
Intent intent = new Intent(LoginActivity.this, PostActivity.class);
startActivity(intent);
finish();
}
else {
GUIHelper.showError(LoginActivity.this, "Login is failed. " + result);
}
}
}).execute();
}
First, it checks username and password, and if it's error - show error message and return. Next, create ProgressDialog,
showing "Logging in. Please wait.". And then, create AsyncTask to perform login. In it's doInBackground
we call our singleton DrupalConnect class method login. In onPostExecute method (called after doInBackground is complete),
we check the result. If all is ok, switch to the next activity. If there is an error, show the message describing what's wrong.
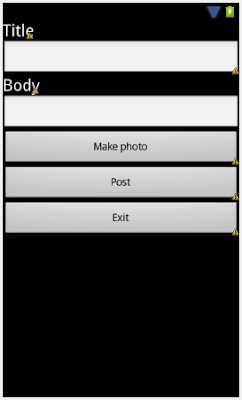
We created our first activity for user login. And how create the main application activity, call it PostActivity. It will be simple
activity with two EditText controls for title and body, and three buttons: make photo, post and exit. User will enter title and body, and if he wants to also attach a photo,
he clicks "Make photo" button. When all done, he clicks "Post" button, to make post and upload photo (if he made it).
Define the UI control varibles.
private EditText editTitle;
private EditText editBody;
private Button buttonMakePhoto;
private Button buttonPost;
private Button buttonExit;
Get UI controls and setup button handlers in the onCreate method.
@Override
public void onCreate(Bundle savedInstanceState) {
super.onCreate(savedInstanceState);
setContentView(R.layout.activity_post);
editTitle = (EditText) findViewById(R.id.editTitle);
editBody = (EditText) findViewById(R.id.editBody);
buttonMakePhoto = (Button) findViewById(R.id.buttonMakePhoto);
buttonMakePhoto.setOnClickListener(new OnClickListener() {
@Override
public void onClick(View v) {
makePhoto();
}
});
buttonPost = (Button) findViewById(R.id.buttonPost);
buttonPost.setOnClickListener(new OnClickListener() {
@Override
public void onClick(View v) {
postPage();
}
});
buttonExit = (Button) findViewById(R.id.buttonExit);
buttonExit.setOnClickListener(new OnClickListener() {
@Override
public void onClick(View v) {
exit();
}
});
}
Create the "Make photo" button handler.
private void makePhoto() {
if (!CameraHelper.isMediaStorageAvailable()) {
GUIHelper.showError(this, "SD card is not available. It needed to store photos");
return ;
}
Intent intent = new Intent(MediaStore.ACTION_IMAGE_CAPTURE);
CameraHelper.photoFile = CameraHelper.getOutputMediaFile(CameraHelper.MEDIA_TYPE_IMAGE);
intent.putExtra(MediaStore.EXTRA_OUTPUT,
Uri.fromFile(CameraHelper.photoFile));
startActivityForResult(intent, CAPTURE_IMAGE_ACTIVITY_REQUEST_CODE);
}
It calls Android's standard image capture activity to capture the image from the camera. Now we need to override onActivityResult in PostActivity
to get the capture result. It will be called after the camera activity is closed.
@Override
public void onCreate(Bundle savedInstanceState) {
super.onCreate(savedInstanceState);
setContentView(R.layout.activity_post);
editTitle = (EditText) findViewById(R.id.editTitle);
editBody = (EditText) findViewById(R.id.editBody);
buttonMakePhoto = (Button) findViewById(R.id.buttonMakePhoto);
buttonMakePhoto.setOnClickListener(new OnClickListener() {
@Override
public void onClick(View v) {
makePhoto();
}
});
buttonPost = (Button) findViewById(R.id.buttonPost);
buttonPost.setOnClickListener(new OnClickListener() {
@Override
public void onClick(View v) {
postPage();
}
});
buttonExit = (Button) findViewById(R.id.buttonExit);
buttonExit.setOnClickListener(new OnClickListener() {
@Override
public void onClick(View v) {
exit();
}
});
}
Next, implement the "Post" button handler.
private void postPage() {
if (isPostInProgress) {
return ;
}
isPostInProgress = true;
final String title = editTitle.getText().toString();
final String body = editBody.getText().toString();
final ProgressDialog progressDialog = ProgressDialog.show(this,
"Posting", "Posting. Please, wait.", true, false);
(new AsyncTask<Void, Void, Boolean>() {
Exception e;
@Override
protected Boolean doInBackground(Void... params) {
try {
nid = DrupalConnect.getInstance().postPage(title, body);
return true;
}
catch (Exception e) {
this.e = e;
return false;
}
}
@Override
protected void onPostExecute(Boolean result) {
super.onPostExecute(result);
progressDialog.dismiss();
if (result) {
if (CameraHelper.photoFile != null) {
uploadPhoto();
}
else {
GUIHelper.showMessage(PostActivity.this, "Post succeeded.", "Message");
isPostInProgress = false;
}
}
else {
GUIHelper.showError(PostActivity.this, "Post is failed. "+e.getMessage());
isPostInProgress = false;
}
}
}).execute();
}
It gets the page title and body from the EditText controls, then shows the progress dialog with the "Posting. Please, wait." message. And then
creates an AsyncTask for performing the call to Drupal. Please look at the onPostExecute method of AsyncTask, it hides the progress dialog and checks for the post result.
If post succeeds and there is also a photo made by the user, it calls the uploadPhoto method. The code for this method is given below:
private void uploadPhoto() {
final ProgressDialog progressDialog = new ProgressDialog(this);
progressDialog.setTitle("Uploading photo");
progressDialog.setMessage("Uploading photo");
progressDialog.setProgressStyle(ProgressDialog.STYLE_HORIZONTAL);
progressDialog.setIndeterminate(false);
progressDialog.setCancelable(false);
progressDialog.show();
(new AsyncTask<Void, Integer, Boolean>() {
Exception e;
@Override
protected Boolean doInBackground(Void... params) {
PhotoParams photoParams = new PhotoParams();
photoParams.nid = nid;
photoParams.file = CameraHelper.photoFile;
photoParams.fileName = CameraHelper.photoFile.getName();
DrupalConnect.getInstance().uploadPhoto(photoParams, new HttpProgressListener() {
@Override
public void sendStarted(int total) {
publishProgress(0, total);
}
@Override
public void sendProgress(int uploaded, int total) {
publishProgress(uploaded, total);
}
@Override
public void sendError(Exception ex) {
e = ex;
}
@Override
public void sendDone() {
}
});
return null;
}
@Override
protected void onPostExecute(Boolean result) {
super.onPostExecute(result);
progressDialog.dismiss();
if (e == null) {
deletePhoto();
GUIHelper.showError(PostActivity.this, "Post and upload are succeeded.");
}
else {
GUIHelper.showError(PostActivity.this, "Upload is failed. "+e.getMessage());
deletePage();
}
isPostInProgress = false;
}
@Override
protected void onProgressUpdate(Integer... values) {
super.onProgressUpdate(values);
int sent = values[0];
int total = values[1];
if (sent == 0) {
progressDialog.setMax(total);
}
progressDialog.setProgress(values[0]);
}
}).execute();
}
First, it show progress dialog with "Uploading photo" message, and starts AsyncTask for the actual upload. It create PhotoParams
structure with photo file, file name, and page node identifier (the page to which a photo be attached). Calls DrupalConnect's uploadPhoto method, passing
it PhotoParams and http progress listener arguments. Listener reports http upload progress. It's sendProgress method calls AsyncTask's
publishProgress to update progress dialog's progress. The actual progress dialog update is performed in onProgressUpdate
method of our async task. When upload is done, onPostExecute hides progress dialog, and checks for result. If all is ok, it show
"Post and upload are succeeded." message. But, if there is an error, we must delete page as it's already created on Drupal's side,
but our transaction is failed. To perform this, call method deletePage of PostActivity. The code for deletePage is given below:
private void deletePage() {
if (nid == 0) {
return ;
}
(new AsyncTask<Void, Void, Boolean>() {
@Override
protected Boolean doInBackground(Void... params) {
try {
DrupalConnect.getInstance().deletePage(nid);
nid = 0;
}
catch (Exception e) {
e.printStackTrace();
}
return null;
}
}).execute();
}
And again, we create the AsyncTask to perform Drupal remote call. We pass page nid (stored from last postPage call) to DrupalConnect's deletePage method.
And finally, we need to implement handlers for "Exit" button. It will perform logout and close PostActivity.
private void exit() {
    (new AsyncTask<Void, Void, Boolean>() {
        @Override
        protected Boolean doInBackground(Void... params) {
            try {
                DrupalConnect.getInstance().logout();
            }
            catch (Exception e) {
                e.printStackTrace();
            }
            return null;
        }

        @Override
        protected void onPostExecute(Boolean result) {
            super.onPostExecute(result);

            PostActivity.this.finish();
        }
    }).execute();
}
And again, conversation with DrupalConnect is made in AsyncTask.
Summary
You can see, how easy it's to connect Drupal and Android using XML-RPC. I shown only how to create and delete pages and upload photos,
it's also possible to manipulate other Drupal objects (comments, files, users, etc), register new users and more.
This approach is applicable to other web CMSes, that supports XML-RPC, and to other mobile platforms.
Please, send me your comments and suggestions.
You can download source code for this article
here:https://github.com/BItGriff/AndroidDrupal/archive/master.zip.
If you need more information about Drupal remote methods, you can read my next article
Remote operations on Drupal objects. Technical details.
My name is Andrey Moskvichev.
I'm a software developer with more than 14 years of programming experience.
I specialize in networking, Unix systems (Linux, FreeBSD), mobile programming, computer graphics, software architecture, reverse engineering, data processing systems, AI, computer vision.
I'm interested in all new cutting edge technologies.


 General
  News
News  Suggestion
  Question
  Bug
Bug  Answer
  Joke
Joke  Praise
  Rant
Rant  Admin
Admin 


