Introduction
For many applications, the SQL Server database doesn't only hold business data. There is a good chance that the sys.messages table holds custom messages for the application and that another table may be used for application wide defaults. These repositories for messages, defaults, and so on help the developer to maintain the vital attribute of consistency. When it comes to developing an ASP.NET application, we need to make regular references to these tables to determine the message ID of a particular message from the database, or the exact name or value of a default. My experience has been that this can lead to shortcuts and inconsistency. What is needed is a hassle-free way of generating a class and enums for my messages.
What I required was all my messages for the application to be held in sys.messages and all my application defaults to be held in my table PortDefaults. In SQL Server, they are available to other developers who want to run ad hoc queries directly on the database, and to Stored Procedures and user defined functions which are the only access the ASP.NET application has to the database. When writing VB.NET code for the application, I required intellisense to offer me a list of the available messages and defaults for me to choose from so I did not need to constantly be referring back to my SQL tables. Most of all, I wanted all this to be fuss and maintenance free. If another developer had added a new set of messages, I wanted them to be available to me without any need to change other tables or code. If I added a new default to the database, I wanted it to show on my intellisense prompt.
The fabulous BuildProvider class in conjunction with the CodeDom allowed these goals to be achieved easily, with considerable help from two excellent articles:
Development Tools
The code in this article was developed in Visual Studio 2005, using VB.NET 2005.
Background
The application I am dealing with has hundreds of messages associated with it, and I realized that having the entire list appear in the intellisense drop down each time was going to be too much, so I decided that tables that I would use would have three columns:
- An ID column: An integer unique to the message, this would be the integer value of my enum field value.
- A text column: The message text which would be the enum field name. Of course, I would have to get rid of any punctuation for the name to be valid.
- A group column: A group name for the message to belong to, which would be the enum's name. Fortunately, like many, I had readymade groups for my messages in sys.messages, with different number ranges representing different types of messages, e.g., 50001-59999 for information, 70000-79999 for error etc.
sys.messages doesn't have a "group" column, so I created a view to supply one:
SELECT message_id,
CASE
    WHEN message_id < 60000 THEN 'Information'
    WHEN message_id < 70000 THEN 'Warning'
    WHEN message_id < 80000 THEN 'Error'
END AS [group],
text FROM sys.messages
WHERE (message_id > 50000)
Using the Code
There are three distinct elements to our task. The first is to establish where our data tables are and which columns we are interested in. The second is generating the code based on the contents of our data tables. The third is to get Visual Studio to create the code automatically when we are developing code. The code we want to create is going to be something similar to:
Namespace repository
    Class SqlMessage
        Enum Information
            The_task_has_completed_successfully = 50001
            Your_password_was_changed = 50002
        End Enum
        Enum Warning
            Stock_of_this_item_is_now_low = 60001
            This_supplier_will_not_deliver_at_weekends = 60002
            Your_password_will_expire_in_PARM_days
        End Enum
        Enum Error
            No_items_were_found = 70001
            This_account_has_not_been_authorised = 70002
            Your_password_has_expired = 70003
        End Enum
    End Class
End Namespace
We start by creating an XML file to hold information about our SQL connection, data tables, and columns, and a few details about what we want to create. We will give the file an extension of .repos. Any unused extension will do, but the extension will be important later. The name of the file is not important. Our XML file will look similar to this:
="1.0"="utf-8"
<repositorys namespace="repository">
<repository
connectionString= "SERVER=.\SQLEXPRESS;
DATABASE=portsys;Integrated Security=SSPI"
tableName="PortMessagesView"
numberColumnName="message_id"
groupColumnName="group"
textColumnName="text"
className="SqlMessage" />
<repository
connectionString= "SERVER=.\SQLEXPRESS;
DATABASE=portsys;Integrated Security=SSPI"
tableName="PortDefaultsView"
numberColumnName="uid"
groupColumnName="group"
textColumnName="name"
className="PortDefaults" />
</repositorys>
<repositorys> has the namespace attribute which specifies the namespace that our created code will be in.
I have shown two <repository>s here to demonstrate that multiple repository entries can be made in the same file. The attributes for <repository> are:
connectionString - to get connected to the database.tableName - to specify which table (or in our case, view) the data we want is in.numberColumnName - to specify the column in the table containing the unique integer identifier.groupColumnName - to specify the column in the table containing the group that the message belongs to.textColumnName - to specify the column containing the text of the message.className - to specify the name of our class in our created code.
You must specify all attributes for each repository.
We now know enough to move on to the second task: generating the code. If you are not familiar with the CodeDom, this is not the article to learn much from, but hopefully will be enough to inspire you to investigate further. We will navigate through our XML file, creating a CodeCompileUnit and adding our namespace on the way.
Try
Dim filename As String = MyBase.VirtualPath
Dim xmlStream As Stream = VirtualPathProvider.OpenFile(MyBase.VirtualPath)
xmlFile.Load(xmlStream)
Catch ex As XPath.XPathException
System.Console.WriteLine("XML Exception:" & ex.Message)
Catch ex As Exception
System.Console.WriteLine("Exception:" & ex.Message)
End Try
navigator = xmlFile.CreateNavigator
Dim createdCode As New CodeCompileUnit
Dim createdNamespace As New CodeNamespace
Dim ns As String = ""
iterator = navigator.Select("/repositorys")
iterator.MoveNext()
ns = iterator.Current.GetAttribute("namespace", "")
If ns = "" Then
ns = "DefaultRepository"
System.Console.WriteLine("No namespace found - using default")
End If
createdNamespace.Name = ns
createdCode.Namespaces.Add(createdNamespace)
Dim comment As New CodeCommentStatement("This code has " & _
"been generated by the message repository tool")
createdNamespace.Comments.Add(comment)
iterator = navigator.Select("/repositorys/repository")
Do While iterator.MoveNext
Dim cs As String = iterator.Current.GetAttribute("connectionString", "")
If cs = "" Then
System.Console.WriteLine("connectionString not specified " & _
"for repository " & iterator.Current.Name)
Exit Sub
End If
We now know what all our attributes are, so we can go on to fill the namespace with a class using CodeTypeDeclaration. Then, fill the class with one or more enums (depending on how many groups there are) using CodeTypeDeclaration with isEnum set to True. Each enum is filled with declarations using CodeMemberField to create the field and CodePrimitiveExpression to set its value. The field name must comprise only alphas and underscores, so a quick function filterName will clean the text up for use.
Private Function filterName(ByVal source As String) As String
    Dim filtered As String = ""
    For Each letter As Char In source.ToCharArray
        If Not Char.IsLetter(letter) Then
            If letter = "%"c Then
                filtered &= "PARM"
            Else
                letter = "_"c
                filtered &= letter
            End If
        Else
            filtered &= letter
        End If
    Next
    Return filtered
End Function
The filtered function returns PARM in place of the percent sign, just to highlight that a parameter is expected for the message. Not perfect, as it does not deal with escaped % signs, but is adequate for our purposes.
Dim messageClass As CodeTypeDeclaration = New CodeTypeDeclaration(cn)
messageClass.Name = cn
createdNamespace.Types.Add(messageClass)
Dim allDa As SqlDataAdapter = New SqlDataAdapter("select * from " & tn, cs)
Dim allDs As DataSet = New DataSet
allDa.Fill(allDs)
Dim groupsDa As SqlDataAdapter = _
New SqlDataAdapter("select distinct [" & _
gc & "] from " & tn, cs)
Dim groupsDs As DataSet = New DataSet
groupsDa.Fill(groupsDs)
For Each group As DataRow In groupsDs.Tables(0).Rows
Dim currentGroup As String = group.Item(0)
Dim createEnum As CodeTypeDeclaration = New CodeTypeDeclaration(currentGroup)
createEnum.IsEnum = True
messageClass.Members.Add(createEnum)
For Each datarow As DataRow In allDs.Tables(0).Select(_
"[" & gc & "]='" & _
currentGroup & "'")
Dim fieldName As String = filterName(datarow.Item(tc).ToString)
Dim fieldValue As Integer = CInt(datarow.Item(nc))
Dim field As CodeMemberField = New CodeMemberField
field.Name = fieldName
field.InitExpression = New CodePrimitiveExpression(fieldValue)
createEnum.Members.Add(field)
Next
Next
We now have everything in our CodeCompileUnit. Of course we have not done anything with it yet. Our next task is to get the code in our CodeCompileUnit to be made available to our application. For this we use the BuildProvider facilities available to ASP.NET. If you have never come across the BuildProvider before, then be warned - this really is as easy as it looks!
First, we need to tell ASP.NET about our provider, which we do in web.config. I have created a folder in my App_Code folder called CustomBuilders, which is where I will put the builder. We specify this in <codeSubDirectories>. The namespace and class of my BuildProvider will be CustomBuilders.ReposBuilder. We specify this in the type attribute of <add> in <buildProviders>. Earlier, you will remember, we created our input XML file with a file extension of .repos. This is specified in the extension attribute of <add>. The entry in the web.config file will be similar to the example below:
<system.web>
<compilation debug="true">
<codeSubDirectories>
<add directoryName="CustomBuilders"/>
</codeSubDirectories>
<assemblies>
<add assembly="System.Design, Version=2.0.0.0,
Culture=neutral, PublicKeyToken=B03F5F7F11D50A3A"/>
<add assembly="System.Windows.Forms, Version=2.0.0.0,
Culture=neutral, PublicKeyToken=B77A5C561934E089"/>
<add assembly="VSLangProj, Version=7.0.3300.0,
Culture=neutral, PublicKeyToken=B03F5F7F11D50A3A"/>
</assemblies>
<buildProviders>
<add extension=".repos" type="CustomBuilders.ReposBuilder"/>
</buildProviders>
</compilation>
...
</system.web>
The extension attribute of .repos (or whatever extension you chose for your XML input file earlier on) is the wonderful thing about the BuildProvider. Now, every time you place a file with the .repos (or whatever) extension into the App_Code folder, the BuildProvider will be triggered to generate the code you have specified. You won't see the code (just as you don't see so much of the code in ASP.NET 2.0), but it's there, and as if by magic, your newly generated namespace and classes will be there for you to use.
So (at last!), it is time to bring things together by creating our custom builder namespace (CustomBuilders) containing our build provider (ReposBuilder). We inherit the BuildProvider class and provide just one override for the GenerateCode method which will contain our code-generating code and a couple of lines to write out the code.
Imports Microsoft.VisualBasic
Imports System
Imports System.IO
Imports System.Text
Imports System.Web
Imports System.Web.UI
Imports System.Web.Hosting
Imports System.Web.Compilation
Imports System.CodeDom
Imports System.Xml
Imports System.Data
Imports System.Data.SqlClient
Namespace CustomBuilders
<BuildProviderAppliesTo(BuildProviderAppliesTo.Code)> _
Public Class ReposBuilder
Inherits BuildProvider
Private xmlFile As New XmlDocument
Private navigator As XPath.XPathNavigator
Private iterator As XPath.XPathNodeIterator
Public Overrides Sub GenerateCode(ByVal assemblyBuilder _
As System.Web.Compilation.AssemblyBuilder)
MyBase.GenerateCode(assemblyBuilder)
If Not (createdCode Is Nothing) Then
assemblyBuilder.AddCodeCompileUnit(Me, createdCode)
End If
End Sub
End Class
End Namespace
This VB file needs to be placed in the App_Code/CustomBuilders folder that we created earlier. No need to compile - nothing else required beyond this code, only the web.config entries and our XML input file with the .repos extension in the App_Code folder.
So what do we get?
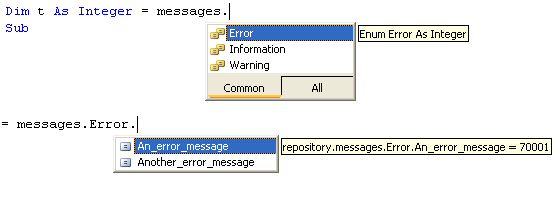
When you add your .repos file to the App_Code folder, ASP.NET will see to the code creation for you. If you go to the VB code for a page and add an import, you will see (in our case) he {}repository come up on the list. Having imported it, you can use a simple statement like:
dim t as integer = message.error.No_items_were_found
When you enter the dot after the message, the intellisense will offer you Error|Information|Warning, and as you enter the dot after Error, the intellisense dropdown offers you all your error messages. The variable t will be assigned the message number from your message table. The designer is even kind enough to put them all in alphabetical order for you!
Points of Interest
If, like me, you tend to shy away from some of the less obvious features of ASP.NET, because you don't have time to acquire the skills or feel that the return on the effort would not be worthwhile, think again when it comes to the BuildProvider. It really is so straightforward to use, and even a simple application like this could reap gains in a very short time, not to mention improvements in consistency and reductions in maintenance.
This member has not yet provided a Biography. Assume it's interesting and varied, and probably something to do with programming.


 General
  News
News  Suggestion
  Question
  Bug
Bug  Answer
  Joke
Joke  Praise
  Rant
Rant  Admin
Admin 


 Be Humble in Victory and Strong in Defeat.
 It is there now.