Introduction
When you first heard about the 3D possibilities of WPF, you probably thought that it's a great improvement. But then you discovered that the existing 2D controls become obsolete when you make the decision of using a 3D interface.
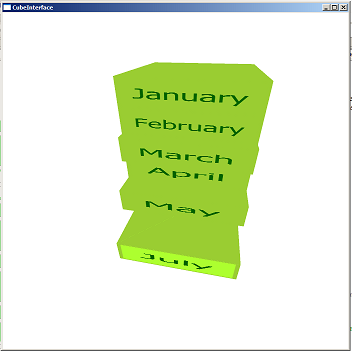
The goal of this article is to explain the necessary steps you have to take in order to reuse the power of your existing controls in a 3D application. We will do this by example, building the 3D correspondent of a generic 2D listbox (by generic, we understand that the list elements can be any 2D control).
The Code
To run the code correctly, you will need Visual Studio 2005 with the Orcas extensions from June and the .NET Framework 3.0 June CTP. I am no graphic artist, but the 3D animation effects look great and could be made to look even better.
Basic 3D Theory and Practice
The first prerequisite required to understand this article is having a basic understanding of 3D theory and how 3D interfaces are built in WPF. Dont worry if you don't have this knowledge though, this article contains all the information that is required and a bit more.
The Problem
Let's analyse the problem first. I hope you all read the article on 3D in WPF, because we will start using that info right now.
In short, to create a 3D interface in WPF, you create a ViewPort instance. The ViewPort object will contain as children all 3D objects that you will see at runtime. These objects are are in fact sets of triangles that get defined by three points (remember the order counts!).
It is on these 3D objects (models) that we have to put the 2D controls that we want to use; the problem is: how do we do it?
The Solution
We will render the visual aspect of the control on a model just as we would put a texture on it. To do this, when we create the model, we will have to specify a mapping between the 3D coordinate system of the model and the 2D one of the control. For at least three Point3D objects on the model, we have to specify a corresponding Point2D on the control. The function that creates a cube model now becomes:
private void createCubeModel()
{
Material material;
GeometryModel3D triangleModel;
triangleMesh = new MeshGeometry3D();
Point3D point0 = new Point3D(1, 5, 5);
Point3D point1 = new Point3D(1, 5, -5);
Point3D point2 = new Point3D(-1, 5, 5);
Point3D point3 = new Point3D(-1, 5, -5);
Point3D point4 = new Point3D(1, -5, 5);
Point3D point5 = new Point3D(1, -5, -5);
Point3D point6 = new Point3D(-1, -5, 5);
Point3D point7 = new Point3D(-1, -5, -5);
triangleMesh.Positions.Add(point0);
triangleMesh.TextureCoordinates.Add(new System.Windows.Point(0, 2000));
triangleMesh.Positions.Add(point1);
triangleMesh.TextureCoordinates.Add(new System.Windows.Point(2000, 2000));
triangleMesh.Positions.Add(point2);
triangleMesh.TextureCoordinates.Add(new System.Windows.Point(0, 0));
triangleMesh.Positions.Add(point3);
triangleMesh.TextureCoordinates.Add(new System.Windows.Point(2000, 0));
triangleMesh.Positions.Add(point4);
triangleMesh.Positions.Add(point5);
triangleMesh.Positions.Add(point6);
triangleMesh.Positions.Add(point7);
triangleMesh.TriangleIndices.Add(2);
triangleMesh.TriangleIndices.Add(0);
triangleMesh.TriangleIndices.Add(3);
triangleMesh.TriangleIndices.Add(3);
triangleMesh.TriangleIndices.Add(0);
triangleMesh.TriangleIndices.Add(1);
Now we have to actually put the control on the model. We do this by using the newly introduced Brush class: the VisualBrush class. This class takes the underying Visual object of any control and creates a normal texture from it. Then, we apply this texture on our model.
public void Add(Visual l)
{
texts.Add(l);
ModelVisual3D extraCube = new ModelVisual3D();
Model3DGroup modelGroup = new Model3DGroup();
GeometryModel3D model3d = new GeometryModel3D();
model3d.Geometry = (MeshGeometry3D)triangleMesh;
DiffuseMaterial visualMaterial = new DiffuseMaterial(new VisualBrush(l));
model3d.Material = visualMaterial;
modelGroup.Children.Add(model3d);
extraCube.Content = modelGroup;
models.Add(model3d);
mainViewport.Children.Add(extraCube);
To remove a list item, we just delete the corresponding ArrayList item, Clear the ViewPort, recreate the models, and then put the remaining Visuals on the models.
The ViewPort Hit-Testing Mechanism
Now, we have the models with the controls rendered on them and add-remove capabilities.
But, alas! Things are not that simple! WPF does not and will not include an interactive VisualBrush in its first release. So if you test the application, you'll see that you have no interaction with the control. We must provide this functionality manually, with the help of the ViewPort hit-testing mechanism.
We will use the hit-testing offered by the ViewPort to find out which model we clicked on, or on which model is the mouse currently located. The hit-testing mechanism is based on projecting a ray from the mouse location throught the ViewPort, and if that ray hits a model, then we have results. At the end of the function, hitgeo will contain the geometry hit.
void mainViewport_MouseDown(object sender, MouseButtonEventArgs e)
{
System.Windows.Point mouseposition = e.GetPosition(mainViewport);
Point3D testpoint3D = new Point3D(mouseposition.X, mouseposition.Y, 0);
Vector3D testdirection = new Vector3D(mouseposition.X, mouseposition.Y, 10);
PointHitTestParameters pointparams =
new PointHitTestParameters(mouseposition);
RayHitTestParameters rayparams =
new RayHitTestParameters(testpoint3D, testdirection);
hitgeo = null;
VisualTreeHelper.HitTest(mainViewport, null, HTResult, pointparams);
}
private HitTestResultBehavior
HTResult(System.Windows.Media.HitTestResult rawresult)
{
RayHitTestResult rayResult = rawresult as RayHitTestResult;
if (rayResult != null)
{
DiffuseMaterial darkSide =
new DiffuseMaterial(new SolidColorBrush(
System.Windows.Media.Colors.Red));
bool gasit = false;
for (int i=0;i<models.Count;i++ )
if ((GeometryModel3D)models[i] == rayResult.ModelHit)
{
hitgeo = (GeometryModel3D)rayResult.ModelHit;
gasit = true;
}
if (!gasit) {hitgeo=null;}
}
return HitTestResultBehavior.Stop;
}
As you can see, we iterate through a vector of models to find the index of the model that was hit. That is because our list is composed of multiple models, each representing an element. We could have took all the elements, put them in a <CODE>StackPanel, and then add this StackPanel to a single model. Then, we wouldn't need to find out which model was hit, but rather calculate, from the point that was hit, the item that is located at that position.
Because having each element on a different model allows interesting effects, we choose this option.
Generic Listbox, You Say?
The controls are rendered on the 3D model by using their corresponding Visual, which means that we can add any object with a visual appearance on a .NET 3.0 window. Even with panels, all their contents can be rendered in a single stroke. The following code is just a demonstration of these powerfull capabilities; it doesn't look like much, but demonstrates something.
private void AddComplexObject()
{

    DockPanel dp = new DockPanel();
    dp.Background = Brushes.YellowGreen;
    Label y = new Label();
    y.Background = Brushes.YellowGreen;
    y.Content = "Year";
    y.Margin = new Thickness(2);
    dp.Children.Add(y);
    DockPanel.SetDock(y, Dock.Top);
    TextBox m = new TextBox();
    m.Text = "Month";
    m.Margin = new Thickness(2);
    dp.Children.Add(m);
    DockPanel.SetDock(m, Dock.Bottom);
    Add(dp);
}
Animation Effects
Let's complete the ListBox implementation by adding some nice effects. Because the elements are positioned one on top of the other, we could create a drawer-like animation. That is, when the user puts his mouse on an element, it comes closer, like opening a drawer. programmaticaly, the animation maps to a transform called TranslateTransform; it affects the object's coordinates.
To do this, we use this function, applied to the model on which the mouse is located:
void ApplyTransform(GeometryModel3D model)
{
    TranslateTransform3D tt3d =
       new TranslateTransform3D(new Vector3D(0, 0, 0));
    DoubleAnimation da = new DoubleAnimation(-4,
                         new Duration(TimeSpan.FromSeconds(1)));
    tt3d.BeginAnimation(TranslateTransform3D.OffsetYProperty, da);
    Transform3DGroup tgroup = new Transform3DGroup();
    tgroup.Children.Add(tt3d);
    model.Transform = tgroup;
}
Usage
If you just want to use the code, then you should remember this: put your objects in the texts ArrayList and then call the RePopulate() function to update the list. Call the function again after each change done to the ArrayList. Have fun!
Dragos is currently a student at the Polytechnic University of Bucharest. He likes keeping up to date with new and amazing technologies and he hopes he will one day master the mechanisms behind modern day programming languages so that he can write the best possible code from a performance and maintainability point of view.
He keeps track of the things he learns on a daily basis on his blog, at http://picobit.wordpress.com/ .


 General
  News
News  Suggestion
  Question
  Bug
Bug  Answer
  Joke
Joke  Praise
  Rant
Rant  Admin
Admin 


