Introduction
In this article, I will show you how to start developing distributed solutions with the CodeGen SDK. The tool is free to use and it's been used by my company for several years now - it is stable and is commercially used.
SDK main features
Although the list is very long (it's been evolving since 2008), here are the key features:
- Multi-user interface with secure login and per project permissions;
- Proprietary code subversion: projects integrating multiple ASP.NET solutions, client forms, and the main server program;
- Proprietary data access layer: visual CAD for database elements, including visual query management;
- Internal task/bugs workflow components to integrate all developers (architects, developers, testers, business, quality);
- Internal document subversioning for all projects and departments;
- Project generation (automation) and version depot: easy branching, cloning, exporting, and importing (Open Source possibilities);
- Automated compiling the entire solution and database installation.
Tutorials
Please go to http://sycraf.com/support.aspx for the latest tutorials covering the advanced aspects of the SDK. This is the official resource site.
SDK installation
Make sure you have SQL Server 2008 R2 installed on your machine. Please download the latest build available here: http://sycraf.com/downloads.aspx.
Locate the file Server_19x_Codegen.zip and extract it to any directory.
- Run the the program "Server\ServerSetup.exe" with administrator privileges or turn off UAC.
- Select "English" in the first dialog, and click "I agree..." in the next dialog.
- Choose a port for your main server program - 5000 is the default.
- You need to inform the "sa" user password, so have it tested and paste it in the password textbox.
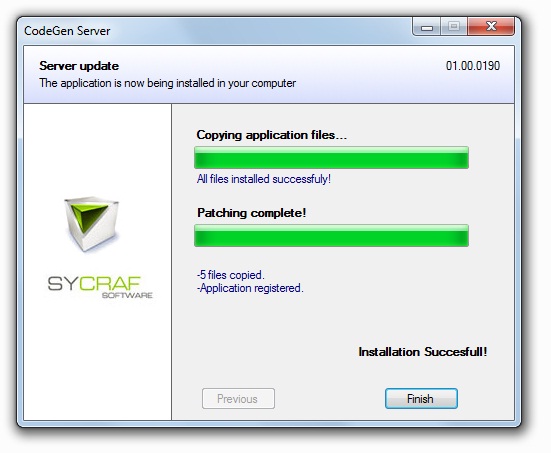
- Click "Next" to install and then "Finish".
Locate and click the "CodeGen Server" icon in your desktop. Click "Start" on your left.

Locate the file Sycraf_SDK_19x.zip and extract it to your desktop. This is my choice, you can extract anywhere you want because there is no Registry installation of the SDK.
SDK first run
Inside the "CodeGen SDK" folder, locate the file "Main\Client.exe" and run it.
Double-click the localhost item, and in the next dialog, provide "admin" and "admin" for username and password. This will create the first user for your company.
This is the main "deck", the main interface of the SDK:
Creating users
On the upper tab "User area", click the button "User maintenance". When the new dialog appears, with the action combo selected as "Create new user", click "Execute" and inform your new user login and actual name.
After you create the new user, the listbox on the left will reload. Please select the new user and click "Management" to update the user details. In this example, our user will be "Architect/Developer".
Your first solution
On the upper tab "Software", click the button "Start new software solution...", and in the next dialog, choose your desired name, and select "Company project" over the type.
After the creation, double click the new project, or with the project action "Load project" selected, click "Execute".
This action will bring the main CAD module with a full-screen edit. Locate this item in the menu:
This will compile the solution and generate everything. In the dialog below, mark both options and click "Execute".
A compilation window should open. If you haven't installed MS Visual C++, you cant compile by prompt, so please install this Visual Studio module:
After compiling, press any key in the prompt window. A new Explorer directory will appear like below.
Enter "testing_depot" (or "x_depot" for a project "x"), and select "Server\ServerSetup.exe" for your main server program.
Install the new application server for your project just like you did for for the CodeGen master program. The SDK is built over the same SDK. :)
After the installation, go back to the main visual module. Select in the menu "Server\Database". With the new window open, click with the second mouse button in the white area and choose "New table".
Now, select the item in the list "T_Employee" and double click it. In the next dialog, in the white area, with the second mouse button, select "Add".
Add the new field "st_name" as an alphanumeric (50 length). You can index this field optionally.
Close the table edit dialog, and select "T_Employee" in the "Database" dialog. With the second mouse button, click on the option "Code and save database" and close this dialog.
In the main menu, select "Server\Synchronization". Give the item "T_Employee" a double click, and in the white area of "Row selection", use the second mouse button to generate the menu, choosing "Add selection" just like below.
This will generate a query inside the server program. You can add any statements you need, there are all the combinations possible in the "where type" list. When done, click "Save".
Back to the "Synchronization" dialog, select "T_Employee", and with the second mouse button, click over "Code synchronization".
This table is not yet in SQL Server - to install it is fast and easy: go to "Project\Generate version", and only mark the "increment release version" number and then "Execute". The depot directory will appear again, and you simply run "Server\ServerSetup" again to update the database by clicking "Next" and then "Finish" .
With the database ready, let's proceed to create our server transactions. Transactions are the way our server answers requests coming from any application (ASP.NET, Forms).
Select in the menu "Server\Transactions". On the dialog, right click in "New Transaction" and give the name "fetch_users". By double clicking the item, we go into Edit mode just like below.
Right click in the first grey rectangle, over the input mapping, and create a "variable" with the identifier "name_to_find". Right click in the second grey rectangle, over the output mapping, and create a "variable" called "page_id".
For the communication code to be generated (in all solutions), you need to 'Code and save transaction".
Open your base "CodeGen SDK", directory, and find the solution below (sorry if my machine is in Portuguese):
When you open the project, you can see the solution structure, with your database table on "Synchronization\T_Employee" and the transaction "fetch_users" ready to be developed.
Open the source file "T_Employee.cs" and go to the end. There you will find the generated code for our query:
Now, let's develop our first transaction. Select the source file for "fetch_users" and open it. Locate the section below:
Change the code to the following:
Please check Visual Studio for the Release build. Set to "Expert mode" if you are using the Express version.
Rebuild the solution and run. Click the Start button afterwards.
OK, now the server is waiting for requests to be made. Let's open Web Developer Studio in the following folder created by CodeGen:
You should obtain the screen below. Open the "Default.aspx.cs" source file.
Let's now fetch the server data. This is done easily by the code below:
Now, to properly display the data, let's edit the "Default.aspx" source file and add a literal "litEmployes" to our ASP form.
Back in the code-behind, let's add the following code:
And the result:
Here is the server log. The server cannot be debugged in real time. Use the command "Trace" to dump values in the log.
DataServer 2011-03-18 21:35:30:31392 ##### Received:
   SYCRAF000061»False«»fetch_users«»»name_to_find›•Oliver•««»«»«
DataServer 2011-03-18 21:35:30:31392 ##### Size: 61
Transaction 2011-03-18 21:35:30:31892 fetch_users * Starting: fetch_users
Transaction 2011-03-18 21:35:30:31992 fetch_users * setup fetch_users
Transaction 2011-03-18 21:35:30:31992 fetch_users * setup done fetch_users
Transaction 2011-03-18 21:35:30:31992 fetch_users * authenticate fetch_users
Transaction 2011-03-18 21:35:30:31992 fetch_users * authenticate done fetch_users
Transaction 2011-03-18 21:35:30:32092 fetch_users * execute fetch_users
Synchronize 2011-03-18 21:35:30:32092 fetch_users T_Employee serial : 13
Synchronize 2011-03-18 21:35:30:32192 fetch_users 13 SQL: select count(*) from T_Employee
Synchronize 2011-03-18 21:35:30:33992 fetch_users # Count: 0
Synchronize 2011-03-18 21:35:30:33992 fetch_users 13 # Warning: no rows selected!
Synchronize 2011-03-18 21:35:30:33992 fetch_users 13 SQL: # Time: 18,001
Synchronize 2011-03-18 21:35:30:33992 fetch_users T_Employee serial : 14
Synchronize 2011-03-18 21:35:30:34292 fetch_users 14 SQL:
   insert into T_Employee (st_name) values ( 'Oliver0')
Synchronize 2011-03-18 21:35:30:35492 fetch_users 14 SQL: # Time: 12,0007
Synchronize 2011-03-18 21:35:30:35492 fetch_users 14 SQL:
   insert into T_Employee (st_name) values ( 'Oliver1')
Synchronize 2011-03-18 21:35:30:35592 fetch_users 14 SQL: # Time: 1
Synchronize 2011-03-18 21:35:30:35592 fetch_users 14 SQL:
   insert into T_Employee (st_name) values ( 'Oliver2')
Synchronize 2011-03-18 21:35:30:35692 fetch_users 14 SQL: # Time: 1,0001
Synchronize 2011-03-18 21:35:30:35792 fetch_users 14 SQL:
   insert into T_Employee (st_name) values ( 'Oliver3')
Synchronize 2011-03-18 21:35:30:35892 fetch_users 14 SQL: # Time: 1
Synchronize 2011-03-18 21:35:30:35892 fetch_users 14 SQL:
   insert into T_Employee (st_name) values ( 'Oliver4')
Synchronize 2011-03-18 21:35:30:35992 fetch_users 14 SQL: # Time: 1,0001
Synchronize 2011-03-18 21:35:30:35992 fetch_users 14 SQL:
   insert into T_Employee (st_name) values ( 'Oliver5')
Synchronize 2011-03-18 21:35:30:36092 fetch_users 14 SQL: # Time: 1
Synchronize 2011-03-18 21:35:30:36092 fetch_users 14 SQL:
   insert into T_Employee (st_name) values ( 'Oliver6')
Synchronize 2011-03-18 21:35:30:36192 fetch_users 14 SQL: # Time: 1,0001
Synchronize 2011-03-18 21:35:30:36192 fetch_users 13 SQL:
   select i_unique,st_name from T_Employee where st_name like '%Oliver%' Order by st_name
Synchronize 2011-03-18 21:35:30:36693 fetch_users 13 SQL: # Time: 5,0003
Transaction 2011-03-18 21:35:30:36993 fetch_users * execute done fetch_users
Transaction 2011-03-18 21:35:30:36993 fetch_users * finish fetch_users
Transaction 2011-03-18 21:35:30:36993 fetch_users * finish done fetch_users
The log is located in the installation directory, just like this:
Now, using the same project, let's create a new Windows Forms application:
Go into the main menu, and select "Project\Interface applications" and click the button "Add".
Now, your main solution will automatically reload and incorporate a new project. CodeGen will change the SLN file for us.
The same code used in ASP.NET will be re-used for Windows Forms, changing the interface detailing. Please rebuild the solution first and then double-click on the Form1 object.
To run the Windows Form, right-click in "tst_Form" and select "Set as startup project" and then execute.
OK, we now have two interfaces operating the server at any given time. Let's save our code into CodeGen so other users can get our modifications.
Go back to CodeGen main menu, and select "User Code\Server Application\Transactions".
Let's check the differences between our repository and our modifications: (many, many thanks for ExamDiff).
Save this new version (right click on the selected file):
You can see the history and can pin this version for production:
Now select the ASP.NET solution folder in "User Code\Web Application\ASPX and web files". Select both files that the column "changed" shows as binary difference detected:
For the Windows Form application, please select the menu "Project\Interface application":
Go to "User Code\Interface [ tstForm ]".
Now the form will be empty. This is normal, just right-click and select "Add new file". Select all documents and click in the ">>" button.
When you press "Confirm...", these files will be in the repository.
Now let's look at the more advanced features. Let's say we need AJAX in our ASP.NET website.
Locate in the main menu, the option below:
Click in the button "Add library" and select your AJAX Control Kit.
Next, CodeGen will ask you to code, so it can copy this new DLL to the proper bin directory of the web application.
Select in the main menu, "Project\Code entire project".
If you go back into your ASP.NET solution and refresh the bin folder, the new DLL is there to be used.
Another advanced feature in CodeGen is the modularization capability. This feature can be found on the main menu as "Project\Modularization\Build" and "Project\Modularization\Manage".
By building modules, you simply export the server features (tables, transactions, enumerations) that other projects can inherit, by a simple subscription command.
Let's create our first module by accessing the menu item: "Project\Modularization\Build".
Type the name of the module "myFirstModule" and click the button "Create Module".
The list of available modules will be updated. Select your new model on the left listbox and over the "Transactions" tab, click in the button "Manage".
Select on the right column our developed transaction, "fetch_users", click on the "<<" button and then hit "Done".
Now, let's add our table "T_Employee", doing the same technique, copying to the left list, and hit the button "Done".
Now, we close the main CAD module and go back to the main form of CodeGen. Let's create a new project called "improved".
Double click on the project to open Visual CAD CodeGen.
Now access the menu item "Project\Modularization\Manage".
First, click on the "Add" button on the "Manage module subscriptions" dialog. Next, select the project "testing" on the left - the right listbox will then load the available modules from that project. Select "myFirstModule" and click "Add".
Your new project now subscribes the module created on the other project. All work done in the module is instantly passed to other projects that subscribe it.
But our new project is not yet integrated. Access the menu below:
Use the "Source safe method" and click on the right button "Proceed".
You can check the source code for the server transaction and see the module is now perfectly integrated (green):
And the database table:
Open Source projects
CodeGen can be used for starter kits of web systems... all made in C#, ASP.NET. The big feature here is the "Export" option in the main CodeGen interface:
Everything will be put inside that file - even external assemblies. It's that simple to exchange projects.
In our site, we host project files (*.cdgen) where people can import these samples and copy what they think is important. You can learn a lot by just changing code and copying functions.
Forum sample
This is a redo over our own website forum. It has a lightweight design and use our own reporting functions perfected over the years.
Here is our "PageReport" function - it is very simple to use. Below is the result:
And here is the ASP.NET C# code:
GetConnection();
string cur_page = Request.QueryString["page"];
if (cur_page == null)
cur_page = "1";
string tot_pages = "";
string id = "";
var_exchange.fetch_forum_categ(cod, cur_page, "10", ref id, ref tot_pages );
ArrayList full_memory = GetServerPages(id);
ExitSession();
if (full_memory.Count > 0)
{
ArrayList my_report = new ArrayList();
for (int t = 0; t < full_memory.Count; ++t)
{
DataPortable p = full_memory[t] as DataPortable;
ArrayList lst_sub_content = new ArrayList();
lst_sub_content.Add("<a href='forum_thread.aspx?id=" +
p.getValue("i") + "'>" + p.getValue("t") + "</a>" );
lst_sub_content.Add(p.getValue("e").Replace ( "\r\n", " ") +
"<br><br>");
lst_sub_content.Add(p.getValue("n") + "<br>" + p.getValue("exp"));
lst_sub_content.Add(p.getValue("f"));
lst_sub_content.Add(p.getValue("r"));
string last_post = p.getValue("l");
if ( last_post != "-" )
last_post += "<br>" + p.getValue("dl") + "<br><br><br>";
else
last_post += "<br><br><br><br>";
lst_sub_content.Add(last_post);
my_report.Add(lst_sub_content);
}
litForum.Text = var_util.PageReport ( "",
680,
"Thread Title,Thread start excerpt,Created by,Flags,Replies,Last post",
"120,150,110,60,60,120",
ref my_report,
cur_page,
tot_pages,
"forum_categ.aspx?cod=" + cod );
}
else
litForum.Text = "<br><br><b>No open threads found!</b><br>";
And here is the server side program:
T_User usr = new T_User (this, 0);
LOG_Thread post = new LOG_Thread (this, 0);
LOG_Thread first_post = new LOG_Thread(this, 0);
int cur_page = Convert.ToInt32(input_cur_page) - 1;
int qtty = Convert.ToInt32(input_qtty);
T_Thread thr = new T_Thread(this, 0);
thr.SetCountMode();
thr.select_rows_categ(input_categ);
int tot_pages = (int)(thr.GetCount() / qtty);
if (thr.GetCount() > tot_pages * qtty)
tot_pages++;
output_tot_pages = tot_pages.ToString();
thr = new T_Thread(this, qtty);
thr.Skip(cur_page * qtty);
if (thr.select_rows_categ(input_categ))
{
while (thr.fetch())
{
usr.selectIdentity(thr.get_fk_created_by());
first_post.selectIdentity(thr.get_fk_first_post());
string nick = usr.get_st_nick(),
nu_replies = thr.get_nu_posts(),
expert = usr.get_st_expertise(),
last_poster = "-",
date_last = "-";
if (thr.get_fk_last_post() != "0")
{
post.selectIdentity(thr.get_fk_last_post());
usr.selectIdentity(post.get_fk_user());
date_last = post.get_dt_input();
last_poster = usr.get_st_nick();
}
DataPortable port = new DataPortable();
port.setValue("i", thr.get_identity());
port.setValue("exp", expert );
port.setValue("n", nick);
port.setValue("e",
first_post.get_st_text().PadRight(
50, ' ').Substring(0, 50).Trim() + "...");
port.setValue("dl", thr.get_dt_last());
port.setValue("l", last_poster);
port.setValue("f", thr.get_nu_flags());
port.setValue("t", thr.get_st_title());
port.setValue("r", nu_replies);
PageAdd(port);
}
output_id = PageClose();
}
Bookstore sample
In this next sample, we integrate AJAX into a basic bookstore type of application (unfinished at the time of writing). Here are some improvements, like the PageColumnReport (paginated as well):
The auto-complete function:
Here are the menus (using ASCX) and ad-rotators:
Links
This is the basic operation of the CodeGen SDK. Find all the free community projects here: http://sycraf.com/forum_projs.aspx.
For more programming details, please check this location: http://sycraf.com/server_guide.aspx, or go to the support page http://sycraf.com/support.aspx.
Conclusion
The main goal of using this SDK is to create a platform of services where you can connect several web sites, Windows Forms apps, TCP/IP devices in one place, resolving every decision in the form of logical transactions with easy and automated access to the database. All code is maintained in the generator (CodeGen), and all source-code can be pinned, checked for differences, modulated, and then integrated into a software version, done with an installation program that requires no maintenance from you.
Code reuse is another issue that rarely sees the light in any project. Our take in this matter is to create server modules that can be exported and imported between projects, so you can build a system with a simple interface that can work with several clients. Another benefit of using the SDK is creating "starter kits", full with web site and server logics that can be cloned into brand new projects. This way, your team can jump start any project by selecting a kit that saves you as much as 20% at the beginning of the construction cycle.
Happy coding!
This member has not yet provided a Biography. Assume it's interesting and varied, and probably something to do with programming.


 General
  News
News  Suggestion
  Question
  Bug
Bug  Answer
  Joke
Joke  Praise
  Rant
Rant  Admin
Admin 


