
jMVC.NET: Easy Dynamic Client-side UIs with Clean MVC Coding
4.26/5 (9 votes)
jMVC.NET is an ASP.NET control to help you build UIs that change dynamically without postbacks, AJAX or tricky event handling
Introduction
Programming dynamic UIs in ASP.NET can be tricky to say the least. If you're adding and removing controls programmatically in response to user input, you have to jump through a lot of hoops to keep ViewState and control events working. Things easily get messy and obscure bugs can creep in (ever seen the "Failed to load Viewstate" error?). Plus, the end-user experience can be terrible with all those postbacks. AJAX and the UpdatePanel can help a bit, but fundamentally, it should be easier than this - right?
Right. jMVC.NET is an attempt to simplify this task, creating a better experience both for the developer and the end user. You can drop a jMVC:MVCPanel control into your existing ASP.NET WebForm page (alongside other traditional ASP.NET Web controls), and the MVCPanel will host a dynamic control structure according to a template you provide. We use the Model-View-Controller pattern to keep things clean and tidy, and on the server you can use strongly-typed C#/VB.NET objects to set and retrieve the data being edited by the user.
Online demos are hosted on an external site, showing source code and interactive UIs for "Hello world", "Simple list editor", "Client-side grid" and "Hierarchical folders editor" demos. More demos are on my blog.
Tutorial: Task List
For our tutorial, let's pretend we're making a simple task manager application. The user wishes to manage a list of tasks, each of which may be complete or not, and let's say they can add some optional notes. We want the finished UI to look like this:
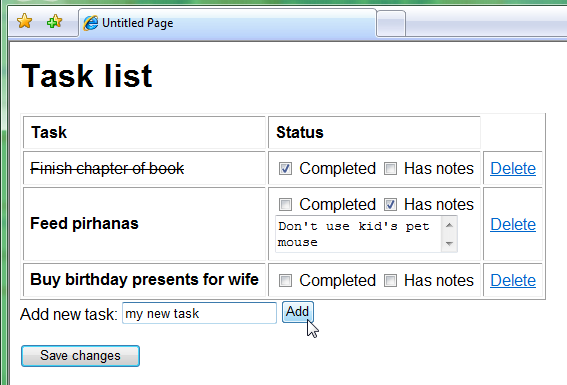
Remember, to keep the application responsive, changes to the task list should work with no postbacks or AJAX requests.
Installation
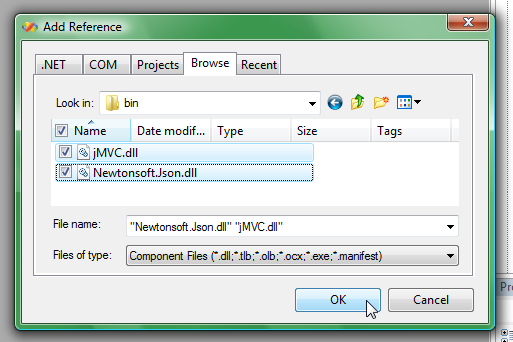
Start by adding a project reference to the jMVC.NET DLL (and to the json.net DLL which is also provided):
Next, in the ASPX page where you'll be adding the controls, add a reference to jMVC:

Adding the Control
Now you're ready to add a jMVC:MVCPanel control anywhere inside your ASPX form.
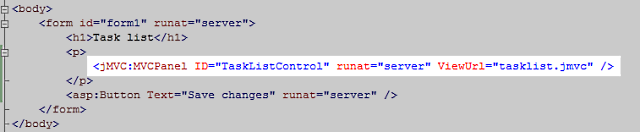
(Notice we've referenced a file called tasklist.jmvc which doesn't exist yet - we'll come back to that in a minute.)
Adding the Model
In your code behind, define a structure for your data model as a .NET object, and assign it to the TaskListControl control.
    public partial class TaskList : System.Web.UI.Page
    {
        protected void Page_Load(object sender, EventArgs e)
        {
            if(!IsPostBack)
                TaskListControl.Model["tasks"] = new List<Task>();
        }

        private class Task
        {
            public string Name;
            public bool IsCompleted;
            public bool HasNotes;
            public string Notes;
        }
    }
Adding the View
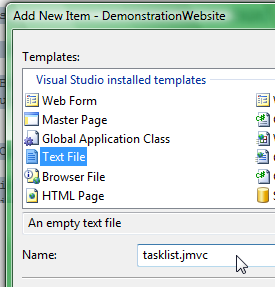
So far so good! We have a data model; next we need a view. Create a blank text file in the same directory as your ASPX page, and call it tasklist.jmvc - this will be the template we referenced earlier.
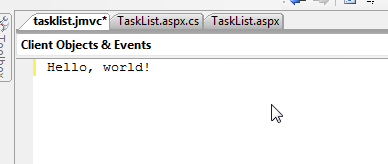
You could start by adding nothing but the string "Hello, world!" to your tasklist.jmvc template. If you then run your application, the page will display the string "Hello, world!" in place of your TaskListControl control:

The Real View
OK, so "hello world" isn't enough. It turns out your boss wants an application that actually does something. Edit your tasklist.jmvc file so it looks like this (and don't worry if you don't understand it at first glance):
<% if(model.tasks.length == 0) { %>
    <p>No tasks have been added.</p>
<% } else { %>
    <table border="1" cellpadding="6">
        <thead>
            <tr>
                <th align="left">Task</th>
                <th align="left">Status</th>
                <th align="left"></th>
            </tr>
        </thead>
        <% for(var i = 0; i < model.tasks.length; i++) { %>
            <tr>
                <td>
                    <span style='<%= model.tasks[i].IsCompleted ?
                    "text-decoration:line-through" : "font-weight:bold" %>'>
                        <%= model.tasks[i].Name %>
                    </span>
                </td>
                <td>
                    <label>
                        <input type="checkbox" onclick="<%* function(i)
                    { model.tasks[i].IsCompleted = this.checked } %>"
                            <%= model.tasks[i].IsCompleted ? "checked" : "" %> />
                        Completed
                    </label>
                    <label>
                        <input type="checkbox" onclick="<%* function(i)
                    { model.tasks[i].HasNotes = this.checked } %>"
                            <%= model.tasks[i].HasNotes ? "checked" : "" %> />
                        Has notes
                    </label>
                    <% if(model.tasks[i].HasNotes) { %>
                        <div><textarea onchange="<%* function(i)
                    { model.tasks[i].Notes = this.value; } %>">
                            <%= model.tasks[i].Notes %></textarea></div>
                    <% } %>
                </td>
                <td>
                    <a href="#" onclick="<%* function(i)
                    { model.tasks.splice(i, 1); } %>"">Delete</a>
                </td>
            </li>
            </tr>
        <% } %>
    </table>
<% } %>

Add new task:
<input type="text" id="NewTaskName" onkeypress="return event.keyCode != 13;
            /* don't submit form if ENTER is pressed */"/>
<input type="button" value="Add" onclick="<%* function()
        { addNewTask(model.tasks); } %>" />

<%
    function addNewTask(taskList) {
        var taskName = document.getElementById("NewTaskName").value;
        if(taskName != "")
            taskList[taskList.length] = { Name : taskName, Notes : "" };
    }
%>
Finishing the Work
Done! Run your application and you'll see that the page is now fully interactive. Look ma, no postbacks! The final task is to receive the updated data on the server and do something with it (e.g. save it to a database).


What Was All That About?
The jMVC syntax may be a little unfamiliar at first, but is in fact a very concise way of mapping your data model to a set of interactive HTML controls. There is certainly far less work involved in this than achieving the same behaviour in traditional server-oriented ASP.NET, with or without AJAX, and less code means fewer bugs.
Take note of how clean the server-side end of this is: there are barely three lines of code, and we're using our strongly-typed .NET data model interactively in the browser.
jMVC template syntax consists of nothing more than HTML, plus three control structures which can run inside the browser:
- Evaluations use the
<%= model.property %>syntax, and insert the result of the evaluation into the generated UI - Flow control uses the
<% /* Javascript here */ %>syntax, and is commonly used for iteration or recursion over the model, like this:
<% for(var i = 0; i < model.items.length; i++) { %>
    Item: <%= model.items[i].name %>
<% } %>
- Closures (the fancy ones) use the
<%* function() { /* Javascript here */ } %>syntax, and are used to add event handlers, like this:
<input type="button" onclick="background-color: Yellow;"><%* function(i)
    { alert("This is item number " + i); } background-color: Yellow;">%>"/>
The core workflow is that your .NET data model is automatically converted to JSON, and the jmvc template acts as a mapping from the JSON data to a set of HTML controls. Whenever one of your closures edits the underlying data model, the UI is automatically regenerated to show the effects of the change. When you finally do a real postback, the JSON data is mapped back to a .NET object for your server-side code to pick up.
More Information
Tip #1: If you want Visual Studio to give you proper syntax highlighting for jMVC files, right-click the file, choose "Open with...", then select "HTML Editor".
Tip #2: Interactive examples with source code are available on an external site.
Tip #3: This article has focused on integrating jMVC controls with ASP.NET, but my blog also has articles on using jMVC as a standalone JavaScript library and with Castle MonoRail. There's also another jMVC.NET tutorial for ASP.NET programmers.
Tip #4: You can see how jMVC.NET works behind the scenes (i.e. updating the JSON data model in real time), by enabling the debug info, like this:
History
- 25th November 2007: First written