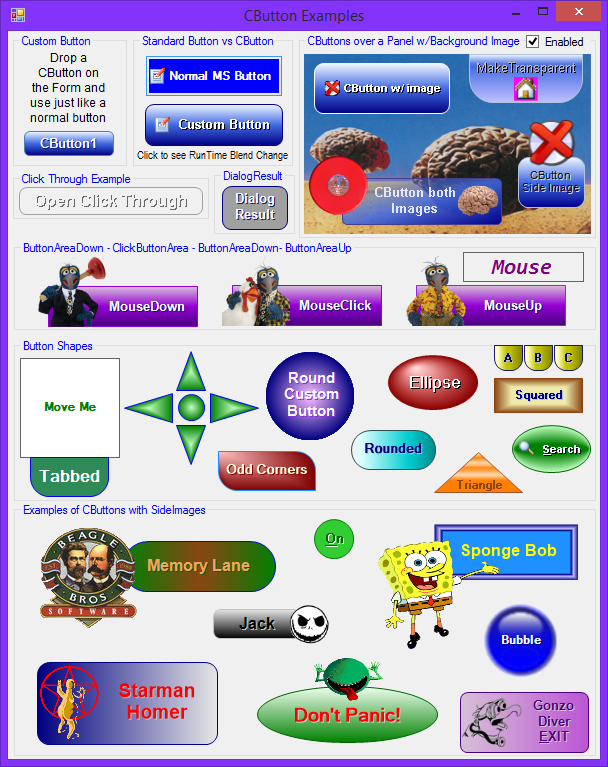
Introduction
The CButton is a simple custom button control written in VB.NET. Sorry I didn't realize the "C" prefix was a language specific thing when I started. It is just short for Custom Button. I won't let it happen again. This is a great alternative to the plain Microsoft button.
Important Note For Existing Users of versions earlier than 3.4.
With Version 3.5 the DesignerRectTracker Class is no longer needed and will require some designer clean up of existing projects that use the old control and will be using the new one. (See further below for more details)
Here is a list of the primary features:
- Change the Shape of the button
- Adjust the corners of a round rectangle
- Solid and Multi color Fills
- Text shadow and margin
- Adjustable rollover and click color change with simulated click movement
- Normal button image and/or additional sideimage
I improved design time editing in Version 1.2 by adding UITypeEditors and ControlDesigners. See UITypeEditorsDemo[^] for a detailed explanation. This enabled me to combine some properties into one single property, or improve on others.
For example:
ButtonColorA, ButtonColorB, and ButtonColorC were combined into ColorFillBlend allowing unlimited Color blend instead of being limited to only three colorsButtonColorCenterPoint, and ButtonColorCenterPtOffset were combined into FocalPointsCornerRadius became an expandable property Corners allowing each corner to be adjusted separately

Background
Here is another example of needing (well, let's be honest, a plain button would work, so I wanted) a better looking and visually versatile button. There are a lot of great button controls already, but not with all the features I was looking for. Basically, I created the properties I was looking for, and then took over the OnPaint to draw it the way I wanted.
Control Properties
Here is a list of the primary properties:
Shape
What shape the button is (Rectangle, Ellipse, Triangle)
ColorFillBlend
Colors to use in gradient blend fills
BorderColor, BorderShow
Show the border in a different color
FillType
What color gradient type to use (Solid, Linear, or Path)
FocalPoints
CenterPoint and FocusScales for Path Gradient Type Fills
Corners
Radius for each corner arc
DimFactorHover, DimFactorClick
Number to adjust the buttons color during mouse rollover and click
TextShadow, TextShadowShow
Show or not show the shadow of the text and in what color
TextMargin
Push the text away from the inside edge of the button
TextSmoothingMode
Set the TextRenderingHint of the Graphics Object for better looking text
SideImage
Add an extra image that can be placed outside the button surface
Padding
Offset the edges of the ButtonArea from the edge of the Control
Using the Code
Once you get the CButton designed the way you want, there isn't really any complicated code. Just use it like a normal button.
Because the Click event fires if you click anywhere on the control, I added two new Events; the ClickButtonArea event in Version 1.1 to fire only when the mouse clicks inside the button part of the control, and the SideImageClicked event in Version 2.0.
Public Event ClickButtonArea(ByVal Sender As Object, _
ByVal e As System.Windows.Forms.MouseEventArgs)
Public Event SideImageClicked(ByVal Sender As Object, _
ByVal e As System.Windows.Forms.MouseEventArgs)
Private Sub CButton_MouseUp(ByVal sender As Object, _
ByVal e As System.Windows.Forms.MouseEventArgs) Handles Me.MouseUp
If MouseDrawState = eMouseDrawState.Down _
Then RaiseEvent ClickButtonArea(Me, New EventArgs)
MouseDrawState = eMouseDrawState.Up
Me.Invalidate(ButtonArea)
End Sub
Points of Interest
The control is just a process of layering the parts together in the right positions. There are four main areas to track. The control area, button area, text area, and image area. The button area is reduced from the control area by the control padding values. The text area is reduced from the button area by the text margin values and the image area. The image area is based on the image size. The items are placed into these areas based on their layout options.
Protected Overrides Sub _
OnPaint(ByVal e As System.Windows.Forms.PaintEventArgs)
e.Graphics.SmoothingMode = SmoothingMode.AntiAlias
e.Graphics.TextRenderingHint = _TextSmoothingMode
Dim bColor, tColor, tsColor As Color
If Enabled Then
bColor = _BorderColor
tColor = ForeColor
tsColor = _TextShadow
Else
bColor = GrayTheColor(_BorderColor)
tColor = GrayTheColor(ForeColor)
tsColor = GrayTheColor(_TextShadow)
End If
Using MyPen As New Pen(bColor)
MyPen.Alignment = PenAlignment.Inset
ButtonArea = AdjustRect(New RectangleF(0, 0, _
Size.Width - 1, Size.Height - 1), Padding)
Using gp As GraphicsPath = GetPath()
If BackgroundImage Is Nothing Then
Select Case FillType
Case eFillType.Solid
Using br As Brush = New SolidBrush(GetFill)
e.Graphics.FillPath(br, gp)
End Using
Case eFillType.GradientPath
Using br As PathGradientBrush = _
New PathGradientBrush(gp)
Dim cb As New ColorBlend
cb.Colors = GetFillBlend()
cb.Positions = ColorFillBlend.iPoint
br.FocusScales = _
FocalPoints.FocusScales
br.CenterPoint = New PointF( _
Padding.Left + _
ButtonArea.Width * _
FocalPoints.CenterPoint.X, _
Padding.Top + _
ButtonArea.Height * _
FocalPoints.CenterPoint.Y)
br.InterpolationColors = cb
e.Graphics.FillPath(br, gp)
End Using
Case eFillType.GradientLinear
Using br As LinearGradientBrush = _
New LinearGradientBrush( _
ButtonArea, Color.White, Color.White, _
FillTypeLinear)
Dim cb As New ColorBlend
cb.Colors = GetFillBlend()
cb.Positions = ColorFillBlend.iPoint
cb.Positions.Length)
br.InterpolationColors = cb
e.Graphics.FillPath(br, gp)
End Using
End Select
End If
If MyBase.Focused AndAlso ShowFocus = eFocus.Dot Then
Using focusPen As Pen = New Pen(Brushes.Black, 1) _
With {.DashStyle = DashStyle.Dot}
e.Graphics.DrawPath(focusPen, GetPath(-1, -1))
End Using
End If
If BorderShow Then
e.Graphics.DrawPath(MyPen, gp)
End If
End Using
Dim ipt As PointF = ImageLocation(GetStringFormat(SideImageAlign), _
Size, SideImageSize)
rectSideImage = New Rectangle(CInt(ipt.X), CInt(ipt.Y), _
SideImageSize.Width, SideImageSize.Height)
If SideImageBehindText AndAlso SideImage IsNot Nothing Then
If Enabled Then
e.Graphics.SmoothingMode = SmoothingMode.None
e.Graphics.DrawImage(SideImage, ipt.X, ipt.Y, _
SideImageSize.Width, SideImageSize.Height)
Else
ControlPaint.DrawImageDisabled(e.Graphics, _
New Bitmap(SideImage, SideImageSize.Width, _
SideImageSize.Height), _
CInt(ipt.X), CInt(ipt.Y), BackColor)
End If
End If
SetImageAndText(e.Graphics)
If Not Image Is Nothing Then
If Enabled Then
e.Graphics.DrawImage(Image, Imagept.X, Imagept.Y, _
ImageSize.Width, ImageSize.Height)
Else
ControlPaint.DrawImageDisabled(e.Graphics, _
New Bitmap(Image, ImageSize.Width, ImageSize.Height), _
CInt(Imagept.X), CInt(Imagept.Y), BackColor)
End If
End If
If TextShadowShow Then
TextArea.Offset(1, 1)
e.Graphics.DrawString(Text, Font, _
New SolidBrush(tsColor), TextArea, GetStringFormat(TextAlign))
TextArea.Offset(-1, -1)
End If
e.Graphics.DrawString(Text, Font, _
New SolidBrush(tColor), TextArea, GetStringFormat(TextAlign))
If Not SideImageBehindText AndAlso Not SideImage Is Nothing Then
If Enabled Then
e.Graphics.SmoothingMode = SmoothingMode.None
e.Graphics.DrawImage(SideImage, ipt.X, ipt.Y, _
SideImageSize.Width, SideImageSize.Height)
Else
ControlPaint.DrawImageDisabled(e.Graphics, _
New Bitmap(SideImage, _
SideImageSize.Width, SideImageSize.Height), _
CInt(ipt.X), CInt(ipt.Y), BackColor)
End If
End If
End Using
End Sub
To Gray the colors when the control is disabled, I used two methods:
To Gray a single color, I used this Function:
Function GrayTheColor(ByVal GrayColor As Color) As Color
   Dim gray As Integer = _
    CInt(GrayColor.R * 0.3 + GrayColor.G * 0.59 + GrayColor.B * 0.11)
   Return Color.FromArgb(GrayColor.A, gray, gray, gray)
End Function
To Gray an Image, I originally used this Function:
Private Function EnableDisableImage(ByVal img As Image) As Bitmap
    If Me.Enabled Then Return img
    Dim bm As Bitmap = New Bitmap(img.Width, img.Height)
    Dim g As Graphics = Graphics.FromImage(bm)
    Dim cm As ColorMatrix = New ColorMatrix(New Single()() _
         {New Single() {0.5, 0.5, 0.5, 0, 0}, _
        New Single() {0.5, 0.5, 0.5, 0, 0}, _
        New Single() {0.5, 0.5, 0.5, 0, 0}, _
        New Single() {0, 0, 0, 1, 0}, _
        New Single() {0, 0, 0, 0, 1}})

    Dim ia As ImageAttributes = New ImageAttributes()
    ia.SetColorMatrix(cm)
    g.DrawImage(img, New Rectangle(0, 0, img.Width, img.Height), 0, 0, _
        img.Width, img.Height, GraphicsUnit.Pixel, ia)
    g.Dispose()
    Return bm

End Function
In Version 2.0, I switched to the ControlPaint function because I thought the image was better looking.
ControlPaint.DrawImageDisabled(e.Graphics, Me.Image, _
    CInt(Imagept.X), CInt(Imagept.Y), Me.BackColor)
Corners, Padding Margins, and FocalPoint Adorners
New in Version 3.5, Adorners and Glyphs are added to the ControlDesigner. For an Explanation of Adorners Glyphs Behavior and ControlDesigner for WinForms, go to this link.
The Corners, ButtonArea (Padding), TextMargin, and Focal Points can all be edited in the PropertyGrid. This can be a bit tedious and unintuitive. With the use of Adorners and Glyphs, these properties can be edited directly on the control with the mouse.
ChooseAdorner
Selecting the control will display three buttons just off the upper right corner of the control.
Corner Adorner
Click of the (C)orner button to display five corner glyphs. Move the four corner glyphs back and forth to adjust each corner individually. Move the center glyph to adjust all four corners to the same value.
FocalPoints Adorner
Click the (F)ocalPoints button to get the Center and FocalScale glyphs just like the old version. This only works when the FillType is GradientPath. A small square and circle selection will appear on the control. Drag the circle around to move the CenterPoint, and drag the square to move the FocusScales. Hold the Shift Key down and click the glyph to reset the Center to the middle of the button or reset the FocusScale to 0.
Padding Margin Adorner
Click the (P)adding to adjust the ButtonArea (Padding Property) and the TextMargin Property. A dotted line will mark the location of the margin. Drag each side around to adjust. If the two margins directly overlap, the Padding will select first. Hold the Shift key down to force the TextMargin to select.
.
Important Upgrade Note for version 3.5+
This control has been around for a long time and based on downloads and comments, quite a few people are using it. The Adorner upgrade made the use of the DesignerRectTracker Class unnecessary. If you use version 3.5 in a project, you used previous versions in which you will get a bunch of errors in any Form you have an old CButton in.
This is painfully tedious, but you need to delete all of these lines that have an error to get rid of all references to the old trackers in the Form's Designer.
If anyone knows of a way to clean these out easier or in bulk, I would love to know.
The fastest way I have found to do it so far is to open a form designer window and Search (Ctrl-F) for DesignerRectTracker. Then press F3 to find and the Ctrl-L to detete the line of code. After I got the rhythm, it went pretty quick.
TypeConverter for ColorFillBlend
New in Version 2.0, a TypeConverter for the ColorFillBlend can convert a String representation of the blend to a cBlendItems to allow more precise tweaking and to easily copy a blend from one cButton to another.
History
- Version 1.0 - May 2008
- Version 1.1 - July 2008
- Updated "Clickable Region" and added a
ClickButtonArea event
- Version 1.2 - September 2008
- Updated Properties to use
UITypeEditors and ControlDesigner - Added Triangular Buttons
- Version 1.3 - September 2008
- Button Area Click Fix. The button did not click when the mouse was moving
- Version 1.4 - October 2008
- Added Enable/Disable Feature
- Version 1.5 - December 2008
- Fixed the
FocalPoints and Corners properties to immediately refresh the control when the child properties are changed in the PropertyGrid - Removed
FocalPoints Modal UITypeEditor and added direct adjustment of the points on the design surface
- Version 1.6 - January 2009
- Added Mnemonic Keys based on NfErNo's suggestion.
- Version 1.7 - April 2009
- Added
SendMessage for click through non button area
- Version 1.8 - November 2009
- Added Key events based on getholdofphil's suggestion
- Fixed focus problem
- Version 1.9 - July 2010
- Switched the Disable Image routine to
ControlPaint method - Added
TextSmoothingMode property - Added
SideImageClicked Event - Changed the
ClickButtonArea EventArgs to MouseEventArgs to pass the mouse button easier
- Version 2.0 - December 2011
- Added
IButtonControl Interface for PerformClick and DialogResult - Added
BlendItemsConverter to the cBlendItem Type
- Version 2.0 - January 2013
- Added Visual Studio 2012 version
- Version 3.4 - March 2015
- Version 3.5 - April 2015
- Removed ControlDesigner Adorner Override and Added real Adorners and Glyphs (See important Note Above before replacing Version 3.4 or earlier in existing projects.)
- Added
ButtonAreaUp and ButtonAreaDown
- Version 3.6 May 2015
- Fixed
SideImage Click after MouseUp/Down broke it
I first got hooked on programing with the TI994A. After it finally lost all support I reluctantly moved to the Apple IIe. Thank You BeagleBros for getting me through. I wrote programs for my Scuba buisness during this time. Currently I am a Database manager and software developer. I started with VBA and VB6 and now having fun with VB.NET/WPF/C#...


 General
  News
News  Suggestion
  Question
  Bug
Bug  Answer
  Joke
Joke  Praise
  Rant
Rant  Admin
Admin 


 will really appreciate a response from you! thanks in advance!