Introduction
The ASP.NET DropDownList is an easy way to offer a set of selections for the user. However, if you want to allow the user to enter information not available in the drop down list, you will have to write your own JavaScript code or jQuery. This source code combines that work into a ASP.NET DLL control you can easily place on any ASP.NET web page.
The downloadable source project above uses the following technologies:
- ASP.NET 4.0 / Webforms
- C#
- jQuery / JavaScript
- CSS
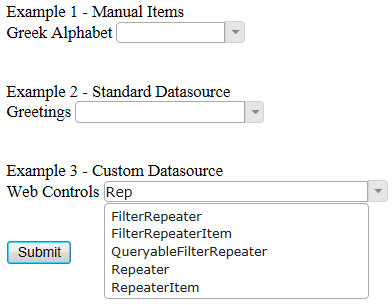
Example
Background
You do not have to have knowledge with jQuery, JavaScript, or CSS to use the EditableDropDownList. The only requirement is that any page that references the EditableDropDownList also contains the proper links to the CSS and JavaScript files available in either of the downloadable files above. The source code download contains the class library project for the EditableDropDownList and a test website using the EditableDropDownList control.
Using the Code
To use the EditableDropDownList, you will need to follow these steps:
- Include a project reference to the EditableDropDownList.dll to your ASP.NET webforms project.
- You can skip steps 2 and 5 by using the
EditableDropDownList from your Visual Studio toolbox. - To do so, be sure that you are currently editing a web page so that you can get access to the toolbox and ASP.NET controls.
- From your Visual Studio toolbox, right click to create a new tab or use an existing one to add the
EditableDropDownListControl. Start by right clicking in the toolbox and select "Choose Items.." and then browse to where you have saved the EditableDropDownList.dll. - Once added, you can now double click or click and drag the
EditableDropDownList to your web page to get started. This will automatically add the reference to your web project, place the proper code in the header of your web page, and add the control into your web page.
- Register the
EditableDropDownList at the top of your web page.
<%@ Register Assembly="EditableDropDownList"
Namespace="EditableControls" TagPrefix="editable" %>
- Add these files to your website:
- jquery-ui.css
- img/ui-bg_flat_0_aaaaaa_40x100.png
- img/ui-icons_222222_256x240.png
- img/ui-icons_454545_256x240.png
- img/ui-icons_888888_256x240.png
- (Javascript files below should be referenced in this order below)
- jquery-1.6.4.min.js (* or greater)
- jquery.ui.core.js
- jquery.ui.widget.js
- jquery.ui.button.js
- jquery.ui.position.js
- jquery.ui.autocomplete.js
- jquery.ui.combobox.js (This file is not a part of the jQuery library)
- Add the references to the CSS and JavaScript files in the page header:
<head runat="server">
    <title></title>
    <link href="css/jquery-ui.css" rel="stylesheet" type="text/css" />
    <script src="js/jquery-1.6.4.min.js" type="text/javascript"></script>
    <script src="js/jquery.ui.core.js" type="text/javascript"></script>
    <script src="js/jquery.ui.widget.js" type="text/javascript"></script>
    <script src="js/jquery.ui.button.js" type="text/javascript"></script>
    <script src="js/jquery.ui.position.js" type="text/javascript"></script>
    <script src="js/jquery.ui.autocomplete.js" type="text/javascript"></script>
    <script src="js/jquery.ui.combobox.js" type="text/javascript"></script>
</head>
- Add the
script tags for the EditableDropDownList on your web page:
<editable:EditableDropDownList ID="EditableDropDownList1" runat="server">
</editable:EditableDropDownList>
- Bind items to your drop down list either manually by adding
ListItems to the EditableDropDownList or by binding to a DataSource.
- Both examples can be found in the downloadable source code above.
- You're done! You can now work with your
EditableDropDownList to find what options work best for you. I would love to hear some great feedback if you use this control on your site.
How is the EditableDropDownList Different from the Normal .NET DropDownList?
Here are the primary differences from the ASP.NET DropDownList control:
OnClick event is new.
- You can now capture the event that a user clicked or selected an item. Capturing this event will cause an automatic page postback after the user makes a selection.
AutoWidth to fit the contents of the list items.
- This functionality is a part of the browser and the
<select> element. We are not using a select element for this control so it will be up to you to give a width that works well for the data that you are providing to the user.
- Sorted [New/Added] (Boolean)
- A new property "
Sorted" has been added to allow you to automatically sort your items for you.
- Duplicate entries will be ignored. If you have multiple entries provided in your drop down list, then only a single entry will be listed.
- Blank dropdown list entries are not allowed. If you would like to provide a blank entry for the user to select, then I would suggest that you use "
" as your display value. - If no dropdown list items are given or
Enabled="false", then a simple text box will be displayed. - There may be some other properties that are available in the ASP.NET
DropDownList like "DataTextFormatString" that will not work with the EditableDropDownList. If you would like to add this or any other functionality, you are welcome to modify the source code as needed. - The maximum dropdown height is set in the CSS file
"css/jquery-ui.css" to 300px.
- This will cause a scroll bar to always be visible but it will also prevent the drop down list from getting to big.
- To turn this feature off, you will need to remove or comment out the line setting the
max-height or you can adjust the maximum height.
Customization
If you would like to modify the look and feel of the EditableDropDownList, there are several ways of doing this:
- Use CSS classes and set the
CssClass property accordingly. (Be sure that the reference to your CSS file in the header is after the reference to the file "jquery-ui.css") - Set styles through the code behind of the page as you would with any ASP.NET control. (Example:
EditableDropDownList1.Style.Add(HtmlTextWriterStyle.BackgroundColor, "#fefecc");) - Modify the jQuery CSS file "jquery-ui.css".
- If you want to maintain a consistent look and feel throughout your website and everywhere that you use the
EditableDropDownList, then this will be your best option. - Keep in mind that if you are using other jQuery UI controls, then changes will affect those controls as well.
History
- 25th November, 2011: Article published
- 15th January, 2012: Updated the
EditableDropDownList control so that it will now work properly when used in a MasterPage - 25th February, 2012: Updated the
EditableDropDownList control:
- So that it will now work properly when used in a
UpdatePanel - Allow
AutoPostBack to be set to True - Added
OnClick event - Added
max-height the CSS file "css/jquery-ui.css"
- 18th June, 2012: Updated the
EditableDropDownList control: - The original text input ID is set to the ClientID, the autocomplete text input ID is set to the ClientID + '_list', and the button is set to ClientID + '_list_button' so that these controls can be accessed in javascript.
- 19th July, 2012: Fixed a bug where the TextChanged and SelectedIndexChanged had stopped working properly due to the previous update.
- 12th November 2012: Moved the SelectedIndexChanged event to be raised just before the control's PreRender event so that all other controls on the page will have their data loaded and ready in-case they are needed.
- 19th November 2012: Fixed the following items.
- If the EditableDropDownList is disabled it will not lose it's text on postback.
- TabIndex can be set.
- If you call the Focus() method then jquery will be used to set focus on this control.
- 23rd November 2012: Added option to autoselect the first item of the dropdown list.
- New boolean property name AutoselectFirstItem.
- 19th December 2012: The drop down list will use the same font-family as its text box.
- Added the style 'white-space: pre-wrap' to the dropdown list to allow for formatting with spaces.
Happy coding!
Began writing software at the age of 10.
Graduated from the University of Houston in 1995 with a BS in Computer Science and a minor in Math.
I love developing great software and websites.
I recently moved to Seattle and I'm currently working for a Health Care Analytics company.
Hobbies include Basketball and Soccer and very happily married to a wonderful wife.


 General
  News
News  Suggestion
  Question
  Bug
Bug  Answer
  Joke
Joke  Praise
  Rant
Rant  Admin
Admin 


