Introduction
Building a good hardware driver is a difficult task. It's a bit like buying a new car. The buying part is pretty easy and fun, but then, time goes by, and you need to take care of it once in a while. Wash it, replace parts, add fuel and so on... and if the car is a wreck? The maintenance can become a really hard task.
This article will try to explain the design concept of building a driver engine for any type of hardware. It doesn't matter if it's a digital camera, wireless communication device, or even a toaster - the design method is the same. Following the design methods will result in a more agile and flexible driver, ease your code maintenance and re-factoring time.
Hopefully this article will be useful to you and help you in building a flexible and more agile hardware engine. In this article, I tried to reflect some of my experience in this field - any comments (good or bad) are welcome.
The Implementation Design Concept - Part 1
The Com Class
The Com Class is "layer" in the driver, that manages all Hardware-CPU data transport. In order to design a good data transport (or com class) you need to "break" the "layer" into subjects or mini-classes. Every hardware that communicates with a CPU has 3 important subjects:
- List of commands that you want the hardware to do
- A specific communication language (or protocol) - GPIB, USB, IPP...
- A Connector: it can be USB, USB2, WiFi, LPT...
The three should be very well defined before writing even a line of code, plus, the three should be dealt with separately in the code. The only connection between them should be via the Com Class.
The Com Class should "know" what the type of commands are, in what language the command should be executed and in which of the connectors it should transmit or receive the command/data from.
So, in the Com Class - you should have 2 main classes:
Serializer class - that its "job" is to take the commands and serialize them to a specific language. Connector class - that takes the serialized commands and converts them to the correct line of signals for the connector to transmit.
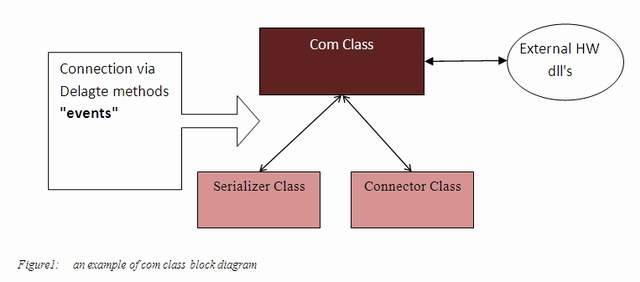
Of course - these aren't all the classes you might need - BUT make sure you don't "couple" between classes - for example the serializer class shouldn't be coupled with a connector class, because the two do not involve each other. Hardware language is only a signal in known order, it does not involve hardware connection type to it - so does the driver!
Minimizing coupling between blocks is very important - In that way, you can connect your hardware through different connectors, using the same protocol (serializer class) without any major difficulties.
The Memory Class ("keep it simple" Approach)
Every hardware has memory in order to execute complex logic functions.
If your hardware has no memory – then you can skip this part.
There are several kinds of memories from a "driver design" point of view. I like to categorize them in 2 major types:
- Hardware "Brain" memory – This type of memory can store actual commands and execute them when needed, just like your RAM memory in your CPU. This type of memory is more hard to define and I will not deal with it in this article.
- Hardware "Brainless" memory – This type of memory is simply a bunch of numbers or statements you can store in your hardware, in order to execute complex hardware functions or storing data. Every memory cell is called a register.
So, let's focus on type 2 memory:
Hardware "Brainless" memory: In the Memory class, you should manage the memory of your hardware. When I say "manage", I mean create a shadow copy in your driver software and manipulate it in the driver. DO NOT manipulate the memory in your hardware.
register class handler:
The register handler can be a class or an object and the handler job will be to manipulate the value of the register.
It can manipulate int16, int32, int64, string, byte… it does not matter what type of variable the register is, but it should be the same for all registers. Because the register handler is the low level of your hardware – it is also the weak point of your driver.
Implement it with care.
Implementing memory manipulation function in the handler in the best way you can do it. Value manipulation functions in the register handler should include nothing more than a Set / Get / Reset and few other helper functions.
Don't try to using hard algorithms here!
Keep it simple!
For example - let's look at a flow diagram for a basic "write to memory" command that you can have in your driver:

What's Next
In Part 2 - there will be some implementation examples, I will discuss the top level class of the driver and more...
This member has not yet provided a Biography. Assume it's interesting and varied, and probably something to do with programming.


 General
  News
News  Suggestion
  Question
  Bug
Bug  Answer
  Joke
Joke  Praise
  Rant
Rant  Admin
Admin 


