Introduction
Transfer is a Windows desktop application that, under user
control, copies the contents of directories and subdirectories
from one directory to another using a graphical interface. Once
Transfer has been executed, XFR can be executed using the transfer
data saved during an earlier execution of Transfer.
The primary design goal of Transfer is to provide a tool that is
simple to use. Other goals were to allow a user to specify:
- that only those files with specific extensions be copied;
- that whole directory subtrees not participate in the copy;
- whether or not empty directories that exist in the source directory
structure be created in the target directory structure;
- whether or not the transfer should continue when an error is encountered.
XFR is a Windows console application that allows its user to
effectively execute Transfer from a command line or from within a
.bat or .cmd file. The prerequisite for the
execution of XFR is that Transfer has been successfully executed
and produced the transfer data required by XFR.
This article not only provides a technical discussion of the
Transfer and XFR tools but can also be used as a User's Guide for
their use.
Table of Contents
The symbol [^] returns to the Table
of Contents.
Examples Directories
Throughout this article, examples of the execution of the Transfer
application appear. The directories that were chosen for examples
are the directories and subdirectories within the
"Solution 'Transfer'" directory structure. This structure, with
an EmptyTestDirectory included, is:
C:/
Gustafson
Transfer_Test_directory
Utilities_2013
Transfer
Constants
DataStructures
EmptyTestDirectory
Transfer
Utilities
XFR
The source directory for all examples is
C:\Gustafson\Utilities_2013\Transfer
and the target directory is
C:\Gustafson\Transfer_Text_Target
Background
Earlier Experimentation [^]
In an earlier Code Project article,
Timings for Four Directory Traversal Algorithms,
the results of
timing four different directory traversal methods were presented.
Of the four traversal methods, the Stack implementation was chosen
for the Transfer tool.
In that paper it was stated that the directory traversal
would occur asynchronously (i.e., in a separate thread).
During Transfer design, it was found that there would be no
advantage to be gained by executing the directory traversal
asynchronously. This was because directory traversal
only occurs when the source directory changes and
all of its subdirectories and files must be recollected.
Also, directory traversal is only the first of a
sequence of operations that must occur. Because there was no
advantage, the Transfer's directory traversal occurs
synchronously.
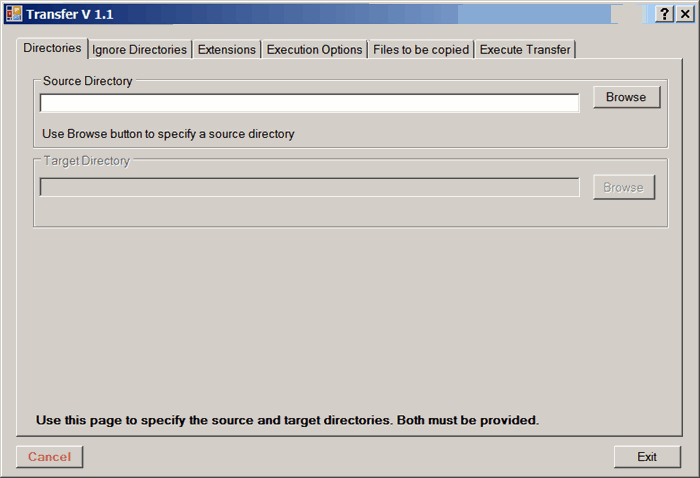
Transfer User Interface [^]
Transfer's user interface is a collection of TabPages. When Transfer
is first executed the display looks like the following:
As the user supplies data, the UI reacts by making TabPages available.
The contents of these pages are described below.
Within the UI, two buttons have a
Red text color. These buttons cause
a departure from normal processing. For example, in the previous
image, if the user clicks Cancel,
Transfer terminates without saving any input that the user may
have entered since its most recent execution. To protect against
an accidental click, the user must press the Ctrl key at the same
time that one of these buttons is clicked.
Diagram Legend [^]
The following Legend describes the contents of all of the diagrams
in this article.

Data Storage [^]
Data entered by the user is saved in a memory structure named
transfer_data.
using System;
using System.Collections.Generic;
using EO = DataStructures.ExecutionOptions;
using SL = DataStructures.SortedList;
namespace DataStructures
{
public class TransferData
{
private SL empty_directories = null;
private SL excluded_extensions = null;
private SL ignores = null;
private EO options = new EO ( );
private string source = String.Empty;
private string target = String.Empty;
private string user = String.Empty;
public TransferData (
SL empty_directories,
SL excluded_extensions,
SL ignores,
EO options,
string source,
string target,
string user )
{
Empty_Directories = empty_directories;
Excluded_Extensions = excluded_extensions;
Ignores = ignores;
Options = options;
Source = source;
Target = target;
User = user;
}
public TransferData ( )
{
empty_directories = new SL ( );
excluded_extensions = new SL ( );
ignores = new SL ( );
options = new EO ( );
Source = String.Empty;
Target = String.Empty;
User = String.Empty;
}
public SL Empty_Directories
{
get
{
return ( empty_directories );
}
set
{
empty_directories = value;
}
}
public SL Excluded_Extensions
{
get
{
return ( excluded_extensions );
}
set
{
excluded_extensions = value;
}
}
public SL Ignores
{
get
{
return ( ignores );
}
set
{
ignores = value;
}
}
public EO Options
{
get
{
return ( options );
}
set
{
options = value;
}
}
public string Source
{
get
{
return ( source );
}
set
{
source = value;
}
}
public string Target
{
get
{
return ( target );
}
set
{
target = value;
}
}
public string User
{
get
{
return ( user );
}
set
{
user = value;
}
}
}
}
A note about style. In the preceding example Auto-Implemented
Properties could have been used because no additional logic is
required. However, the current form makes maintenance
significantly easier if additional logic is required at some future
time.
When Transfer starts, the data for this structure is retrieved
from a hard drive.
During user interactions with the Transfer UI, this structure is
revised, most often in the Leave TabPage event handler; although
some updates occur immediately.
When either the Exit or Save button is clicked,
the contents of this structure are saved to a hard drive.
The path to the saved data structure defaults to the path to the
Transfer executable. In my case, the path is:
C:\Gustafson\Utilities_2013\Transfer\Transfer\bin\Debug
The filename is formed by prepending the current user's name to
the literal "TransferHistory.xml". Again in my case, the filename
is
gus.TransferHistory.xml
Transfer attempts to find the path to the user's data by searching
upward from the executable's path to C:/.
public static string find_file ( string filename )
{
bool done = false;
bool found = false;
string path = String.Empty;
if ( String.IsNullOrEmpty ( filename ) )
{
found = false;
}
else
{
if ( !String.IsNullOrEmpty (
Path.GetDirectoryName ( filename ) ) )
{
filename = Path.GetFileName ( filename );
}
path = Path.GetDirectoryName ( Application.
ExecutablePath );
while ( ! ( done || found ) )
{
done = ( path.ToUpper ( ).Equals ( @"C:\" ) );
if ( ! done )
{
Directory.SetCurrentDirectory ( path );
found = File.Exists ( @".\" + filename );
if ( ! found )
{
Directory.SetCurrentDirectory ( @"..\" );
path = Directory.GetCurrentDirectory ( );
}
}
}
}
if ( ! found )
{
path = String.Empty;
}
return ( path );
}
The user's data is stored on the hard drive as an XML file. For
example, if only one source and target directory are supplied, the
XML will appear as:
<code lang="xml">
="1.0"="utf-16"
<transferhistory>
<transfer>
<source path="path-to-source-1" />
<target path="path-to-target-1" />
<ignores />
<excludedextensions />
<options>
<option>Continue_On_Error</option>
<option>Copy_Empty_Directories</option>
</options>
</transfer>
</transferhistory>
If Transfer is executed against a second source directory, the XML
will appear as:
<code lang="xml">
="1.0"="utf-16"
<transferhistory>
<transfer>
<source path="path-to-source-1" />
<target path="path-to-target-1" />
<ignores />
<excludedextensions />
<options>
<option>Continue_On_Error</option>
<option>Copy_Empty_Directories</option>
</options>
</transfer>
<transfer>
<source path="path-to-source-2" />
<target path="path-to-target-2" />
<ignores />
<excludedextensions />
<options>
<option>Continue_On_Error</option>
<option>Copy_Empty_Directories</option>
</options>
</transfer>
</transferhistory>
Thus, each time that Transfer is executed and the user specifies a
new source directory, a new <transfer>...</transfer>
element will be added to the current content of the XML file.
In addition to retrieving transfer data saved earlier, Transfer
sets the registry key
HKEY_CURRENT_USER\Software\GGGustafson\Transfer\ExecutableAt
to point to the location of the Transfer executable. This registry
entry will be used by the XFR application.
Transfer Graphical Interface [^]
This section describes each of the Transfer TabPages.
Directories [^]
The Directories TabPage allows the user to specify the topmost
source directory and the target directory to which source
directories and files will be copied.
As displayed in Transfer User Interface,
above, when Transfer is first executed, or when the Source
directory Browse button is clicked, the Target directory GroupBox
is disabled.
The user clicks the Browse button to select a source directory. A
directory dropdown list is presented, with the local disk (C:\) at
the top of the list.
The user scrolls down, expanding nodes as needed. When the desired
directory is found, the user selects it (by clicking on the
directory name), and clicks the OK button. The selected directory
appears in the Source directory TextBox and the Target directory
GroupBox is enabled.
The Target directory is chosen in the same way as the Source
directory. However, the Target directory may not be a subdirectory
of the Source directory.
Until both source and target directories are provided, the user
cannot leave the Directories TabPage. This prohibition is enforced
by the TabControl's Deselecting event handler. To implement this
handler, the tag property of each TabPage was given a unique
value:
TabPage               Tag

Directory             directories
Ignore Directories    ignores
Extensions            extensions
Execution Options     options
Files to be copied    files
Execute Transfer      execute
When a TabPage is deselected, the event handler is invoked. That
handler ascertains, from the TabPage's tag, which TabPage is
being deselected and determines if the TabPage may be left. If
not, e.Cancel is set to true, thereby prohibiting the user from
leaving the page.
Note that the Deselecting event handler is invoked before the
TabPage's Leave event handler.
void transfer_TC_Deselecting (
object sender,
TabControlCancelEventArgs e )
{
TabPage leaving = ( sender as TabControl ).SelectedTab;
bool page_in_error = false;
switch ( leaving.Tag.ToString ( ).ToLower ( ) )
{
case "directories":
if ( ( transfer_data != null ) &&
( transfer_data.Count > 0 ) &&
( transfer_data_index >= 0 ) )
{
TD data =
transfer_data [ transfer_data_index ];
if ( String.IsNullOrEmpty ( data.Source ) )
{
source_directory_message_LAB.Text =
"A source directory must be supplied";
source_directory_message_LAB.ForeColor =
Color.Red;
page_in_error = true;
}
if ( String.IsNullOrEmpty ( data.Target ) )
{
target_directory_message_LAB.Text =
"A target directory must be supplied";
target_directory_message_LAB.ForeColor =
Color.Red;
page_in_error = true;
}
}
else
{
}
if ( !page_in_error )
{
save_BUT.Visible = true;
}
break;
case "ignores":
break;
case "extensions":
break;
case "options":
break;
case "files":
break;
case "execute":
break;
default:
break;
}
if ( page_in_error )
{
e.Cancel = true;
}
}
When both the Source and Target directories have been
specified, the Source directory is traversed, producing an
in-memory all_files structure.
If the user clicks on the Remove
Button, the current Source and all of its data (e.g., Target,
Ignores, Extensions, etc.) are removed from the transfer_data
structure. The only recovery is to click on the
Cancel Button and restart the
application.
When the Directories TabPage is entered, the Source directory is
retrieved from the transfer_data in-memory structure. Initially,
the transfer data extracted is that for the first transfer
element. Thereafter, the user controls which transfer data is
displayed.
The user may add a Source directory. That action will cause the
transfer_data contents to be revised.
On leaving the Directories TabPage, the all_files data is
generated from the current Source directory.
Transfer maintains currency by revising the value in
transfer_data_index.
The all_files is a SortedFileDataList. The SortedFileDataList
class is defined as:
using System.Collections.Generic;
using FD = DataStructures.FileData;
namespace DataStructures
{
public class SortedFileDataList : List < FD >
{
public void add ( FD file_data )
{
FD_Comparer fd_comparer = new FD_Comparer ( );
int position = this.BinarySearch ( file_data,
fd_comparer );
if ( position < 0 )
{
position = ~position;
}
this.Insert ( position, file_data );
}
public FD find ( string full_file_name )
{
FD_Comparer fd_comparer = new FD_Comparer ( );
FD file_data = new FD ( );
int position;
file_data.File_Length = 0;
file_data.Full_File_Name = full_file_name;
position = this.BinarySearch ( file_data, fd_comparer );
if ( position >= 0 )
{
file_data = this [ position ];
}
else
{
file_data = null;
}
return ( file_data );
}
public bool contains ( FD file_data )
{
return ( find ( file_data.Full_File_Name ) != null );
}
public void modify_sorted ( FD file_data,
int index )
{
this.RemoveAt ( index );
add ( file_data );
}
public void remove ( FD file_data )
{
FD_Comparer fd_comparer = new FD_Comparer ( );
int position;
position = this.BinarySearch ( file_data, fd_comparer );
if ( position >= 0 )
{
this.RemoveAt ( position );
}
}
}
}
The FileData class is defined as:
using System;
namespace DataStructures
{
public class FileData
{
private string full_file_name;
private long file_length;
public FileData ( string full_file_name,
long file_length )
{
File_Length = file_length;
Full_File_Name = full_file_name;
}
public FileData ( string full_file_name )
{
File_Length = 0;
Full_File_Name = full_file_name;
}
public FileData ( )
{
File_Length = 0;
Full_File_Name = String.Empty;
}
public long File_Length
{
get
{
return ( file_length );
}
set
{
file_length = value;
}
}
public string Full_File_Name
{
get
{
return ( full_file_name );
}
set
{
full_file_name = value;
}
}
}
}
Each FileData item of the all_files SortedFileDataList is created
as each file is found during the directory traversal. The file
length is recorded to provide the copy algorithm with the length
of the source files without performing another IO operation. The
traversal algorithm
is:
using System;
using System.Collections.Generic;
using System.IO;
using FD = DataStructures.FileData;
using SFDL = DataStructures.SortedFileDataList;
namespace Utilities
{
public class StackBasedTraversal
{
public static SFDL traverse_directories ( string root )
{
Stack < string > directories = new Stack< string > ( 20 );
SFDL all_files = new SFDL ( );
if ( Directory.Exists ( root ) )
{
directories.Push ( root );
while ( directories.Count > 0 )
{
string current_directory;
string [ ] files = null;
string [ ] subdirectories;
current_directory = directories.Pop ( );
try
{
subdirectories = Directory.GetDirectories (
current_directory );
}
catch ( UnauthorizedAccessException ex )
{
continue;
}
catch ( DirectoryNotFoundException ex )
{
continue;
}
foreach ( string subdirectory in subdirectories )
{
directories.Push ( subdirectory );
}
try
{
files = Directory.GetFiles (
current_directory );
}
catch ( UnauthorizedAccessException ex )
{
continue;
}
catch ( DirectoryNotFoundException ex )
{
continue;
}
foreach ( string file in files )
{
try
{
FD data = new FD ( );
FileInfo file_info;
file_info = new FileInfo ( file );
data.Full_File_Name = file_info.FullName.
Trim ( );
data.File_Length = file_info.Length;
all_files.add ( data );
}
catch ( FileNotFoundException ex )
{
continue;
}
}
}
}
return ( all_files );
}
}
}
The all_files SortedFileDataList contains, as its name implies,
all files found beneath the Source directory.
The transfer can be executed as soon as both source and target
directories have been provided. However, in that case, all files
beneath the source directory will be included in the transfer. If
the user wants to specify directories or extensions that should
not participate in the transfer, other TabPages need to be
accessed.
Ignore Directories [^]
The Ignore Directories TabPage allows the user to specify
directories that are not to participate in the transfer. Most
commonly, such directories include /bin and /obj directories.
Other directories may also be specified.
As displayed above, when the Ignore Directories TabPage is first
entered, it will contain an empty ListBox. If directories are
selected to be ignored, they will appear in the ListBox and be
recorded in the
transfer_data] structure. For
example, if the user clicked on the All .bin not present and All
.obj not present buttons, the ListBox could contain:
There are two ways to remove the entries in the ListBox.
- Select those directories that are to be removed by selecting a
directory entry and clicking the Remove button. Multiple
directories may be selected by holding down the Shift or Ctrl key
while making the selection.
- The Remove All button may be clicked, clearing all entries from
the ListBox.
Each time the Ignore Directories TabPage is entered, the
in-memory
transfer_data structure is accessed and any Ignores
directories that were saved earlier are written to the ListBox.
As the user revises the contents of the ListBox, transfer_data is
revised accordingly.
When the use leaves the Ignore Directories TabPage, the saved
Ignore directories (in the transfer_data structure) are used to
revise the all_files in-memory structure by eliminating all of the
Ignore directories contained therein.
Extensions [^]
The Extensions TabPage allows the user to exclude extensions
from participating in the transfer. Most commonly, such
extensions include dll, exe, and pdb. Other extensions may also
be specified.
The contents of the Extension TabPage ListBoxes are
dependant on whether or not Ignore directories have been
specified or whether Transfer was executed earlier. The
preceding image displays a first execution with no Ignore
directories specified. Note the presence of the dll, exe, and
pdb extensions.
The next image displays the Extensions TabPage when Ignore
directories have been specified (as if the user
clicked on the All .bin not present and All .obj not present
buttons in the
Ignore Directories TabPage).
Note here that the following extensions are not present:
- bat
- cache
- dll
- exe
- manifest
- pdb
- resources
- xml
All of these extensions are found in a directory that is to be
ignored.
Extensions cannot be added to either ListBox. The items
in the two ListBoxes reflect the current extensions beneath the
Source directory. To add an extension, a file with the desired
extension must be added to a directory beneath the Source
directory.
The algorithm used to fill the ListBoxes is not intuitive.
-
In the original design, all of the extensions found in files
in child directories of the Source directory were placed in
the Available ListBox. When the user left the Extensions
TabPage, the directories, moved from the Available ListBox to
the Chosen ListBox, were recorded. There is a major problem
with this
approach. File extensions in an added directory would not
appear in the extensions list in the transfer_data in-memory
structure. They also would not participate in the actual
transfer operation. This was not what was desired.
-
The solution was relatively straight-forward. Rather than
place all of the extensions in the Available ListBox; they
were placed in the Chosen ListBox. Now, newly added files,
with previously unseen extensions, would be transferred. In
effect, the semantics of the Available ListBox became a list
of extensions that were available, but not chosen for
transfer. If, during an earlier execution of Transfer, the
user had placed extensions in the available ListBox, they
would have been recorded in the Excluded_Extensions property
of the transfer_data structure.
The user moves extensions from one list to the other by clicking
on the arrow buttons located between the two ListBoxes.
The single arrow buttons move one or more selected
extensions to the opposite box.
Multiple extensions may be selected by holding down the Shift or
Ctrl key while making the selection.
The double arrow buttons move all extensions from one ListBox to
the opposite ListBox.
When all of the undesired extension have been moved from the
Chosen ListBox to the Available ListBox, the user simply
leaves the Extensions TabPage.
Each time the Extensions TabPage is entered, the in-memory
all_files is recreated from a traversal of the directories and
files beneath the Source directory. Then all_files has all Ignore
directories removed.
An in-memory all_extensions List is filled with the extensions of
all files found in all_files.
The Available and Chosen ListBoxes are filled from all_extensions.
The user moves extensions from one ListBox to the other.
When the user leaves the Extensions TabPage, the in-memory
transfer_data structure is
revised by saving the contents of the Available ListBox in
Excluded_Extensions.
Execution Options [^]
The Execution Options TabPage allows the user to influence the
way in which Transfer operates.
There are two options available to the user. They are recorded
in the ExecutionOptions structure:
namespace DataStructures
{
public class ExecutionOptions
{
private bool continue_on_error = false;
private bool copy_empty_directories = false;
public bool Continue_On_Error
{
get
{
return ( continue_on_error );
}
set
{
continue_on_error = value;
}
}
public bool Copy_Empty_Directories
{
get
{
return ( copy_empty_directories );
}
set
{
copy_empty_directories = value;
}
}
}
}
Both the Continue_On_Error and Copy_Empty_Directories are set to
true by default.
Each time the Execution Options TabPage is entered, the state of
the two options are retrieved from the in-memory transfer_data
structure and used to set the initial state of the two
CheckBoxes.
When the user leaves the Execution Options TabPage, the in-memory
transfer_data structure is
revised by saving the state of the two CheckBoxes.
Files to be copied [^]
The Files to be copied TabPage displays a list of all files that
will participate in the Transfer copy operation. If a file does
not appear in this list, it will not be copied.
The contents of the Files to be copied TabPage are influenced by
all the previous selection UI TabPages (i.e., Directories,
Ignore Directories, and Extensions).
Each time the Files to be copied TabPage is entered, a new
all_files in-memory structure is generated from the Source
directory recorded in the in-memory transfer_data structure.
Then the in-memory transfer_data structure is accessed and the
Ignores and Excluded_Extensions are used to create the
files_to_copy in-memory structure.
The files_to_copy in-memory structure is used to fill the ListBox.
When the user leaves the Files to be copied TabPage, no action is
taken.
Execute Transfer [^]
The Execute Transfer TabPage performs the actual copying of
files from the source directory to the target directory. When
this TabPage is first entered, it has the following appearance.
Behind the Execute Transfer TabPage is a state machine.
Initially, only the Start Button is displayed. When clicked, the
Start Button text changes to Stop, a Pause Button and a
ProgressBar are displayed, the transfer state is initialized,
and the transfer begins.
If the Pause Button is clicked, the current state of the
transfer is saved, the text of the Pause Button changes to
Resume, and the transfer stops.
If the Stop Button is clicked, the transfer stops, without
saving the current state. The state is restored to the Execute
Transfer initial state.
If the Resume Button is clicked, the state is restored to the
state of the transfer saved when the Pause Button was clicked,
the text of the Resume Button changes to Pause, and the transfer
restarts.
The actual copying of files occurs asynchronously using a
BackgroundWorker, created during the
initialization of the transfer state. The BackgroundWorker
supports cancelation (Stop and Pause Buttons) and progress
reporting.
The files_to_copy in-memory structure contains the sorted list of
all of the files that will be copied from the source to target
directories.
Two structures are used to communicate between Transfer and the
BackgroundWorker. ThreadInput, sent by Transfer to the
BackgroundWorker, provides the copy state.
namespace DataStructures
{
public class Thread_Input
{
public string source_directory { get; set; }
public string target_directory { get; set; }
public int file_count { get; set; }
public int start_at { get; set; }
}
}
ThreadOutput, sent by the BackgroundWorker to Transfer, updates
the information displayed in the Execute Transfer TabPage.
namespace DataStructures
{
public class Thread_Output
{
public string file_transferred { get; set; }
public string error_message { get; set; }
}
}
In Transfer, when the BackgroundWorker invokes the ReportProgress
method, it passes two parameters.
public void ReportProgress ( int    percentProgress,
                             Object userState )
From
Microsoft documentation,
percentProgress is the percentage, from 0 to 100, of the
background operation that is complete. However, because the type
of percentProgress is Int32, in Transfer the index of the just
copied file in files_to_copy is passed. With the upper bound of
the ProgressBar set to files_to_copy.Count, the value supplied in
the percentProgress plus one can be used directly to set the
ProgressBar value.
The userState Object returned is an instantiation of
Thread_Output. file_transferred is used to display the name of the
file just copied. If the error_message is neither null nor
empty, an error was encountered. Transfer acts on the error
depending upon the setting of Continue_On_Error.
The actual work of copying files, one file at a time, is performed
by the copy_file method.
public static string copy_file ( string filename,
long file_length,
string source_directory,
string target_directory )
{
bool copied = false;
string error_message = String.Empty;
int length = 0;
Op_Codes op_code;
string path = String.Empty;
string target_filename = String.Empty;
op_code = Op_Codes.INITIALIZE;
while ( op_code != Op_Codes.FINISHED )
{
switch ( op_code )
{
case Op_Codes.INITIALIZE:
copied = initialize ( filename,
file_length,
source_directory,
target_directory,
ref length,
ref target_filename,
ref path,
ref error_message,
ref op_code );
break;
case Op_Codes.TEST_TARGET_PATH:
copied = test_and_set_target_path (
path,
ref error_message,
ref op_code );
break;
case Op_Codes.TEST_TARGET_FILE:
copied = test_file_exists (
target_filename,
ref error_message,
ref op_code );
break;
case Op_Codes.TEST_FILE_SIZES:
copied = test_file_sizes (
target_filename,
file_length,
ref error_message,
ref op_code );
break;
case Op_Codes.COMPARE_CONTENTS:
copied = compare_contents (
filename,
target_filename,
ref error_message,
ref op_code );
break;
case Op_Codes.COPY_FILE:
copied = copy_a_file ( filename,
target_filename,
ref error_message,
ref op_code );
break;
case Op_Codes.FINISHED:
default:
op_code = Op_Codes.FINISHED;
break;
}
}
return ( error_message );
}
copy_file is invoked by the BackgroundWorker for each file in
files_to_copy. The helper methods that support the file copying
are:
static bool initialize ( string filename,
long file_length,
string source_directory,
string target_directory,
ref int length,
ref string target_filename,
ref string path,
ref string message,
ref Op_Codes op_code )
{
bool success = true;
message = String.Empty;
try
{
length = source_directory.Length;
target_filename = target_directory +
filename.Substring ( length );
path = Path.GetDirectoryName ( target_filename );
op_code = Op_Codes.TEST_TARGET_PATH;
}
catch ( Exception e )
{
message = process_exception ( e, op_code );
success = false;
op_code = Op_Codes.FINISHED;
}
return ( success );
}
static bool test_and_set_target_path ( string path,
ref string message,
ref Op_Codes op_code )
{
bool success = true;
message = String.Empty;
try
{
if ( Directory.Exists ( path ) )
{
op_code = Op_Codes.TEST_TARGET_FILE;
}
else
{
Directory.CreateDirectory ( path );
op_code = Op_Codes.COPY_FILE;
}
}
catch ( Exception e )
{
message = process_exception ( e, op_code );
success = false;
op_code = Op_Codes.FINISHED;
}
return ( success );
}
static bool test_file_exists ( string filename,
ref string message,
ref Op_Codes op_code )
{
bool success = true;
message = String.Empty;
try
{
if ( File.Exists ( filename ) )
{
op_code = Op_Codes.TEST_FILE_SIZES;
}
else
{
op_code = Op_Codes.COPY_FILE;
}
}
catch ( Exception e )
{
message = process_exception ( e, op_code );
success = false;
op_code = Op_Codes.FINISHED;
}
return ( success );
}
static bool test_file_sizes ( string target_filename,
long source_length,
ref string message,
ref Op_Codes op_code )
{
bool success = true;
message = String.Empty;
try
{
FileInfo file_info = new FileInfo ( target_filename );
if ( file_info.Length != source_length )
{
op_code = Op_Codes.COPY_FILE;
}
else
{
op_code = Op_Codes.COMPARE_CONTENTS;
}
}
catch ( Exception e )
{
message = process_exception ( e, op_code );
success = false;
op_code = Op_Codes.FINISHED;
}
return ( success );
}
static bool compare_contents ( string source_filename,
string target_filename,
ref string message,
ref Op_Codes op_code )
{
bool success = true;
message = String.Empty;
try
{
if ( FIO.files_contents_equal ( source_filename,
target_filename ) )
{
op_code = Op_Codes.FINISHED;
}
else
{
op_code = Op_Codes.COPY_FILE;
}
}
catch ( Exception e )
{
message = process_exception ( e, op_code );
success = false;
op_code = Op_Codes.FINISHED;
}
return ( success );
}
static bool copy_a_file ( string source_filename,
string target_filename,
ref string message,
ref Op_Codes op_code )
{
bool success = true;
message = String.Empty;
try
{
File.Copy ( source_filename,
target_filename,
true );
}
catch ( Exception e )
{
message = process_exception ( e, op_code );
success = false;
}
op_code = Op_Codes.FINISHED;
return ( success );
}
The OpCodes that are used are:
public enum Op_Codes
    {
    NOT_SPECIFIED,
    INITIALIZE,
    TEST_TARGET_PATH,
    TEST_TARGET_FILE,
    TEST_FILE_SIZES,
    COMPARE_CONTENTS,
    COPY_FILE,
    FINISHED
    }
Each time the Execute Transfer TabPage is entered, a new
all_files in-memory structure is generated from the Source
directory recorded in the in-memory transfer_data structure.
Then the in-memory transfer_data structure is accessed and the
Ignores and Excluded_Extensions are used to create the
files_to_copy in-memory structure.
The files_to_copy in-memory structure is used to determine what
files are to be copied.
When the user leaves the Execute Transfer TabPage, no action is
taken.
XFR Command Line Tool [^]
XFR is predicated upon an earlier execution of Transfer and
effectively provides a substitute for the XCOPY console command.
XFR is controlled by command line arguments and switches.
Forms of the XFR Command [^]
There are three forms of the XFR command line:
XFR
If XFR is invoked without any arguments, usage text will be
displayed and XFR will not perform any copying.
XFR ?
If XFR is invoked with a question mark (?) as its only argument,
XFR will access the transfer data generated by an earlier
execution of the Transfer application and will display the source
directories found therein. Each directory will be preceded by an
index that can be used to further invoke XFR. XFR will not perform
any copying if this form of invocation is used.
XFR <index> [ /I ] [ /E ] [ /F ] [ /V ]
If XFR is invoked with a directory index (obtained from XFR ?),
XFR will use the transfer data associated with that index to
perform the file copying. XFR will perform copying unless a
listing switch is present.
XFR Command Switches [^]
XFR accepts two types of switches: listing and execution.
Switches always begin with the forward slash (/), may appear in
any order, are case insensitive, and will be processed in the
order of their appearance. Switches may only appear after an
invocation of the form XFR ? and must be the last entries on the
command line.
There are three listing switches. If any listing switch is
present, no copying will occur.
/I Provide a list of Ignore directories
/E Provide a list of Excluded Extensions
/F Provide a list of Files to be copied
There is one execution switch. Presence of the execution switch
does not affect the copying (i.e., copying will occur).
/V Provide verbose output (i.e., the name
of each file copied).
All other forms of invocation will produce an error message,
followed by usage text.
Conclusion [^]
This paper has presented a directory copy tool that may be helpful to
programmers.
References [^]
The following references may be helpful.
History [^]
| 02/08/2013
| -
| Original Article
|
| 02/11/2013 | - | XFR has a version of 1.2
XFR displays a signon line (XFR V 1.2 MMM d, yyyy hh:mm tt)
XFR returns an ERRORLEVEL: zero if OK; one if error
"Press any key to
continue" removed to allow XFR to be executed from within a
batch file (.bat or .cmd).
|


 General
  News
News  Suggestion
  Question
  Bug
Bug  Answer
  Joke
Joke  Praise
  Rant
Rant  Admin
Admin 


