Latest News:
The name is now official: MyXaml!!!
MyXaml now supports Styles! (see revision history).
Interested in participating in the development of this technology? Join the open-source project! This project is NOT intended to emulate Longhorn's markup language nor the MSAvalon namespace. Rather, MyXAML supports namespaces without using a DOM backbone, instead using the property setters defined in the namespace classes directly.
Contents
If you rate this article, please explain your rating!
3/10/04
- Style sheets
- Revamped markup syntax -- removed need for the FormBase attribute
- Now can instantiate any class in a declared namespace at the root level, rather than just a System.Windows.Forms class.
An example of a style specification is:
<xgg:Style def:Name='XP'>
  <xgg:StyleProperties>
    <xgg:PropertyStyle FlatStyle='System'/>
  </xgg:StyleProperties>
</xgg:Style>

<xgg:Style def:Name='ButtonStyle' BasedOn='{XP}'>
  <xgg:StyleProperties>
    <xgg:PropertyStyle Size='80, 25'/>
  </xgg:StyleProperties>
</xgg:Style>
And the usage is straight forward:
<Button def:Name='OKButton'
Style='{ButtonStyle}'
Location='225, 10'
Visible='true'
Click='OnOK'
Text='&OK'/>
A couple notes about Style: Derived styles supersede properties defined in the "BasedOn" style. Because attributes are parsed from left to right, an object with a Style attribute can override a the property value by specifying the property value to the right of the Style attribute.
Refactoring Your Previous Markup
To review the changes made to the markup itself, see the body of this article. Basically, the old form was:
<Canvas Name="Foo" FormBase="Form"..></Canvas>
The new markup structure is:
<Form Name="Foo"...></Form>
More information can be found on the http://www.myxaml.com/ website--click on Tutorials.
2/25/04 - Many new features
- support for menus
- support for class namespaces via xml namespaces
- support for
DataSource properties used in list controls as an attribute
- support for
DataSource element for Xml defined lists
- support for
DataBinding
- inline code support
- code-behind support
- improved property setters
- revamped XML syntax to be more like XAML
- constructor parameters when instantiating runtime classes
- and many more features
2/16/04 - Added support for properties defined as attributes and for form events
2/13/04 - Initial Release
As per Leppie's suggestion, I have modified the form generator to handle XML attributes as a means of specifying property values. The property model architecture is still required for more complicated property types however.
This admittedly makes the XML considerably more readable! Currently, both modalities are supported (using attributes vs. using nodes), so you can mix and match as you please, but that may change in the future.
This is a complete rewrite of the article. Rather than going into code examples, I'm going to illustrate each of the features of this library.
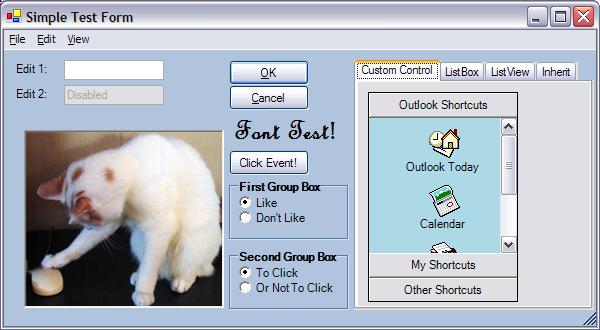
First off, let's start with the fun part, which is specifying the form in XML. I'll use the above screenshot to demonstrate the various features of the generator. After this section, I'll have some architectural diagrams that illustrate different use models.
An important consideration is that the nodes in the XML map directly to properties of the current context instance. For example, when a form is instantiated with a form base of "Form", the context instance is a System.Windows.Forms.Form, and you may set attributes to any of the properties that the Form class provides, including property collections such as Menu and Controls, as long as they are supported either with by a TypeConverter or a property setter model. The only exception to this hardfast rule is a DataSource element, in which the child nodes, Item, do not correlate to anything in particular because the DataSource property takes an Object type.
Another important consideration is that, rather than inlining a control's attributes and children, you can at any point specify Canvas as an attribute, and define a new type for that specific control. We'll see example of this later. What that means is that, for the specific control, you may define code-behind instances, as all root nodes allow for code-behind instances.
To begin with, let's inspect the XML header:
<?xml version="1.0" encoding="utf-8"?>

<UI xmlns="System.Windows.Forms, System.Windows.Forms, Version=1.0.5000.0,
Culture=neutral, PublicKeyToken=b77a5c561934e089"

xmlns:ka="OutlookBar, OutlookBarAssembly, Version=1.0.1.2, Culture=neutral,
PublicKeyToken=null"

xmlns:def="Definition">

<Form Name='PropertyTest' Location='10, 10' Size='600, 330'
      Visible='false' BackColor='LightSteelBlue' Closing='OnCloseEvent'
      Load='PropertyTestLoaded'
Text='Simple Test Form'>
Notice the use of namespaces to provide fully qualified names for the assemblies. This allows you to utilize third party components in your XML definition. Rather than using Microsoft's XAML namespace, I am choosing to code the assembly information directly in the namespace. This information has to reside somewhere, and this isn't XAML.
Defining A Form, Properties and Events
In XAML, the root node is typically a form in which you specify the coordinates of the child objects, so I chose to use the same name. The form is specified as:
<Form Name='PropertyTest' Location='10, 10' Size='600, 330'
Visible='false' BackColor='LightSteelBlue' Closing='OnCloseEvent' Load='OnLoad'
Text='Simple Test Form'>
Here, various properties are being set, and the "Load" event is being wired to an event handler. The event handler is a method name that is available in the target instance provided to the
XmlGuiGenerator. For example:
public class Demo
{
  Form form;
  public Demo()
  {
    form=(Form)Generator.LoadForm("propertyTest.xml", "PropertyTest",
          this, null);
    form.ShowDialog();
  }

  public void OnLoad(object sender, EventArgs e)
  {
    MessageBox.Show("OnLoad", sender.ToString());
  }
}
Similar to the System.Web.UI namespace, the <ode>XmlGuiGenerator will fire the "Load" event for any control that is instantiated, if the event is defined.
Notice that the FormBase is 'Form'. The form base can be anything, really, and we'll discuss that later on. A root node is special in that it can also have a code-behind or inline code instance that is compiled and instantiated at runtime. Several examples of this will be discussed later.
If the root node or child control supports the Menu property, you may define a menu:
<Menu>
<MenuItems>
<MenuItem Text='&File' Popup='OnPopup'>
<MenuItems>
<MenuItem Text='New'/>
<MenuItem Text='-'/>
<MenuItem Text='E&xit' Click='ExitApp'/>
</MenuItems>
</MenuItem>
<MenuItem Text='&Edit'/>
<MenuItem Text='&View'/>
</MenuItems></Menu>
Controls are added to the Controls collection, for example:
<Controls>
  <Button Location='225, 100' Size='80, 25' Visible='true'
          BackColor='Control'
          Click='OnMyEvent'>Click Event!</Button>
  <Label Location='225, 50' Size='120, 40' Visible='true'
         Font='French Script MT, 22pt, style=Bold'>Font Test!</Label>
  <Label Location='10, 12' Size='50, 15' Visible='true'>Edit 1:</Label>
  <Label Location='10, 37' Size='50, 15' Visible='true'>Edit 2:</Label>
  <TextBox Location='60, 10' Size='100, 20' Visible='true'/>
  <TextBox Location='60, 35' Size='100, 20' Visible='true' Enabled='false'>
           Disabled</TextBox>
  <Panel BorderStyle='Fixed3D' Top='95' Left='20' Size='200, 178'
         Visible='true' BackgroundImage='jojo.jpg' Anchor='Bottom, Left'/>
  <GroupBox Location='225, 130' Size='120, 60' Visible='true'
            Text='First Group Box' Font='MS Sans Serif, 8pt, style=Bold'>
    <Controls>
      <RadioButton Location='10, 15' Size='70, 15' Visible='true'
            Font='MS Sans Serif, 8pt' Load='InitialRadioButtonState'>
            Like</RadioButton>
      <RadioButton Location='10, 30' Size='70, 15' Visible='true'
            Font='MS Sans Serif, 8pt'>Don't Like</RadioButton>
    </Controls>
  </GroupBox>
  ...
This is a good example of inlined controls, in which the group box specifies child controls that it contains.
The second group box in the demo is canvased, meaning that it is defined in a separate root node. In the parent form XML, it declared as:
<GroupBox Canvas="GroupBox2"/>
A separate canvas defines the group box attributes and collections:
<GroupBox Name='GroupBox2' Location='225, 200' Size='120, 60' Visible='true'
          Text='Second Group Box' Font='MS Sans Serif, 8pt, style=Bold'>
  <Controls>
    <RadioButton Location='10, 15' Size='70, 15' Visible='true'
        Font='MS Sans Serif, 8pt' Load='InitialRadioButtonState'>
        To Click</RadioButton>
    <RadioButton Location='10, 30' Size='100, 15' Visible='true'
        Font='MS Sans Serif, 8pt'>Or Not To Click</RadioButton>
  </Controls>
</GroupBox>
Note that the events are handled by the target context declared by the parent form, which in this case is the class instance passed in to the generator as described above. (More on event context later).
Similarly, tab pages can be inlined or canvased:
<TabControl Location='350, 10' Size='240, 250' Visible='true'>
  <TabPages Canvas='TabPage1'/>
  <TabPages Canvas='TabPage2'/>
  <TabPages Name='TabPage3' Text='ListView' Load='PopulateListView'>
    <Controls>
      <ListView Location='5, 10' Size='222, 210' HeaderStyle='Nonclickable'
        FullRowSelect='true' GridLines='true' View='Details'>
        <Columns Width='150' TextAlign='Left'>State</Columns>
        <Columns Width='50' TextAlign='Center'>Abbr.</Columns>
      </ListView>
     </Controls>
  </TabPages>
  <TabPages Canvas='TabPage4'/>
</TabControl>
(In fact, the generator will allow you to specify a canvas as well as inlined collections, but that feature should not be relied upon).
Remember the namespace "ka" in the XML header. He's how my Outlook Bar control is implemented in the XML:
<TabPage Name='TabPage1' Text='Custom Control'>
...
  <Controls>
    <ka:OutlookBar Location='10, 10' Size='150, 210' Visible='true'
        BorderStyle='FixedSingle' Load='MyForm.OnLoad'/>
  </Controls>
</TabPage>
Note that the OutlookBar is declared with the namespace "ka" prefix. This tells the generator that the class name for this control is coming from the namespace declared in the XML header. Using the namespace, the fully qualified name can be obtained, and the class instantiated.
Now, what you ask, is in-between that "...", and what's "MyForm.OnLoad"??? Well, read-on.
The tab pages illustrate different means of implementing code-behind. The first is inlining. The full canvas for TabPage1 is defined as:
<TabPage Name='TabPage1' Text='Custom Control'>
<def:Code language='C#'>
<reference assembly="System.Drawing.dll"/>
<reference assembly="System.Windows.Forms.dll"/>
<reference assembly="OutlookBarAssembly.dll"/>
<![CDATA[
using System;
using System.ComponentModel;
using System.Diagnostics;
using System.Drawing;
using System.Windows.Forms;
using OutlookBar;
class MyForm
{
private OutlookBar.OutlookBar outlookBar;
public MyForm() {}
public void OnLoad(object sender, EventArgs e)
{
outlookBar=(OutlookBar.OutlookBar)sender;
IconPanel iconPanel1=new IconPanel();
IconPanel iconPanel2=new IconPanel();
IconPanel iconPanel3=new IconPanel();
outlookBar.AddBand("Outlook Shortcuts", iconPanel1);
outlookBar.AddBand("My Shortcuts", iconPanel2);
outlookBar.AddBand("Other Shortcuts", iconPanel3);
iconPanel1.AddIcon("Outlook Today", Image.FromFile("img1.ico"),
new EventHandler(PanelEvent));
iconPanel1.AddIcon("Calendar", Image.FromFile("img2.ico"),
new EventHandler(PanelEvent));
iconPanel1.AddIcon("Contacts", Image.FromFile("img3.ico"),
new EventHandler(PanelEvent));
iconPanel1.AddIcon("Tasks", Image.FromFile("img4.ico"),
new EventHandler(PanelEvent));
outlookBar.SelectBand(0);
}
public void PanelEvent(object sender, EventArgs e)
{
Control ctrl=(Control)sender;
PanelIcon panelIcon=ctrl.Tag as PanelIcon;
MessageBox.Show("#"+panelIcon.Index.ToString(), "Panel Event");
}
}
]]>
</def:Code>
<Controls>
<ka:OutlookBar Location='10, 10' Size='150, 210' Visible='true'
BorderStyle='FixedSingle' Load='MyForm.OnLoad'/>
</Controls>
</TabPage>
Any inline and code-behind code must declare the assemblies that it is referencing for the JIT compiler to correctly generate the assembly.
The generator allows you to define as many classes as you like in the code-behind. It manages the instance of each class, and since there can only be one instance per class (at least that it knows of), you can specify the instance that will handle events by prefixing the class name to the method name, in the format <className>.<methodName>, as illustrated above in "Load='MyForm.OnLoad'.
If you leave off the class name, the event will instead be wired to the event context passed in to the generator when the form is created.
Notice that the source language is also defined in the XML, allowing you to mix different languages for your code-behind source!
If you would rather work with a .cs or .vb file and take advantage of syntax checking and automated help, you can specify the code behind as residing in a file rather than inline. This is demonstrated in the second tab page:
<TabPage Name='TabPage2' FormBase='TabPage' Text='ListBox'>
  <def:CodeBehind Src="InitDataSource.cs">
  <reference assembly="System.Windows.Forms.dll"/>
  </def:CodeBehind>
  <Controls>
    <ListBox Name='States' Location='10, 10' Size='130, 210'
       DataSource='ListBoxDS.DataSource' DisplayMember='LongName'
       ValueMember='ShortName'
       SelectedValueChanged='ListBoxDS.ShowValue'/>
    <Label Location='150, 10' Size='60, 15' Visible='true'>By event:</Label>
    <TextBox Name='ByEvent' Location='150, 25' Size='75, 20' Visible='true'
       ReadOnly='true'/>
    <Label Location='150, 55' Size='60, 15' Visible='true'>
           By binding:</Label>
    <TextBox Location='150, 70' Size='75, 20' Visible='true' ReadOnly='true'>
      <DataBindings>Text, ListBoxDS.DataSource, ShortName</DataBindings>
    </TextBox>
  </Controls>
</TabPage>
This also illustrates DataBinding. Read on.
Controls that support the DataBinding property can have the property set in the XML. The format is simple:
<DataBindings>Text, ListBoxDS.DataSource, ShortName</DataBindings>
You specify the field to bind to, the data source, and the property name in data source that will return the data. Note that the data source must be obtained from a property from a context instance--either the code-behind or the instance supplied to the generator. Inspecting the C# code that comprises the code behind, the ListBoxDS class is automatically instantiated by the generator (as is, interestingly enough, a single instance of the DataItem class--in future release, I'll implement a class attribute that tells the generator to exclude instantiating the class):
public class ListBoxDS
{
private ArrayList dataSource;
public ArrayList DataSource
{
get {return dataSource;}
}
public ListBoxDS()
{
dataSource=new ArrayList();
dataSource.Add(new DataItem("AL", "Alabama"));
dataSource.Add(new DataItem("WA", "Washington"));
dataSource.Add(new DataItem("WV", "West Virginia"));
dataSource.Add(new DataItem("CT", "Connecticut"));
dataSource.Add(new DataItem("CA", "California"));
dataSource.Add(new DataItem("RI", "Rhode Island"));
dataSource.Add(new DataItem("NY", "New York"));
}
public void ShowValue(object sender, EventArgs e)
{
ListBox lb=(ListBox)sender;
TabPage tp=(TabPage)lb.Parent;
TextBox tb=(TextBox)FormHelper.FindControl(tp, "ByEvent");
tb.Text=lb.SelectedValue.ToString();
}
}
The DataItem class is defined as:
public class DataItem
{
  private string shortName;
  private string longName;

  public DataItem(string shortName, string longName)
  {
    this.shortName=shortName;
    this.longName=longName;
  }

  public string ShortName
  {
    get {return shortName;}
  }

  public string LongName
  {
    get {return longName;}
  }

  public override string ToString()
  {
    return LongName+" ("+ShortName+")";
  }
}
Alternatively, you may have a short list that you simply wish to hardcode members for, rather than creating programmatically. This is accomplished by specifying the DataSource as an element in the XML rather than an attribute, as is illustrated in the fourth tab page:
<MyCodeBehindClass Name='TabPage4' Text='Inherit'
     Load='MyCodeBehindClass.OnLoad'>
  <def:CodeBehind Src="MyCodeBehind.cs">
  <reference assembly="System.Windows.Forms.dll"/>
  </def:CodeBehind>
  <Controls>
    <Label Location='10, 10' Size='150, 15' Visible='true'>Test</Label>
    <Label Location='10, 42' Size='50, 15' Visible='true'>Colors</Label>
    <ComboBox Name='Colors' Location='60, 40' Size='100, 100'
      DisplayMember='text' ValueMember='value'>
      <DataSource>
        <item value='1' text='Red'/>
        <item value='2' text='Green'/>
        <item value='3' text='Blue'/>
      </DataSource>
    </ComboBox>
  </Controls>
</MyCodeBehindClass>
Note that the items must be specified to have "value" and "text" properties.
The XmlGuiGenerator is a very flexible thing (in fact, not limited to forms/controls at all!), and I thought I'd put together some usage scenarios diagrams. Hopefully they'll give you a flavor for the richness of this tool.

In this scenario, there is no code behind and the XML doesn't specify any events itself. Here, the application must wire up any event handlers programmatically, just as is done in regular development.
In this example, the generator manages the wiring of events automatically. The event is specified in the XML along with the method name in a class instance specified by the application. Of course, nothing prevents the application from programmatically wiring up other events.
In this example, the application does not provide an event context. It must wire up events programmatically. Also, since there is code-behind defined in the XML, the events can be handled by the code-behind instead of the application.
Code Behind And Application Context Events
In this example, both the application and the code-behind event handlers are wired by events specified in the XML, and both participate in handling the events.
This is an example of how child controls (or collections in general) are instantiated, and how events can be handled by both the application and code-behind context for both the main form and the child controls. This diagram assumes that all children are specified inline.
This example is a bit more complicated. Here, we have child controls that are specified with separate canvases, allowing the child to have unique code-behind for managing events.
Finally, instead of specifying the form base as a class in the System.Windows.Forms namespace (or other namespace), you can specify the form base to be of the class defined in the code-behind. As long as the code-behind class is derived from the appropriate class, you can set properties and events in both the code-behind and the super-class.
Debugging XML generated GUI's is not easy. There are a couple projects in the works to make your life easier. One is a Form2Xml converter, that parses an existing Visual Studio Designer developed form. Another is a generic form layout tool (http://www.divil.co.uk/net/articles/designers/hosting.asp). Anyone willing to work on those or if you have better ideas, please contact me.
Credits go to CPian Leppie for his many suggestions, CPian tditiecher for finding a bug, Kent Roylance for his patience in working with the CVS repository of this effort (contact me if you are interested in contributing, BTW), creating a Form2Xml utility and pointing me to a generic form designer, jconwell for his excellent article on Dot Net Script, and Roy Davis for his many excellent suggestions.
It has been pointed out that this is a lot like XAML that is planned in the release of Longhorn. The funny thing is, I didn't even now about XAML when I started this project. Oh well. Ignorance is bliss. For further reading on the XAML reference: http://longhorn.msdn.microsoft.com/lhsdk/port_ref_elements.aspx.
Use of this GUI generator must comply with the terms of the GNU General Public License.
Conclusion
Consider that this kind of a generator is not just restricted to windows form controls. It can be easily applied to web form controls, and in fact generalized to construct and initialize any kind of object! Using reflection, it would be possible to provide setters and getters of control values into specific class instance members as well. There's a lot you can do with this.


 General
  News
News  Suggestion
  Question
  Bug
Bug  Answer
  Joke
Joke  Praise
  Rant
Rant  Admin
Admin 


