Introduction
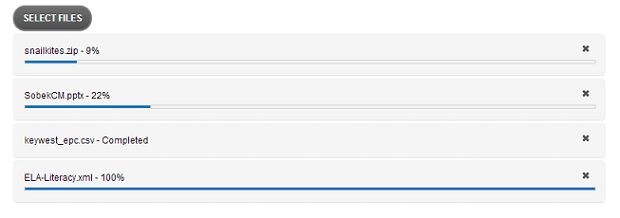
In this article I will demonstrate how to implement multiple file uploads with real-time progress bars within an ASP.NET solution using the Uploadify libraries. The HttpHandler class developed herein should easily plug and play into any ASP.NET application,
along with the provided ASP.NET control or class, making this useful as plug-in-play code as well as a demonstration of how to program the HttpHandler. In addition, I have added additional features in the ASP.NET layer, including file extension filtering, post-back upon completion, and session-based security.
Background
With HTML5 came the promise of handling upload of multiple files simultaneously without the use of ActiveX or other plug-ins. But plain HTML5 does not support real progress bars during the upload and is handled somewhat differently by each browser. And I needed a secure solution which allowed for file extension filtering.
In search of a solution to replace my older solution, I found Uploadify.
Apparently this library was originally written as a Flash plug-in, but a HTML5 solution was released in 2012. The Flash library is free. Regrettably, the HTML5 library comes at a small fee, either $5 or $100 if you wish to distribute the library. Ultimately, I decided it was a small cost for what appeared to be a quality product, but each of you will have to make that determination. I did implement the Flash version in the code included in case it was useful for others. And maybe it will be useful for older browsers in my projects. Also unfortunately, there were no clear examples online of implementing this solution within an ASP.NET project.
In this solution, I have wrapped the options within both a C# class (for writing directly to an output stream without controls) and also a C# web control. The classes handle most of the options which the library can handle. In addition, I added
JavaScript support for filtering the upload files client-side and server-side. The security aspects (and server-side file filtering) require the use of the session state, but help to prevent unwanted uploads. Other options necessary for my project are also added to the C# classes/controls.
Using the code
Before you get started
Before using the included code as-is, you should choose either the free Flash version or the HTML5 library. The entire contents of the Flash version should be placed in the empty Uploadify subfolder whereas the contents of the HTML5 version should be placed in the empty UploadiFive subfolder. The Flash version is utilized for the third demo (Demo3.aspx) and the HTML5 version is utilized for the first two demos.
Or, you could wrap the classes around the HTML5 multiple file input.
Referencing libraries
You will need to add references to the required jQuery library and the Uploadify library chosen. A standard
CSS file comes with the packages, so I have referenced that as well in my code. Add the following lines in the head of your ASPX form.
<script src="jquery/jquery-1.10.2.js" type="text/javascript"></script>
<script src="uploadifive/jquery.uploadifive.js" type="text/javascript"></script>
<link rel="stylesheet" type="text/css" href="uploadifive/uploadifive.css" />
or:
<script src="jquery/jquery-1.10.2.js" type="text/javascript"></script>
<script src="uploadify/jquery.uploadify.js" type="text/javascript"></script>
<link rel="stylesheet" type="text/css" href="uploadify/uploadify.css" />
Adding the control to your page
For ASP.NET web forms, you can add this control to your page by instantiating the UploadiFiveControl class code and adding it to the form or placeholder.
string savepath = Context.Server.MapPath("files");
UploadiFiveControl uploadControl = new UploadiFiveControl
{
UploadPath = savepath,
RemoveCompleted = true,
SubmitWhenQueueCompletes = true,
AllowedFileExtensions = ".jpg|.bmp"
};
form1.Controls.Add(uploadControl);
Adding the control in MVC should work analogously.
Utilizing the Flash version is quite simple, as the same control and classes are utilized, but the version flag is set to Flash, rather than the default. All other changes, including the name change for some of the options, are handled by the control.
UploadiFiveControl uploadControl = new UploadiFiveControl
{
UploadPath = savepath,
RemoveCompleted = true,
SubmitWhenQueueCompletes = true,
AllowedFileExtensions = ".jpg|.bmp",
Version = UploadiFive_Version_Enum.Flash
};
form1.Controls.Add(uploadControl);
HttpHandler for the uploaded files
You will also need to add the UploadiFiveFileHandler HttpHandler into your project. This handles the files as they are uploaded onto your server. This is the portion of the implementation which was least covered in any help pages or blog posts, so it is fully explored in the next section. To include this class, just copy the
UploadiFiveFileHandler.ashx and UploadiFiveFileHandler.ashx.cs into your project.
Security and the HttpHandler
Creating the HttpHandler is fairly straightforward, but providing for flexibility and adding security makes it slightly more complicated. This implementation utilized the session state to
provide security and pass information from the uploading page to the handler. For this purpose, the UploadiFive_Security_Token class is utilized. This class is quite simple and the
declaration is as below:
public class UploadiFive_Security_Token
{
public readonly string UploadPath;
public readonly string AllowedFileExtensions;
public readonly string FileObjName;
public readonly Guid ThisGuid;
public UploadiFive_Security_Token(string UploadPath, string AllowedFileExtensions, string FileObjName )
{
this.UploadPath = UploadPath;
this.AllowedFileExtensions = AllowedFileExtensions;
this.FileObjName = FileObjName;
ThisGuid = Guid.NewGuid();
}
}
As you can see, this class holds the path where the file should be saved, the allowable file extensions, and the key under which the file will be found by the handler. When the
UploadiFiveControl class is rendered, it creates a new security token and stores it in the session state under the GUID.
Additionally, the GUID itself is added it to the FormData dictionary, so that it is passed to the Uploadify library, and in turn passed back to the handler with the file data. Then the handler can retrieve the security token from the session, based on the GUID.
UploadiFive_Security_Token newToken =
new UploadiFive_Security_Token(UploadPath, AllowedFileExtensions, FileObjName);
HttpContext.Current.Session["#UPLOADIFIVE::" + newToken.ThisGuid.ToString()] = newToken;
FormData["token"] = newToken.ThisGuid.ToString();
The form data is included in the JavaScript to create the Uploadify control. Below is a sample of the resultant HTML, without any file extension restrictions:
<input id="file_upload" name="file_upload" class="file_upload" type="file" />

<script type="text/javascript">
  $(document).ready(function() {
    $('#file_upload').uploadifive({
      'fileObjName': 'Filedata',
      'formData': { 'token' : 'da66e0ad-750b-4d76-a016-72633dea8b53' },
      'onQueueComplete': function (uploads) { $('#file_upload').closest("form").submit(); },
      'uploadScript': 'UploadiFiveFileHandler.ashx'
    });
  });
</script>
As you can see above, the GUID generated by the security token is included in the
JavaScript to initialize the library.
The HttpHandler needs access to the session state, so it needs to implement the IReadOnlySessionState interface.
Below is the complete code of the ProcessRequest method of the handler, without any of the file extension restriction code:
Context.Response.ContentType = "text/plain";
Context.Response.Expires = -1;
string tokenKey = Context.Request["token"];
if (tokenKey == null)
{
Context.Response.Write("No token provided with this request");
Context.Response.StatusCode = 401;
return;
}
UploadiFive_Security_Token tokenObj =
Context.Session["#UPLOADIFIVE::" + tokenKey] as UploadiFive_Security_Token;
if (tokenObj == null)
{
Context.Response.Write("No matching server-side token found for this request");
Context.Response.StatusCode = 401;
return;
}
try
{
HttpPostedFile postedFile = Context.Request.Files[ tokenObj.FileObjName ];
if (postedFile != null)
{
string path = tokenObj.UploadPath;
if (!Directory.Exists(path))
Directory.CreateDirectory(path);
string filename = Path.GetFileName(postedFile.FileName);
postedFile.SaveAs(path + @"\" + filename);
Context.Response.Write(filename);
Context.Response.StatusCode = 200;
}
}
catch (Exception ex)
{
Context.Response.Write("Error: " + ex.Message);
Context.Response.StatusCode = 500;
}
If the token is not found in the session the file will not be accepted for upload.
File-Extension Restrictions
It is often desirable to limit what files can be uploaded, based on file extension. In this next section, I will show how I implemented this, within the security framework above, both at the server-side and client-side.
For the client-side checks, this is implemented as an event within the UploadiFive library, but the
onChange event of the file input could also be used, to implement this outside the library.
The allowed file extensions are passed into the UploadiFiveControl control as a comma-separated string.
uploadControl.AllowedFileExtensions = ".jpg|.bmp";
If this is set, then javascript is attached to the onAddQueueItem event when the HTML is rendered.
<script type="text/javascript">
  $(document).ready(function() {
    $('#file_upload').uploadifive({
      'fileObjName': 'Filedata',
      'formData': { 'token' : '4c893799-fd21-4d85-80c4-e32e6cacc794' },
      'removeCompleted': true,
      'onAddQueueItem' : function(file) {
          var extArray = JSON.parse('[ ".jpg", ".bmp" ]');
          var fileName = file.name;
          var ext = fileName.substring(fileName.lastIndexOf('.')).toLowerCase();
          var isExtValid = false;
          for(var i = 0; i < extArray.length; i++)
          {
            if ( ext == extArray[i] )
            {
              isExtValid = true; break;
            }
          }

          if ( !isExtValid )
          {
            alert("File types of '<extension>' are not allowed".replace('<extension>', ext));
            $('#file_upload').uploadifive('cancel', file);
          }
        },
      'uploadScript': 'UploadiFiveFileHandler.ashx'
    });
  });
</script>
This reads the list of extensions, converted by the C# control into a JSON array, and verifies the file extension against the array. If the extension is not allowed, the user is alerted and the file is removed from the queue for upload.
The code on the server-side, in the HttpHandler is quite similar, and utilizes the security token to get the list of allowed extensions. The new code in the handler is included below.
string filename = Path.GetFileName(postedFile.FileName);
if ( !String.IsNullOrEmpty(tokenObj.AllowedFileExtensions))
{
string extension = Path.GetExtension(postedFile.FileName).ToLower();
List<string> allowed = tokenObj.AllowedFileExtensions.Split("|,".ToCharArray()).ToList();
if (!allowed.Contains(extension))
{
Context.Response.Write("Invalid extension");
Context.Response.StatusCode = 401;
return;
}
}
postedFile.SaveAs(path + @"\" + filename);
With this code, the file extension security is now in place both client-side and server-side.
File-Size Limits
There are a number of ways to limit the file uploads by size. IIS has its own upload file size limitations. When working with any uploader, you must be aware of this. In addition, Uploadify has a way to limit the size of files uploaded, and I have exposed this option in the classes I provided.
In the web.config file, you can set the maximum allowed content type, which affects the posted upload files. This appears in a tag under the system.webServer security section. This restriction is based on byte count. So, the code below limits the upload to approximately 200MB. This code is also present in the web.config in the provided code.
<configuration>
    <system.webServer>
        <security>
            <requestLimits maxAllowedContentLength="209715200" />
        </security>
    </system.webServer>
</configuration>
In addition, the Uploadify library exposes a javascript property fileSizeLimit which is exposed in the C# classes as FileSizeLimit. This is a string like '100KB', or '200MB'.
Compatibility and Fallback to Flash
Some browsers still in widespread use do not implement the necessary elements to support the HTML5 version, most notably IE9. Without any provisions to fallback, the user will see the standard HTML file browse input, but there will not be an upload button and nothing will work correctly.
Luckily, we can simply fallback to the Flash version, which looks very similar to the HTML5 version. To do this, we utilize the onFallback event exposed by the control. This was additionally implemented in the C# classes available for download here. Below is what it would look like to add this function to your code using the UploadiFiveControl control.
UploadiFiveControl uploadControl = new UploadiFiveControl
{
UploadPath = savepath,
RemoveCompleted = true,
Version = UploadiFive_Version_Enum.HTML5,
RevertToFlashVersion = true,
NoHtml5OrFlashMessage = "Please try a more current browser"
};
In this example below, we instruct the class to include the Flash fallback by setting the RevertToFlashVersion property to true. Finally, if the browser can support neither HTML5 nor Flash, we can have an alert popup by setting the NoHtml5OrFlashMessage property.
The example above generates the javascript code below which is included in the HTML for your aspx page:
<script type="text/javascript">
$(document).ready(function() {
$('#file_upload').uploadifive({
'fileObjName': 'Filedata',
'formData': { 'token' : 'f8916a9f-9dda-441f-a58b-13948e61f7e7' },
'removeCompleted': true,
'uploadScript': 'UploadiFiveFileHandler.ashx',
'onFallback': function() {
$('#file_upload').uploadify({
'fileObjName': 'Filedata',
'formData': { 'token' : 'f8916a9f-9dda-441f-a58b-13948e61f7e7' },
'removeCompleted': true,
'swf': 'uploadify/uploadify.swf',
'uploader': 'UploadiFiveFileHandler.ashx',
'onFallback': function() { alert('Please try a more current browser'); }
});
}
});
});
</script>
With this functionality added, there is a very nice, nearly identical, fallback in place for older browsers. It does add the caveat that Flash is necessary for the fallback to work, but as a secondary option that was acceptable for my use. Of course, to use this you will need to download both versions and reference the css and js of both versions in your header.
Get this code
All this code and four demo aspx pages are available here:
History
- Original code posted on December 15, 2013.
- Updated code and article to add file-size limitations on December 18, 2013.
- Updated code and article to demonstrate fallback to flash version on January 10, 2014
Mark works at the University of Florida Libraries as the head of the Digital Development and Web team. He has been working with C# and ASP.net since 2002, mostly developing applications to assist with digitization in academic libraries. In addition, he supports consortial efforts through technology and training. He is the lead developer on the open-source SobekCM Digital Repository software for managing online digital content which can be found on GitHub, Google Code, and at http://sobekrepository.org


 General
  News
News  Suggestion
  Question
  Bug
Bug  Answer
  Joke
Joke  Praise
  Rant
Rant  Admin
Admin 


 hi can i download html5 liberary
 found what i need awesome post many thanks for sharing!