Introduction
Windows Azure is an exciting platform from Microsoft which supports massively scalable tables in the Cloud, which can contain billions of entities and terabytes of data. Windows Azure storage lets user store data in Windows Azure Blob (provides storage for large data items) and Windows Azure Table (provides structured storage). A clear understanding about how to interact with entity tables and blobs will enable us to fully appreciate and utilize all the features of Azure. This article describes the concepts for doing CRUD (Create, Read, Update, Delete) operations on Windows Azure Tables and how table data can interact with the Blobs.
Background
The Azure SDK comes with some samples which are helpful to understand the technology. There have been two major releases of the Azure SDK; the first one was in March 2009, and the second one in November 2009. The March release had the StorageClient class to work with Blobs and Table storage in the Local Development storage as well as the Cloud. In the November release, Microsoft released an API for the Storage Service, and simplified things like storage string manipulation.
Some samples have come with the SDK. Two of the samples, Thumbnail and the Personal Web Site, give a very good flavor of the Azure development environment. The Thumbnail sample is useful to understand Blob manipulation and the Worker role in Azure. The personal web site sample has an example of how to work with tables and blobs. The thumbnail example has been modified for the new Storage Client API and the Personal web site has not been.
This article uses the Thumbnail sample and extends it. The Thumbnail sample lets you browse through an image file and save it in Blob storage. A worker role is created which creates the thumbnail of the image you uploaded, and the image and its thumbnail are stored as blobs. The web page displays the thumbnails in the Blob storage, and the page is refreshed every ten seconds.
In this extension, the following features are added:
- Enter a name, date, and comments of the picture you are downloading.
- Modify fields after they are stored in the tables.
- Delete a picture and the associated data.
- The thumbnail in the list, when clicked, displays the original picture.
- Remove automatic refresh every second, and uses an
UpdatedPanel to update the relevant sections of the page, avoiding unnecessary round trips to the server.
Outputs
The original sample default page looked like the following:
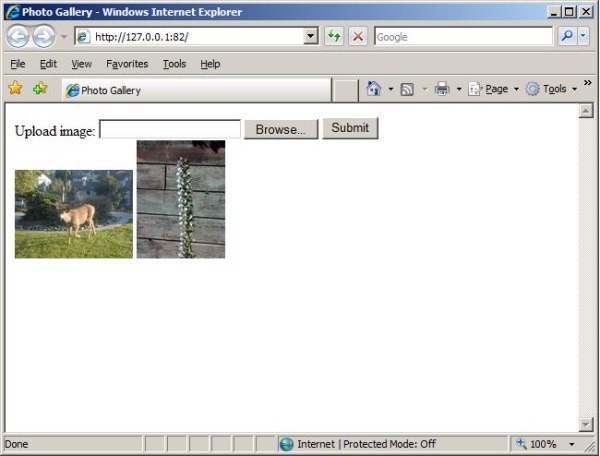
The extended code described in this article produces the following default page:

Set up
Let us jump in to the code. You can unzip the project code with this article and open the solution in Visual Studio to follow this discussion.
I am assuming you know how to set up Azure, have downloaded the SDK, and are able to run samples in the SDK in the Visual Studio 2008 environment. You may want to refer to the Microsoft help videos and articles on setting up Azure if you do not know how to do it. You may also want to refer to the original Thumbnails sample to follow some of the additions done in this code.
One of the new features in the November SDK is to use the DataConnectionString. You can find the WebRole and WorkerRole projects in the roles folded, right click on them, and look at the properties. This will show the menus to set up the DataConnectionString. So there is no need to work with the ServiceConfiguration and ServiceDefinition XML files as you had to in the March release.
Classes
The PhotoTableDataModel, PhotoTableDataServiceContext, and PhotoTableDataSource classes in the Code folder are new and related to the PhotoTable extensions. The ideas for these classes came from the directions given by Jim Nakashima in his blog "Walkthrough: Windows Azure Table Storage (Nov 2009 and later)".
The Blob and Queue related methods in the original sample Default.aspx.cs files are taken out and added to the Blob classes to be consistent with the Table classes.
These classes also create Tables and Blob containers if they are not present.
Storing the blob and the associated table row
When you run the program, you will see the default page. You can browse to the image you want to upload, enter a name, date, and any comment, and push the Submit button. The submit button Click event is raised. The code is given below:
protected void submitButton_Click(object sender, EventArgs e)
{
if (upload.HasFile)
{
DateTime DTN = DateTime.Now;
long DTNTicks = DateTime.Now.Ticks;
var name = string.Format("{0:10}_{1}", DTNTicks, Guid.NewGuid());
blobclass1.GetPhotoGalleryContainer().GetBlockBlobReference(
name).UploadFromStream(upload.FileContent);
blobclass1.GetThumbnailMakerQueue().AddMessage(
new CloudQueueMessage(System.Text.Encoding.UTF8.GetBytes(name)));
System.Diagnostics.Trace.WriteLine(String.Format("Enqueued '{0}'", name));
AddPhotoTableRow(name,DTN);
}
System.Threading.Thread.Sleep(1000);
Display_Thumbnails();
}
This code extends the original sample code. A unique ID (name) is created by combining the Now time and the Guid. A container is created with this ID (name), and a worker queue is created. The worker queue creates the thumbnail image and stores in the thumbnail. AddPhotoTablRow adds the data from the submit form to the Azure table storage. After a one second delay, Display_Thumbnails is called. Display_Thumbnails, AddPhotoTableRow, and Delay will be described shortly.
Display thumbnails
One of the major enhancements to the original sample is the display of the table data and the associated image in a ListView. The ASPX and the code-behind are given below. The original sample code just displays the thumbnails:
<asp:ListView ID="thumbnails" runat="server" >
<LayoutTemplate>
<asp:Image ID="itemPlaceholder" runat="server" />
</LayoutTemplate>

<ItemTemplate>
<tr style = "border:5px" >
<td>
<%# Eval("PhotoName") %><br />

<%# DataBinder.Eval(Container.DataItem, "PhotoTakenDate", "{0:MM.dd.yyyy}")%>

<br />
<%# Eval("PhotoComment") %>
</td>

<td>
<asp:ImageButton ID="photoimagebutton" runat="server"
                          ImageUrl='<%# Eval("Url") %>'
OnCommand="Select_Image_Command" CommandName="Select_Image"
CommandArgument='<%# Eval("rowKey") %>' />
</td>
<td>
<asp:Button runat="server" Text="Delete Data" ID="Delete_Data"
OnCommand="Delete_Data_Command" CommandName="Delete_Data"
CommandArgument='<%# Eval("rowKey") %>' />
</td>
<td>
<asp:Button runat="server" Text="Update Data" ID="Update_Data"
OnCommand="Update_Data_Command" CommandName="Update_Data"
CommandArgument='<%# Eval("rowKey") %>' />
</td>

</tr>
</ItemTemplate>

</asp:ListView>
The code-behind:
private void Display_Thumbnails()
{
	var account = CloudStorageAccount.FromConfigurationSetting("DataConnectionString");
	var context = new PhotoTableDataServiceContext(
                      account.TableEndpoint.ToString(), account.Credentials);
	List<PhotoTableDataModelwithUrl> PTDMUrl = new List<PhotoTableDataModelwithUrl>();
	var bloblist = from o in
      blobclass1.GetPhotoGalleryContainer().GetDirectoryReference("thumbnails").ListBlobs()
	select new { Url = o.Uri };
	foreach (PhotoTableDataModel item in context.PhotoTableData)
    {
    	PhotoTableDataModelwithUrl PTDMUrlItem = new PhotoTableDataModelwithUrl();
    	PTDMUrlItem.PartitionKey = item.PartitionKey ;
    	PTDMUrlItem.RowKey = item.RowKey;
    	PTDMUrlItem.PhotoName = item.PhotoName;
    	PTDMUrlItem.PhotoTakenDate = item.PhotoTakenDate;
    	PTDMUrlItem.PhotoUploadDate = item.PhotoUploadDate;
    	PTDMUrlItem.PhotoComment = item.PhotoComment;

    	foreach (var s in bloblist)
        {
        	if (s.Url.ToString().Contains(PTDMUrlItem.RowKey))
            {
            	PTDMUrlItem.Url = s.Url.ToString();
            }
        }
    	PTDMUrl.Add(PTDMUrlItem);

    }
	thumbnails.DataSource = PTDMUrl;
	thumbnails.DataBind();
	up1.Update();
}
A list is created using the table data and the associated thumbnail image. Using a LINQ query (similar to the one in the original sample), a URL list for all the blobs is created. A second list is created for all rows in the DataTable. Using the first list, the relevant URL is added to the second list, which is then bound to the ListView, which produces the display.
There are three user interaction controls in a row. When you click on the thumbnail image, the bigger image control on the right gets updated with the original image. The Delete Data button deletes the blob and the associated table row. The Update Data button populates the
UpdatePanel with the data for the particular row, which can be changed by the user.
CommandArgument is used to store the row key which is used to identify the row and the blobs associated with it.
AddPhotoTableRow to store table row associated with a blob
The AddPhotoTableRow code is given below:
private void AddPhotoTableRow(string blobname, DateTime DTN)
{
	PhotoTableDataModel PTDM = new PhotoTableDataModel();
	PTDM.PartitionKey = "Album1";
	PTDM.RowKey = blobname;

	if (TextBoxName.Text!="")
    {
    	PTDM.PhotoName = TextBoxName.Text;
    }
	else
    {
    	PTDM.PhotoName = "Name";
    }
	if (TextBoxComment.Text != "")
    {
    	PTDM.PhotoComment = TextBoxComment.Text;
    }
	else
    {
    	PTDM.PhotoComment = "Comment";
    }
	if (TextBoxDate.Text != "")
    {
    	PTDM.PhotoTakenDate = Convert.ToDateTime(TextBoxDate.Text);
    }
	else
    {
    	PTDM.PhotoTakenDate = DTN;
    }

	PTDM.PhotoUploadDate = DTN;
	PTDS.Insert(PTDM);
}
A row is created with the unique blob name as the row key. The partition key is Album1. This can be used to to store album names in future versions to extend this code further. The PhotoTable classes make it a breeze to add a phototable row. It is as simple as stuff the data in a row with a relevant partition key and row key and call the Insert (row) method!
Deleting a table row and blob
Deleting the data code is as below:
protected void Delete_Data_Command(object sender,
          System.Web.UI.WebControls.CommandEventArgs e)
{
	var blobname = e.CommandArgument.ToString();
	var blobcontainer = blobclass1.GetPhotoGalleryContainer();
	var blob = blobcontainer.GetBlobReference(blobname);
	blob.DeleteIfExists();
	var blobt = blobcontainer.GetBlobReference("thumbnails/" + blobname);
	blobt.DeleteIfExists();
	PhotoTableDataModel PTDM = (from PTDM1 in PTDS.Select()
	where PTDM1.RowKey == e.CommandArgument.ToString()
	select PTDM1).FirstOrDefault();

	PTDS.Delete(PTDM);
	Display_Thumbnails();
}
BlobClass and the Photo Table classes enable deleting records easily. The CommandArgument gives the reference which is used to delete the blob and the thumbnail. The row reference is obtained using the LINQ command and then deleted.
Updating a table row
Updating a data row is as given below:
protected void Update_Data_Command(object sender,
          System.Web.UI.WebControls.CommandEventArgs e)
{
	PhotoTableDataModel PTDM = (from PTDM1 in PTDS.Select()
	where PTDM1.RowKey == e.CommandArgument.ToString()
	select PTDM1).FirstOrDefault();

	TextBoxNameEdit.Text = PTDM.PhotoName;
	TextBoxDateEdit.Text = PTDM.PhotoTakenDate.ToShortDateString();
	TextBoxCommentEdit.Text = PTDM.PhotoComment;
	TextBoxRowKeyEdit.Text = PTDM.RowKey;
	UpdateEditPanel1.Update();
}
CommandArgument provides the row reference; the row is obtained using the LINQ command. The row info is obtained from the entered text and then the row is updated by calling the Update method. SubmitChanges is very similar to UpdateTableRow, and uses the data modified by the user.
Update panels
One of the interesting ways the original sample did data updates was by using a timer which updated the page every second. It is not clear why this was done, because this causes a round trip to the server every second even when there is no user interaction. This revised code has UpdatePanels which are updated by the relevant code when information changes due to a user interaction. Excerpts from the code are given below.
ASPX
<asp:UpdatePanel ID="up1" runat="server" UpdateMode="Conditional">
Code-Behind:
up1.Update();
This technique lets the update happen when it is necessary. When a new photo is submitted, the queue sometimes takes a few hundred milliseconds to create the thumbnail. A delay of 1 second is introduced before the thumbnail is updated in the ListView to make sure the just uploaded thumbnail is displayed.
Points of interest
The exciting aspects of this project were the simplification on CRUD operations on Azure tables and associating blobs with tables. Due to the new API, the code has become very user friendly and easy to follow. The AJAX UpdatePanel also reduces the interactions with the server.
History
First version.
Vijay Kumar: Architect, Programmer with expertise and interest in Azure, .net, Silverlight, C#, WCF, MVC, databases and mobile development. Concentrating on Windows Phone 7 and Windows Azure development. Lived in California for many years and done many exciting projects in dotnet and Windows platforms. Moved to Raleigh (RTP), North Carolina recently and available for consulting. Blog http://Silverazure.blogspot.com.


 General
  News
News  Suggestion
  Question
  Bug
Bug  Answer
  Joke
Joke  Praise
  Rant
Rant  Admin
Admin 


