Introduction
There is a limited InstallSheild which is supplied with VC++ 6.0. This is an article to demonstrate how to use Installshield to build an installer which will deliver a single executable to a destination folder.
Step 1
If you have not installed InstallSheild for Visual C++ from the CD, do so now.
Step 2
Fire up Visual C++ and write a totally cool killer app which you wish to deploy.
Step 3
After resting a bit and feeling pretty pleased with yourself for writing a bug free killer app, generate a release build (statically linked).
Now, in the tools menu select "InstallShield Wizard". Use the "Browse" button to locate the project file for your killer app.
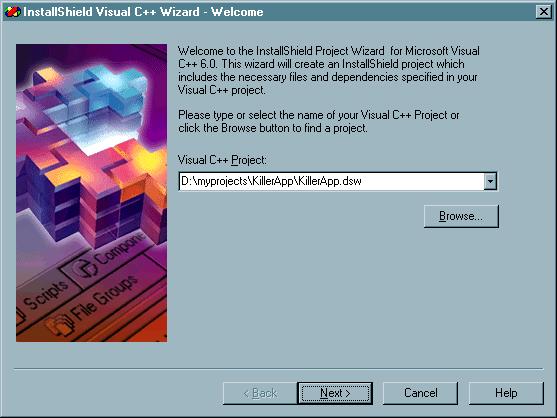
Once you have done this, click the "Next" button and fill in the dialog.

Once you have filled in the relevant details, click the "Next" button again and you will be faced with a "Summary" dialog, click "finish" and InstallShield will open. To look something like this following...
Step 4
Ok, sit back and take a deep breath, the fun isn't over yet. Perhaps it's time for a coffee break, watch some TV. Let it all sink in.
In the "Projects Workspace" on the left, click on the "File Groups" tab
Open the "Program Executables" folder and check that "Links" file displays the information for the killerapp executable in the right hand pane. If it doesn't, right click the "Links" file icon (or right click on the pane which displays the info) and use the file dialog to locate the exe and click "Open".
Step 5
Next click on the "Setup Types" tab.
Because we are only delivering one file we won't be requiring three type of setup. So click on "Compact" and then either hit the "Delete" key, or right click on "Compact" and select "Delete" from the drop down. Click "Yes" when the dialog asks you if you are sure. Then repeat the process for "Custom". This should leave you with just "Typical".
Step 6
There are a few things to do before we're done, not much and it shouldn't take us long, so bare with me and we'll be done before you know it.
Click on the "Scripts" tab and InstallShield will open up a pane on the right hand side. Inside this scripts page is where we can do some cool stuff. The first thing we're going to do is remove parts of the Installation setup which we don't need.
Now, scroll down, or use the Control-F and find the "Show Dialogs" script function.
This function organises the display of the installation dialogs. Locate and either delete or comment out (using "//" just like C++) the sections of code which looks like
Dlg_SdRegisterUserEx:
    nResult = DialogShowSdRegisterUserEx();
    if (nResult = BACK) goto Dlg_SdLicense;
and
Dlg_SdSetupType:
     nResult = DialogShowSdSetupType();
     if (nResult = BACK) goto Dlg_SdAskDestPath;
If you don't want to show text relating to a licence, then deal with
Dlg_SdLicense:
    nResult = DialogShowSdLicense();
    if (nResult = BACK) goto Dlg_SdWelcome;
Now, below this find the script which looks like
Dlg_SdComponentDialog2:
        if ((nResult = BACK)
                 && (svSetupType != "Custom") && (svSetupType != "")) then
           goto Dlg_SdSetupType;
        endif;
        nResult = DialogShowSdComponentDialog2();
        if (nResult = BACK) goto Dlg_SdSetupType;
and replace it with
Dlg_SdComponentDialog2:
        if (nResult = BACK) then
           goto Dlg_SdSetupType;
        endif;
        nResult = DialogShowSdComponentDialog2();
        if (nResult = BACK) goto Dlg_SdAskDestPath;
and find the text which looks like
Dlg_SdAskDestPath:
        nResult = DialogShowSdAskDestPath();
        if (nResult = BACK) goto Dlg_SdRegisterUserEx;
replace it with
Dlg_SdAskDestPath:
        nResult = DialogShowSdAskDestPath();
        if (nResult = BACK) goto Dlg_SdWelcome;
and also find
Dlg_SdComponentDialog2:
        if (nResult = BACK) then
           goto Dlg_SdSetupType;
        endif;
        nResult = DialogShowSdComponentDialog2();
        if (nResult = BACK) goto Dlg_SdSetupType;
and replace it with
Dlg_SdComponentDialog2:
       if (nResult = BACK) then
          goto Dlg_SdAskDestPath;
       endif;
       nResult = DialogShowSdComponentDialog2();
       if (nResult = BACK) goto Dlg_SdAskDestPath;
Step 7
This is probably a bit redundant, but if you don't want to show a splash screen when the installer runs (or if you do and you want to know where to put your image)
Click on the "Setup Files" tab, and use the navigation tree to locate the splash screen infomation. Click on "Language Independant" and in the right hand pane delete the bitmap, or delete it then insert the bitmap you want.
Step 8
Most of us like to add access to the application via the start menu. If you dont want to then move on to step 9.
To add an icon to your application to the "Start Menu", click on the "Scripts" tab, then in the right hand pane (where the scripts are) locate the function "SetupFolders()". Replace the text inside the function with something like the following;
function SetupFolders()
NUMBER nResult;
STRING svPath;
begin
svPath = TARGETDIR ^ "KillerApp.exe";
LongPathToQuote ( svPath , TRUE );
AddFolderIcon ( FOLDER_STARTMENU , "Killer App" , svPath , "" , "" , 0 ,
"" , REPLACE );
nResult = CreateShellObjects( "" );
return nResult;
end;
Now, to find out exactly whats going on, open up the help files and locate the article "Place your application icon on the Start Programs menu" which is in "Getting Started"->"Tutorials"->"Use the Project Wizard:Create a Setup in 15 Minutes or Less!"
Step 9
If you havn't saved your project by now, then you're very naughty and should probably do so now.
Now is the time to build, click the "Media Build" button, or use use the Build menu and select "Media Build Wizard"
When the wizard appears, change the name from "New Media" to something else, we'll use "Killer App"
Click "Next" and proceed to the next dialog. In this one you decide which Media Type to use, as we're (presumably) dealing a small application we will select 3.5" Diskette 1.44 MBytes. Click "Next" then choose "Full Build" if the wizard has not already selected it.
The next dialog allows you to insert your company name, version info etc.
Fill it in with the relevant details and click "Next", if you're not sure which Product Category your application falls into then use "Development Tool".
After this you will be prompted to select which platforms the application is for. Choose the ones (or all) which are relevant and move alove with the "Next" button.
The final dialog is the summary dialog; review the data and if necessary use the back button to go and make any changes you want. When you are done, click "Finish".
Install shield will then calulate the size of the cab files, copy the files etc and finally build the setup. On my system the files build were placed in "C:\My Installations\KillerApp\Media\Killer App\Disk Images\Disk 1". Yours will be found somewhere similar. You can now take all the files found in this final directory and copy them to a floppy disk, and use that to install from. Or you can zip them up using Winzip and distribute that as many like to. Either way, you now have an installer made by Install Shield. You might like to test it by executing the "setup" exe file found there.
Conclusion
InstallShield comes free with VC++ 6.0. It takes a bit of messing about with to get used to, and you can only include five files to install. You can go to the InstallShield website and register your copy, or buy a new version. They also provide tech support.
This the purpose of this article is to show you how to make a simple installer for a small application. You can use the help files (or visit InstallShield's tech support site) to discover how to do some of the more advanced techniques which you see in other installers.
I am by no means an expert in InstallShield, and if I have made any mistakes in this article I would appreciate any feedback which I can use make it better. I will also be providing an article on using the "Project Wizard" to create an installer in the near future.
Thanks go to Derek Waters for his assistance.
This member has not yet provided a Biography. Assume it's interesting and varied, and probably something to do with programming.


 General
  News
News  Suggestion
  Question
  Bug
Bug  Answer
  Joke
Joke  Praise
  Rant
Rant  Admin
Admin 


