Introduction
Four months ago, during my main project, there was a module that performed the role of shutting down a remote computer. For that, I used WMI technology. However, I could not fulfill my wish because I was always receiving a "Privilege not held" message. While searching the Web for a solution, I figured out that everyone is encountering the same problem of an "Access denied" message. The next method I found on the Internet is via importing user32.dll, which is unmanaged code. I also found another method using Telnet.
However, shutting down a machine is relatively simple if you know how to handle it. In this article, I'll describe how to shut one down using Windows' shutdown.exe file. The shutdown.exe file is invoked by using the Process class in the System.Diagnostics namespace.
Privilege will always be a problem, so do keep in mind these things. I used this sample to test with Windows Server 2003 Enterprise Edition as the server and Windows XP as the client (mine was a networking project). I made the server a domain via installing an active directory and making a Windows XP client a valid user in that domain. If your network is a workgroup connection, then you'll not have sufficient privilege to shut down the machine.
I'm not including a code sample for download because the documentation itself is very brief. Also, you can put together all the code I've mentioned and build your application.
So before jumping into the code directly, I'll explain what the Process class actually does for you. At least it will help someone sometime later.
About the Process Class
The System.Diagnostics namespace provides classes that allow you to start system processes, read and write to event logs, and monitor system performance using performance counters. For the time-being, I'll only explain how to handle a system process. The rest of the things will be explained in my next article.
The Process class allows you to start and manage a Windows process, either locally or remotely. In a local machine the features are unlimited, i.e. you can start/stop a process, query information and the modules that it has loaded, the time at which it started, the number of handles and threads, etc. In remote machines, features of the Process class depend on the privilege that you have. The main thing you can do with the Process class will be querying remote processes.
Shutdown.exe Arguments
To see the arguments (command-line arguments) that shutdown.exe takes, take your command prompt window and type this : shutdown /?. Then you will get a screen as shown below:
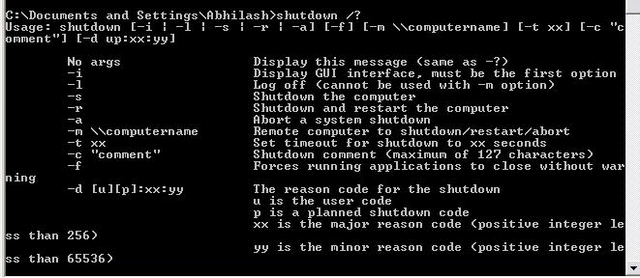
Shutdown Arguments Explained
Here I'll explain the basic arguments that you need for shutdown and for other purposes. You can try the rest by yourself.
-s
This is the argument that asks Windows to shutdown the computer.
Example: shutdown -s
[will display a 30-second warning message and shut down the local computer]
However, this method has a problem in that, if any application is busy or not responding, then a wait dialog box asking you to end the busy/hung process will be displayed (i.e. an "End Now" dialog box that you might have seen sometimes before). This can cause a problem when you try to shut down a machine remotely, because the hung/busy application in the remote machine will prompt you with an "End Now" dialog box which eventually makes all your effort to be in vain. Happily, there is a solution too...
-f
To solve the above mentioned problem, you can append an argument -f along with the shutdown arguments. That will close the hung/busy application instantly without prompting you to end the application manually. So, if you are using remote shutdown, try to add the -f argument along with the shutdown argument.
Example: shutdown -s -f
[will forcefully shut down the local machine]
-a
This argument aborts a system shutdown instantly.
Example: shutdown -a
-t
This argument allows you to set the interval for shutdown. The default time interval is 30 seconds. However you can set your own time interval to, say, 0 seconds, in which case the machine will be shutdown instantly. Even if you do not include the time interval argument, you will be given a 30-second time interval before shutting down the machine, by default.
Example: shutdown -s -f -t 00[shuts down the machine instantly]
-r
This argument shuts down the machine and restarts it.
Example: shutdown -r
-l
Logs off local machine. This argument cannot be used remotely.
Example: shutdown -l
-m \\computer_name_or_IP_Address
And here comes the most awaited thing... remote shutdown. All you have do is append this argument along with the previously mentioned arguments (i.e., -s or -r, -f, -t ). You can either specify the computer name or IP address of the target machine that you wish to shutdown/restart.
Look at the examples below for more information:
shutdown -s -f -m \\192.168.11.99
[forced shutdown of the target machine with IP address 192.168.11.99 after 30 seconds] shutdown -s -f -t 00 -m \\192.168.11.99
[forced shutdown of the target machine with IP 192.168.11.99 instantly] shutdown -s -f
[forced shutdown of local machine after 30-second delay] shutdown -s
[shut down local machine after a 30-second delay. However, beware of hung applications.]
Note that you can replace the IP address with a valid computer name: replace -s with -r for restarting.
Still Doubt What a Process is...??? Read This...
With a Process class instance, you can start Internet Explorer and load it with your URL (which can be usually found after installing a third party software that often takes you to their homepage for registering, etc.). It can be done via a Process class instance. Hope you now know what a process can do. So, these are the steps for starting a process:
- Create an instance of the
Process class. - Associate the instance with the filename/application that you want to load.
- Show the instance where your application lies (i.e. provide the path of the EXE that you want to start).
- Associate the instance with the arguments that are to be loaded.
- Start the instance, which will start the associated process automatically.
- Check whether the process had started or not.
- If hung, kill the process, else do nothing.
I will explain the steps one-by-one so that everything will be clear.
Explanation
Step 1
Create an instance of the Process class.
Steps 2 - 4
Associate the instance with the filename/application that you want to load. Show the instance where your application lies, i.e. provide the path of the EXE that you want to start. Associate the instance with the arguments that are to be loaded. Before starting the process, you have to specify a set of values to the Process instance via the ProcessStartInfo class. The set of values includes the file name [step 2], the file location [step 3], the arguments [step 4], etc.
For shutdown, Windows has an EXE named shutdown.exe. Usually, the shutdown.exe file lies in your system folder (c:\Windows\System32\). Associate the file shutdown.exe with the process instance via the FileName property of ProcessStartInfo class. The arguments (mentioned in the above section) can be specified via the Arguments property of the ProcessStartInfo class.
Note that there are additional settings you can specify if you wish. I'll mention them, too. The ProcessStartInfo class has two more properties: CreateNoWindow and WindowStyle. CreateNoWindow determines whether the user process (i.e. invoking shutdown.exe) is to be started as a separate process or not. It accepts a bool value.
The WindowStyle property is closely related to the CreateNoWindow property. If you set the CreateNoWindow property to true, shutdown will not be started as a separate process. Setting false value to CreateNoWindow can cause your application to start as a separate process. This causes a console window to flash, indicating that your process has been started. If you set the WindowsStyle property as hidden, the console window started will not be displayed. WindowStyle takes other arguments, too: Minimized, Maximized and Nor<code>mal.
string path = @" C:\Windows\System32";
string shut_args = " ";
process1.StartInfo.FileName = " shutdown.exe";
process1.StartInfo.Arguments = shut_args;
process1.StartInfo.CreateNoWindow = true;
process1.StartInfo.WindowStyle = ProcessWindowStyle.Hidden;
Steps 5-7
Once every property has been set, you have to start the process using the Start() method. However, you have to keep something in mind and I'll tell you what it is. Just imagine that your process had to wait for a long time to start due to some internal resource-competing issues. At that time, your process will wait indefinitely until it starts. So, to avoid such a situation, you've to specify a fixed slot of time during which the process waits for getting started. If that timeslot expires, then the process can be killed. Once everything is done, close the process. The below segment of code shows what I've mentioned:
process1.Start();

process1.WaitForExit(10000);
if (!process1.HasExited)
    process1.Kill();
process1.Close();
So that's it...! Bring all the code into one place (use a try-catch block if needed). Run the application and don't forget to include the System.Diagnostics namespace. There is no need to specify the System.Diagnostics namespace if you are using Visual Studio 2005, but Visual Studio 2003 users have to do so.
Extra Innings
In a similar way to which I've called shutdown.exe, you can call Internet Explorer, Task Manager, msconfig, etc. whatever you like or even an EXE that you'd built. While calling Internet Explorer, specify filename as iexplorer.exe along with file path and the desired URL as the argument. Now start the process. Yes..!!! Your URL is loaded. Here is the sample code:
string path =  @" C:\Program Files\Internet Explorer\";

process1.StartInfo.FileName =  " iexplorer.exe";
process1.StartInfo.Arguments =  " www.yahoo.com";
process1.Start();
Enjoy...
Points of Interest
Handling system processes is funny... if you know how to do it. However, there is something interesting:
- While using WMI, you've to specify the username and password for shutting down a machine. Such things are not required while using shutdown.exe.
- The method is so simple to code and handle if employed in a server-client architecture.
History
- December 26, 2007: Original version
- January 12, 2008: Updated text
I'm an software engineer from India. I'm a big fan of Microsoft, the only genuine reason why I came to .NET technologies. And above all, C# always drives me wild...& i always spends my free time with C#.


 General
  News
News  Suggestion
  Question
  Bug
Bug  Answer
  Joke
Joke  Praise
  Rant
Rant  Admin
Admin 


 .
.