Introduction
This project presents a stopwatch application that was developed
due to my taking a mathematics university course and because it's been a long
time since I did any maths academically I thought I'd better start getting some
practice in. This meant taking timed tests and not having a decent way of
timing the tests I thought I'd better write one, and due to being a programmer
a simple time telling device was not enough, it had to look reasonable and get
my attention when I was concentrating on something else.
The application was developed under Windows XP Home edition and
tested on Windows 2k. It is comprised of three main parts, these being, The
main dialog that controls the program, a user control that accepts the time
entries and a user control that displays the clock face. There is also a
Microsoft MediaPlayer object added to the control.
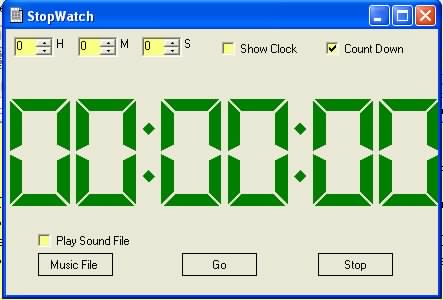
The Main Form
The purpose of the main form is control the feedback of the program
and allow the user to run it anyway that they choose. When the program
is run and a time value is entered the points for the form to take into
account are the form to be displayed which is set by checking the Show Clock check box,
and which way is the count to go which is controlled by the Count Down check
box which is set to checked by default. At this point the Play Sound File check
box can be selected to indicate that a chosen file is to be played once the
count down or count up is finished.
If the user chooses not to display the clock while the timer is
running, possibly because they are taking a timed test on the computer then the
program can be controlled via the Icon that will appear on the taskbar when the
application is running. A taskbar icon is set up by selecting a NotifyIcon
object from the toolbar and adding it to the form. All that is then required is
that an icon that is to be displayed is added through the properties part of
the user interface. A context menu will also need to be added and this is done
by again choosing a context menu object from the toolbar and dropping it onto
the form. The menu will then need to be edited so that the items that are
required appear when there is a mouse click on the icon that appears on the
taskbar. Getting the context menu and the required functions can be a bit
tricky to get exactly right at first as to the absolute beginner it can be a
little unclear when you are editing the menu option or the context menu id.
There's no scientific solution to this it just takes a bit of
practice.
There are two other parts to the main form the that have minor
roles the first is the separate timer that the form has this is purely for
house keeping and is used to check if the DigitalClock control has finished and
the OpenFileDialog which is used for selecting the sound file to be played.
Customizing the Toolbar
This is an important part of this application so it should be
understood right from the start. The default setup for Developer Studio .NET
does not include every single thing in the toolbar that could be included. This
means that occasionally you need to add things for yourself, this is done by
selecting the toolbar and then right clicking on it so that a context menu pops
up. At half way down the menu is the Customize Toolbox option which will
open a dialog that allows you to add some of the controls that have not been
selected so far. These can be COM objects or Custom Controls that have been
created in C# or any other .NET language. Once this project has been
compiled on a computer the DigitalClock control can be added to the toolbar in
this manner.
The TimeSet Control [discussed below]
While not officially being part of this project the TimeSet.Dll
is used within it and the project file for it is included in the
downloads. This
is a very simple control for entering time values in hours minutes and
seconds if required and uses standard up down value controls that are
set to go no higher than the maximum value allowed for each item.
For e.g. the
minutes box will not accept a value greater than sixty if the up down
buttons are used.
The DigitalClock Control
The DigitalClock control is the main display piece of the program
and uses the SevenSegmentDisplay class from Charles Peltzold's book
"Programming
Microsoft Windows with C#". This class is used as is with no editing by me and
so if an explanation of the code is required I suggest you buy the book. If an
explanation isn't required you should still by the book as if you weren't
interested in C# you wouldn't be reading this.
There is a fair bit of house keeping code in the
DigitalClock.DigitalDisplay class most of which is simply keeping track of what
the hours minutes and seconds are and then drawing the display.
Adding the Media Player
To add the Media Player to an application add it to the toolbar as
described above and the drop it onto the form. This will add two dll files to
the executable directory for your project. In this case they are the
Interop.MediaPlayer.dll which contains the code for talking to the com
component of the media player and the AxInterop.MediaPlayer.dll
which contains
the code that the application talks to directly that is then fed through the
Interop.MediaPlayer.dll to the Media Player itself.
Despite this the Media Player itself is very easy to use. Once you
have dropped it on the form the form class declares a variable for you within
the class. All the code has to do then in this case is set the filename that is
to be played and then call stop because the Media Player will start playing the
file straight away if this isn't done. Once the DigitalClock control sets its
Finished variable to true the play is called on the Media Player
One problem with the Media Player is that the code initially sets
the volume to -600 this seemed to be rather quiet and putting the value at 0
seems to play the file at the current volume setting on the computer. However
if a positive value is entered the Media Player would throw an exception, so
the code sets the volume to zero. The code also only allows the opening of mp3
files to be played. This is because that is what I wanted to open if anyone
requires other types of files to be played they will need to change the
parameters used for the OpenFileDialog.
TimeSet - A User Control in C#

Having just finished a project and put it up on the
internet I started to look at what I wanted to write next. Nothing
serious yet just looking at the interface and collecting my thoughts
about how it was going to work. One thing I noticed when doing the front
end for the dialog was that there were no controls that did exactly what
I wanted. So thinking about it I decided that what I required was simply
a way of entering a time in hours, minutes and seconds into a control of
some sort, I didn't need real time updating of the control and I didn't
care about the day or the date just a simple time entry control. There
wasn't one. It's true that for something that simple it could have
easily been mocked up with an edit box and a small amount of code to do
the checking but having looked into C# for a while now I thought it
might be interesting to take a look at if it could do ActiveX type
controls. Controls are something I haven't done for a few years so I
could probably do with a brush up anyway.
The project was developed with Visual Studio .NET on
Windows XP
Starting a Control
To create a control with C# you start a project for a
user control from the new projects menu which will generate a project
containing a main project file ( in this case the TimeSetControl.cs file
) that contains the code for the control. This is a standard C# file
with a .cs extension. The control part is in the fact that the generated
class inherits from the UserControl class which essentially gives a
form on which you can place other controls that are available to the
development environment. These do not have to be predefined controls but
can be controls of you own making. As this project isn't too technical
all that was effectively done is the adding of a few drop down boxes and
some labels that make up the data entry control that I required.
Using the Control
Once the control is built or even if you get a new control from
somewhere else you are going to want to add it to the development
environment so that it can be used in future projects. This is done
through the Tools menu, in the Customize toolbox option. When you click
on the Customize Toolbox option a dialog opens that allows the addition
or removal of COM or .NET controls. Select the .NET tab and
there is a list of all the controls that are installed on the current
computer, you may add or remove these controls from the development
environment by selecting or unselecting the check boxes next to the
names. To insert a new control click on the browse button and select the
control that you wish to add and it will appear on the General Tab of
the toolbar. This may all seem a little easy, especially if you remember
OLE Controls and ActiveX but with the new common runtime the control
itself is a class just like any other and to the outside world at least
requires no special treatment in order to work with everything else.
The Control
The control itself is little more than a container that
holds a few drop down boxes so that data can be added in the correct
format. The interesting point here is the use of the get and set
accessors because they are normally declared public the gui will allow
you to set any variables through the Miscellaneous section of the
properties. This can be either a blessing or not depending on if you
want the variables to be accessed through the gui. If you don't want the
variables to be accessed by the gui then there are two ways that you you
can do it. The first is to declare and implement the get and set
functions with a C++ style syntax which will be ignored by the gui and
the second is to declare the get and set as private.
Conclusion
It has to be said that these days controls of this type
are almost too easy to implement to be worth writing about. They are
easy to create and once created they act just as any other form within
the project so unless you are getting in to owner draw controls then
creating a user control is simplicity itself.
This member has not yet provided a Biography. Assume it's interesting and varied, and probably something to do with programming.


 General
  News
News  Suggestion
  Question
  Bug
Bug  Answer
  Joke
Joke  Praise
  Rant
Rant  Admin
Admin 


 I don't know to do. I like to know C# or VB.NET.