Introduction
Workflows are systems that manage the execution of a business process. They are primarily described as a process that manage the flow of work among various individuals, or divisions, or multiple organizations.
As compared to Sequential Workflows which always progress forward and never go back (although using a while loop, you can reiterate through the same steps multiple times), the State Machine Workflows moves from one state to another, until the workflow concludes by reaching the completed state.
There are three different types of workflows:
- Out of the box Workflows
- SharePoint Designer Workflows
- Custom Workflows built in Visual Studio
SharePoint Workflows can be developed in Visual Studio by using either Visual Basic or Visual C#. In this tutorial, we will simulate the hiring process for an organization.
Our workflow will have the following steps:
- Interview Application Received
- Initial Clearance
- Technical Clearance
- HR Clearance
- Accepted
- Rejected
- Completed
Before starting with workflow, we must have a list (or a library) named Candidates in our SharePoint Application. Metadata related to the list will have the following columns:
- Title
- Technology
- Experience (in months)
- Status
You can add columns as required. State Machine Workflows are essentially event driven workflows. We create a task and attach an event handler to it. We then wait till the task is performed, and after the task is completed; we make a decision based on the user input.
Prerequisites
- .NET (implementation is in C#)
- SharePoint Object Model
Implementation
Step 1
In Visual Studio, select a SharePoint 2010 State Machine Workflow template. Fill in the details related to Name and Solution, etc., and click Ok. Refer to Fig 1.1.
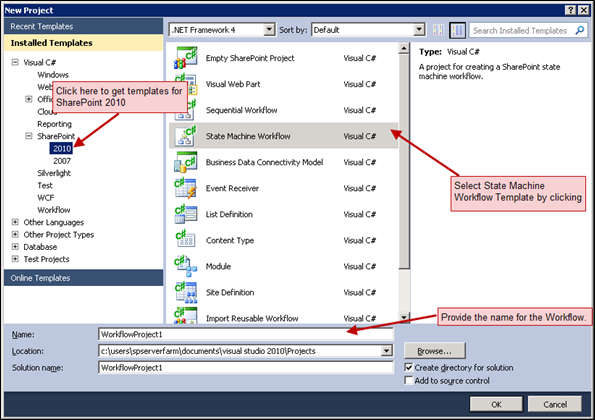
Fig 1.1
In the next window, enter the URL of the site we want our workflow to run on, and click on "Next" button. Workflows can only be deployed as a Farm solution, so we do not have an option to deploy it as a Sandbox Solution. In the next Window, give the name for the workflow, and select a type of workflow we want to create. We will select a List Workflow for this example.
The next window gives us an option of associating our workflow to a list or a document library. We can choose not to associate our workflow by unchecking the association check box. We will have to associate the workflow to a list or library manually later on in that case. In our example, we will associate the workflow with the Candidates list.
The next window allows us to set a trigger for our workflow. In our example, we want our workflow to automatically start when an item is created in the Candidates list. So we will choose that as an option and click on "Finish" button.
Step 2
Let us have a closer look at the Solution Explorer.
The references required for the workflow are automatically added into the solution by the IDE. We may manually add references as and when required.
Feature1 is a feature in which our workflow will be deployed. This feature can be activated and deactivated from Site Settings.
Elements.xml will be used to configure various properties of our workflow. We will have a detailed look at this file later on in the tutorial.
Workflow1.cs is the code behind file of our workflow. All the server side code goes into this file. Refer to Fig 1.2.

Fig 1.2
Before we go any further, we need to configure the Feature Receiver of our workflow. To do that, click on the Workflow Design file and press ‘F4’. This opens up the properties window of workflow. In the properties window, we can see Feature Receiver Property. Open the tree node of the property and it has two properties, viz. Assembly and Class Name.
Type in the following values for these properties. Please make sure that you look up the latest version of the assembly available for Microsoft.Office.Workflow.Feature and the Public Key Token related to it.
For Assembly
Microsoft.Office.Workflow.Feature, Version=14.0.0.0, Culture=neutral,
PublicKeyToken=71e9bce111e9429c
For Class Name
Microsoft.Office.Workflow.Feature.WorkflowFeatureReceiver
Step 3
We will design our workflow now. On the designer surface of the workflow, drag drop State activity. As discussed earlier, we have 9 activities in our workflow, drop in total of 9 State activities from the toolbox and give them appropriate names. Refer to Fig 1.3.
Fig 1.3
We need to set an initial state and a completed state for our workflow. As we want "InterviewApplicationReceived" state to be our initial state, right click on it and choose Set as Initial State option in context menu. Similarly right click "Completed" state and choose "Set as completed state". This is makes "Completed" state as the final state of our workflow.
Step 4
We need to initiate our workflow. For initiating the workflow, we drop an EventDrivenActivity in the initial state of the workflow, i.e., "InterviewApplicationReceived" state. There are two ways of adding the event driven activity to our state. Either you can drag-drop the activity from the toolbox or simply right click the state and click "Add EventDriven" in the context menu.
After adding the activity, double click on the activity to go to the details of activity, give it an appropriate name from properties window. We name it as "eventDrivenActivityInitial" in our workflow.
The next step is to drop OnWorkflowActivated Event handler to our event driven activity. Drag and drop the OnWorkflowActivated event handler from the toolbox onto the activity canvas. The properties window shows properties associated with the event handler.
Fig 1.4
Let us go through the properties of the OnWorkflowActivated event handler. Most of these properties are common to all the event handler activities. Refer to Fig 1.4.
A workflow instance interacts with several SharePoint objects (task lists, and documents or items) during its lifetime. In SharePoint, you can have many workflow instances running at the same time and interacting with several objects at the same time. To be able to identify which workflow instance is interacting with which object, you must use an identifier that links one particular workflow instance to one particular SharePoint object. Each workflow instance must be bound to its own items. Such an identifier is called a Correlation Token. A correlation token links a workflow instance to its documents, items, and tasks. It prevents confusion between different workflow instances. We need have one correlation token for the workflow and one for each task we create during the workflow, so that when a user completes a task we have a unique identifier with which to receive any input from the user into the workflow. Make sure correlation token names are not repeated in different task. Type "InitialToken" (though the name of token can be anything you want, we generally prefer nomenclature of Task name suffixed by Token). Choose the Owner Activity as "InterviewApplicationReceived" State.
Invoked event of the OnWorkflowActivated will be fired when the workflow is activated. We can write the logic related to workflow activation in this event. In this example, we use "onWorkflowActivatedInitial_Invoked" as the method name. The Visual Studio IDE will create write an event handler block in the code behind file once you press tab key after typing in the method name.
Next, click on the ellipsis in WorkflowProperties property. This opens a pop-up, chooses workflowProperties from "Bind to an existing member" tab. If workflowProperties cannot be found in this tab, move to the next tab, i.e., "Bind to a new member", select "Create Field" radio button and type "workflowProperties" in new member name textbox, and press Ok.
Next drop "SetState" Activity (choose from 3.0 tab of toolbox, there is SetState under SharePoint tab as well) just below the event handler. Set the target state name as "Initial Clearance" State. This completes the configuration of our initial state.
Step 5
Now let us configure the Initial Clearance State. Here we are going to add the StateInitialization activity. In StateInitialization activity, we will create the task, and configure the details like participants, due date, etc.
So drag a StateInitialization activity (from 3.0 tab of the toolbox) and drop it inside the Initial Clearance State. We will name this activity as "stateInitializationInitialClearanceActivity". Double click the activity and drag "Create Task" activity (from SharePoint tab of the toolbox) and drop it inside the state initialization activity.
We name the Create Task activity as "createTaskInitialClearance".
Create a new correlation token by typing token name in the properties window. We will name the token as "InitialClearanceToken" and set owner activity as Initial Clearance State.
We need to bind a method with "Method Invoking" event. In this example, the nomenclature used for method invoking event is task name followed by an underscore (_) appended by methodInvoking. So for Initial Clearance task, the method name will be "createTaskInitialClearance_MethodInvoking".
Next we need to set the values to both TaskId and TaskProperties. Click the ellipsis in the TaskId property. It opens up a pop-up window. In "Bind to a new member" tab, choose "Create Field" radio option. Enter the name in textbox and click Ok. We create a TaskId with name "createTaskInitialClearanceTaskId".
Similarly for TaskProperties, create a new field (not property) with name "createTaskInitialClearanceTaskProperties". We are done with configuration of Create Task and State Initialization.
Step 6
Drag an Event Driven activity (from 3.0 tab of the toolbox) and drop it inside the Initial Clearance State. Name it as "eventDrivenActivityInitialClearance".
Double click the Event Driven activity, and drop OnTaskChanged activity (from SharePoint tab of the toolbox) and name it "onTaskChangedInitialClearance".
Create fields for AfterProperties and BeforeProperties (follow the process similar to creating TaskId and TaskProperties) with names "onTaskChangedInitialClearanceAfterProperties" and "onTaskChangedInitialClearanceBeforeProperties" respectively.
Now in Correlation Token field, choose the same token that we had associated the Create Task activity with. That allows the workflow instance to understand with which task this event handler is associated with. In our case, we will choose "InitialClearanceToken" as the correlation token. Most of the workflow errors are related to incorrect assigning of the correlation token. Hence we need to be extra careful when working with the correlation tokens.
Associate a method with Invoked event of the activity, we type in "onTaskChangedInitialClearance_Invoked" as the method name. We also need to bind the TaskId for this activity but we won’t be creating a new TaskId, instead we will bind the TaskId that we created in the Create Task activity. For that choose "Bind to an existing member tab" in the pop-up, select the TaskId that we had created in Create Task activity, and click Ok.
So to re-cap of what we have achieved so far, we created State, added a StateInitialization activity. Inside the StateInitialization Activity, we created a Task and gave it a correlation token. On MethodInvoking event of the CreateTask activity, we have associated a method. We will write some logic in this method. Then we added an EventDriven activity to the State. In the EventDriven activity, we have dropped an OnTaskChanged activity. We created the required fields for this activity, and gave it the same correlation token that we created in CreateTask activity. We associated a method with Invoked event of the OnTaskChanged activity. This method will be fired when user performs the task assigned to him.
Step 7
Now once the user performs a task, in this scenario, when the user indicates whether the received resume is approved or rejected, we need to perform some action based on it.
A default task list item looks like Fig 1.5. We can customize the task list item, and use InfoPath form or an ASPX form instead of the default task list item.
Fig 1.5
For now, if user types "Approved" in the description column of the task, then we will proceed with next step of the workflow; else we will stop the workflow. So we drop an IfElse Activity (From 3.0 tab of the toolbox) below the OnTaskChanged activity, inside the EventDriven activity.
Select IfElseBranchActivity1, in properties window we have a Condition Property, select Code Condition for condition. Open the Condition tree node, in the left node property, type the name of the method which will have the logic to handle the condition. For this example, we type in "InitialClearanceApprovalProcess" as the code condition.
Now drop SetState Activity (from 3.0 tab of the toolbox) inside the IfElseBranchActivity1 and select the next state as the TargetStateName. In this example, "TechnicalClearance" will be the target state. Leave the IfElseBranchActivity2 as it is.
Step 8
We are done with the designing part of the workflow for this state, now we need to write the logic in code-behind file.
So right click on the designer and select View Code from the context menu, or simply press F7 on the designer surface. You can see all the fields and methods that we created from designer surface have been created in the code-behind file.
The first method is associated with OnWorkflowActivated activity. We won’t add any implementation logic in this method as of now.
Next, the method associated with Initial Clearance State -> State Initialization -> Create Task. We have associated a method "createTaskInitialClearance_MethodInvoking" with this event. In this event, we will configure the title of the task, the users or group that will perform the task, due date of the task, and other such details.
private void createTaskInitialClearance_MethodInvoking(object sender, EventArgs e)
{
try
{
this.createTaskInitialClearanceTaskId = Guid.NewGuid();
this.createTaskInitialClearanceTaskProperties.Title =
"Initial Clearance";
this.createTaskInitialClearanceTaskProperties.AssignedTo = "HRGroup";
this.createTaskInitialClearanceTaskProperties.DueDate =
DateTime.Today.AddDays(5.0);
}
catch (Exception ex)
{
System.Diagnostics.EventLog.WriteEntry("Recruitment Workflow",
ex.StackTrace, System.Diagnostics.EventLogEntryType.Error);
LogToHistoryListActivity log = new LogToHistoryListActivity();
log.HistoryDescription = ex.StackTrace;
}
}
Next, the method associated with Initial Clearance State -> Event Driven -> OnTaskChanged. We have associated a method "onTaskChangedInitialClearance_Invoked" with this event. In this method, we will write the logic of the process we want to follow once the user has completed the task.
If we have a look at onTaskChangedInitialClearanceAfterProperties and onTaskChangedInitialClearanceBeforeProperties fields, they are objects of SPWorkflowTaskProperties class. As the name suggests, this class represents the properties of a Workflow Task. We will assign the values from task to these objects so that we can use them other methods.
In this example, we will set the task as complete, by setting the value for PercentComplete Property to 1.0.
private void onTaskChangedInitialClearance_Invoked
(object sender, ExternalDataEventArgs e
{
try
{
this.onTaskChangedInitialClearanceAfterProperties =
this.onTaskChangedInitialClearance.AfterProperties;
this.onTaskChangedInitialClearanceBeforeProperties =
this.onTaskChangedInitialClearance.BeforeProperties;
this.onTaskChangedInitialClearanceAfterProperties.PercentComplete =
(float)1.0;
}
catch (Exception ex)
{
…
}
}
Now we will implement the logic for Code Condition. The IfElse Activity for the task was associated with the InitialClearanceApprovalProcess method.
private void InitialClearanceApprovalProcess(object sender, ConditionalEventArgs e)
{
    try
    {
        if (this.onTaskChangedInitialClearanceAfterProperties.
                        PercentComplete == 1.0)
                 {
            if (this.onTaskChangedInitialClearanceAfterProperties.
                    Description.Contains("Approved"))
                    {
                e.Result = true;
                    }
                    else
                    {
                e.Result = false;
                    }
                }
        else
                {
            e.Result = false;
                }
    }
    catch (Exception ex)
    {
        …
    }
}
We have set the result of if-else to true if the user types in "Approved" in the description field of the task item, else the result is set to false. In the later part of this tutorial, we will see how to use a custom task form to get these values. So we can have a drop-down control for user to indicate whether the candidate it approved or rejected.
Step 9
That’s all the code we have to write to completely configure one task. Perform Step 5 to Step 8 for the remaining tasks. You can see below (Fig 1.6) a snapshot of the completed workflow.
Fig 1.6
Build and deploy the workflow.
Part 2 deals with generating Custom task forms in InfoPath 2010 and associating those forms with each task in the workflow.
History
- 9 May 2011: Initial version.
- 17 Jan 2012: Resolved an error in source code.
I have been designing and developing systems in .NET since 2006. Started out with .NET 1.1, and progressed through to current version. Started working with SharePoint 2010 in 2011, and am currently gaining experience in SharePoint Online and hosted apps.


 General
  News
News  Suggestion
  Question
  Bug
Bug  Answer
  Joke
Joke  Praise
  Rant
Rant  Admin
Admin 


