Introduction
This post is the sequel to my previous post of Introduction to HTML5 <Canvas>: Part 1 (also on CodeProject) and shows a walkthrough example of using canvas for some static 2D drawing (for Introduction to animation wait for my next post). This is the second post to my “HTML5 <Canvas>” series.
In the previous post, we saw how <Canvas>'s <a href="http://www.whatwg.org/specs/web-apps/current-work/multipage/the-canvas-element.html#primary-context">context</a> gives us an API with set of methods and properties to draw on its surface. Now in this post, we will use some of those methods to draw a logo of one of my favorite game PORTAL2.
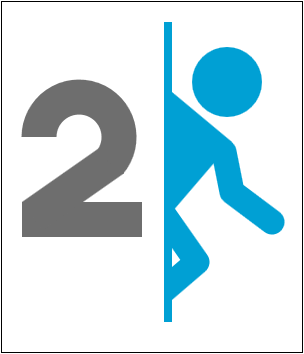
Above is the actual completed art drawn on canvas, and below we will see how we draw that art piece by piece. And let me tell you this article is just for introducing you to the use of various methods provided by canvas and may not show the best and efficient way of drawing on it. So keeping that in mind, let’s get started.
First Things First
As you may know by now, before any drawing we need to have a handle on <Canvas> element to do manipulations, and that handle is the context object of the <Canvas>. The <a href="http://dev.w3.org/html5/2dcontext/#canvasrenderingcontext2d">context</a> of the <Canvas> element provides us all that API of methods to do drawing and manipulation on <code class="prettyprint"><Canvas>. To get the context we use "<a href="http://www.whatwg.org/specs/web-apps/current-work/multipage/the-canvas-element.html#dom-canvas-getcontext">getContext()</a>” method and pass in the string “2d” as parameter * . Also, since we feel more natural using “degrees” for specifying angles but all functions of canvas context take clockwise “radians” as parameter, we’ll use the following function to convert degree into anticlockwise* radians. Also note that it is recommended to use "<a href="http://www.whatwg.org/specs/web-apps/current-work/multipage/the-canvas-element.html#dom-context-2d-save">save()</a>” and “<a href="http://www.whatwg.org/specs/web-apps/current-work/multipage/the-canvas-element.html#dom-context-2d-restore">restore()</a>” methods of context to save the current state of the context on the stack before any manipulation & transformation and restore it back to its previous state respectively.
*(For details, check my previous post or w3c draft).
var ctx = document.getElementById("portalcanvas").getContext("2d");
var acDegToRad = function(deg){
return deg* (-(Math.PI / 180.0));
}
Drawing the “2”
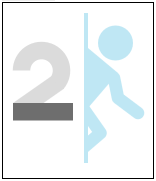
We’ll start by drawing the number “2” on the <Canvas>. It consists of 3 pieces - the base rectangle, a slant rectangle and an arc.
2’s Base: The base rectangle is the easiest of all to draw, just set the “ <a href="http://www.whatwg.org/specs/web-apps/current-work/multipage/the-canvas-element.html#dom-context-2d-fillstyle">fillStyle</a>” property of the context to light gray color and use “<a href="http://www.whatwg.org/specs/web-apps/current-work/multipage/the-canvas-element.html#dom-context-2d-fillrect">fillRect( x, y, width, height)</a>” method to draw the rectangle.
ctx.save();
ctx.fillStyle = "rgb(110,110,110)";
ctx.fillRect(20,200,120,35);
ctx.restore();
If we want, we could also draw the above rectangle as a small horizontal line with line-width equal to the height of the above rectangle. But that would involve more steps like creating a path and then drawing the line along the path, which is more complicated for this primitive shape.
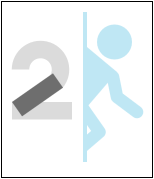
2’s Slant: The slant rectangle is just a simple rectangle but elevated to an angle of 35 Degrees. So to create a slant rectangle, first we will translate the origin of the coordinate space (i.e., the transformation matrix) to the top edge of 2’s base rectangle using “<a href="http://www.whatwg.org/specs/web-apps/current-work/multipage/the-canvas-element.html#dom-context-2d-translate">translate( newX, newY)</a>” and then rotate the coordinate space by 35 degrees in anti-clockwise direction, taking new origin as the pivot/center, by using the “<a href="http://www.whatwg.org/specs/web-apps/current-work/multipage/the-canvas-element.html#dom-context-2d-rotate">rotate(radians)</a>” method and then simply draw the rectangle using <a href="http://www.whatwg.org/specs/web-apps/current-work/multipage/the-canvas-element.html#dom-context-2d-fillrect">fillRect( x, y, width, height)</a>.
ctx.save();
ctx.fillStyle = "rgb(110,110,110)";
ctx.translate(20,200);
ctx.rotate(acDegToRad(35));
ctx.fillRect(0,0,100,35);
ctx.restore();
Also note how we have used save() before any manipulation and then used restore() after drawing, this makes sure that the translation and rotation of coordinate space does not affect rest of drawings we are about do later on. This way context state of the canvas always remains in previous state, in this case, the Initial state. Remember save() and restore() doesn’t save/restore the contents on the canvas, it just save/restore the state of properties/attributes like “fillStyle”, “strokeStyle”, “lineWidth”, etc. and coordinate space on the <Canvas>drawing context.
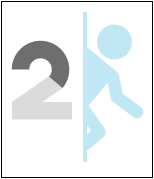
2’s Arc: The top arc of number “2” cannot be drawn by rectangle methods but can be simply drawn like a line arc whose line-width is equal to the height of previous rectangles. For creating any line shape, we first start a path by calling “<a href="http://www.whatwg.org/specs/web-apps/current-work/multipage/the-canvas-element.html#dom-context-2d-beginpath">beginPath()</a>” method, then call any shape method like “<a href="http://www.whatwg.org/specs/web-apps/current-work/multipage/the-canvas-element.html#dom-context-2d-rect">rect()</a>”, “<a href="http://www.whatwg.org/specs/web-apps/current-work/multipage/the-canvas-element.html#dom-context-2d-arc">arc()</a>”, “<a href="http://www.whatwg.org/specs/web-apps/current-work/multipage/the-canvas-element.html#dom-context-2d-lineto">lineTo()</a>”, etc. to add them to path and then optionally call “<a href="http://www.whatwg.org/specs/web-apps/current-work/multipage/the-canvas-element.html#dom-context-2d-closepath">closePath()</a>” method to complete the path and start new one. For this step, we will start a new path and add an arc to the path by using “<a href="http://www.whatwg.org/specs/web-apps/current-work/multipage/the-canvas-element.html#dom-context-2d-arc">arc(x,y,radius, startAngle, endAngle)</a>” method. So far, we have only created the path, to actually draw the arc on canvas we will call “<a href="http://www.whatwg.org/specs/web-apps/current-work/multipage/the-canvas-element.html#dom-context-2d-stroke">stroke()</a>” method. But since stroke will draw with default color, so before calling “stroke()“ we will set “<a href="http://www.whatwg.org/specs/web-apps/current-work/multipage/the-canvas-element.html#dom-context-2d-strokestyle">strokeStyle</a>” property of context to light gray.
ctx.save();
ctx.lineWidth = 35;
ctx.beginPath();
ctx.arc(77,135,40,acDegToRad(-40),acDegToRad(180),true);
ctx.strokeStyle = "rgb(110,110,110)";
ctx.stroke();
ctx.restore();
Drawing the “blue guy”
The next thing to be drawn is that blue guy coming out of the wall. This art consists of a wall, blue guy’s head, his tummy and then this hand & legs.
Wall: The wall is the just a simple slim and tall blue rectangle.
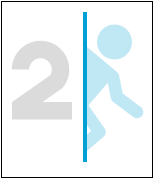
ctx.save();
ctx.fillStyle = "rgb(0,160,212)";
ctx.fillRect(162,20,8,300);
ctx.restore();
Head: The blue guy’s head is also a simple circle, but since we not have a direct method like “fillCircle()”, we’ll need to use a similar trick as we did for “2’s” arc. We will start a new path, add a full 360 degree arc and fill it with color. For filling we will use “fill()” method accompanied by “fillStyle” property set to light blue color, to fill the path with blue color thereby creating a filled circle.
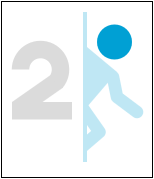
ctx.save();
ctx.fillStyle = "rgba(256,256,256,0.75)";
ctx.fillRect(0,0,300,350);
ctx.fillStyle = "rgb(0,160,212)";
ctx.beginPath();
ctx.arc(225,80,35,acDegToRad(0),acDegToRad(360));
ctx.fill();
ctx.restore();
A thing to note here is that when you create a path you have two options, either to call “stroke()” method to draw that path using current “strokeStyle”, as we did earlier and will do for hand and legs, or to call “fill()” method to fill the path with current “fillStyle”, as we did just now for head and will do for tummy. We also have an option of calling “clip()” method (discussed later).
Tummy: The tummy of the blue guy is also drawn by creating a triangle path and filling the triangle with blue color. To create the triangle path, we first start a new path, move the initial drawing point from origin or any last position (lets it be O) to a point on the wall below the head using “moveTo(x, y)” method which moves the drawing point from current draw point to a new point (let it be A) without adding the line between O & A to the path, then use “lineTo( x, y)” method which moves the drawing point to a new point (let it be B) and also adds the line between A & B to the path. Similarly add the third point (let it be C) to complete the three points of the triangle. This will also add the line between B & C to the path. Now optionally you can use “lineTo( x, y)” method to go back to point A and add line between C & A to the path and thus closing the path but by default the “fill()” will automatically assume a line between opening and closing points and will fill the enclosed area.
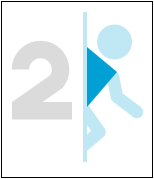
ctx.save();
ctx.fillStyle = "rgb(0,160,212)";
ctx.beginPath();
ctx.moveTo(170,90);
ctx.lineTo(230,140);
ctx.lineTo(170,210);
ctx.fill();
ctx.restore();
Hand: For hand, we will simply create two lines as we did above. A to B for shoulder to elbow and B to C for forearm. But by default, the line is 1px wide first we will set “lineWidth” property of context to 25px, then since line’s ends and joints (at B) are rectangular by default, we will set both “lineCap” property, for line ends and “lineJoin” property to “round”. And since we want lines to be drawn instead of filling the space between, we will call “stroke()” method of context.
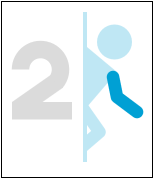
ctx.save();
ctx.lineWidth = 25;
ctx.lineCap = "round";
ctx.lineJoin = "round";
ctx.strokeStyle = "rgb(0,160,212)";
ctx.beginPath();
ctx.moveTo(222,150);
ctx.lineTo(230,190);
ctx.lineTo(270,220);
ctx.stroke();
ctx.restore();
Leg: The leg can be drawn exactly as we drew the hand so code will be much same as above except for the coordinates.
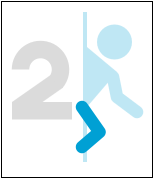
ctx.save();
ctx.lineWidth = 25;
ctx.lineCap = "round";
ctx.lineJoin = "round";
ctx.strokeStyle = "rgb(0,160,212)";
ctx.moveTo(160,210);
ctx.lineTo(195,260);
ctx.lineTo(160,290);
ctx.stroke();
ctx.restore();
But there is a problem with the above code, the result leg doesn’t look like what we want. Part of the leg is hidden in the wall, so we need to clip the extra piece of leg from the drawing.
Clip Leg: With the above code, we didn’t get what we wanted but fret not, “clip()” method comes to rescue. Clip is similar to fill method but instead of filling the area enclosed by the path with some color, it creates an enclosed invisible boundary (outline of triangle is drawn in figure only to highlight the clip area) where any drawing on it clipped if it does not lie in the clipping region and only the drawing lying in the clipping region is shown. So to clip legs protruding through the wall, we’ll first create a clipping region by creating a triangular path with one of its side coinciding with the wall and then draw the leg same as we drew the hand.
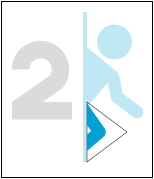
ctx.save();
ctx.beginPath();
ctx.moveTo(170,200);
ctx.lineTo(250,260);
ctx.lineTo(170,320);
ctx.lineTo(170,200);
ctx.clip();
ctx.lineWidth = 25;
ctx.lineCap = "round";
ctx.strokeStyle = "rgb(0,160,212)";
ctx.lineJoin = "round";
ctx.beginPath();
ctx.moveTo(160,210);
ctx.lineTo(195,260);
ctx.lineTo(160,290);
ctx.stroke();
ctx.restore();
And that’s all we need to do to create the that Portal 2 Logo, Below is an animated canvas showing all the pieces we used to draw it (in fact, every image in this article is actually drawn on the <Canvas> elements) accompanied by complete combined code I used to draw it. So I hope that you liked this article and stay tuned for my next post where I will discuss 2D animation on <Canvas>.
 (Actual Source Code)
(function(){
var ctx = document.getElementById("portalcanvas").getContext("2d");
var acDegToRad = function(deg){
return deg* (-(Math.PI / 180.0));
}
ctx.save();
ctx.fillStyle = "rgb(110,110,110)";
ctx.save();
ctx.fillRect(20,200,120,35);
ctx.translate(20,200);
ctx.rotate(acDegToRad(35));
ctx.fillRect(0,0,100,35);
ctx.restore();
ctx.strokeStyle = "rgb(110,110,110)";
ctx.lineWidth = 35;
ctx.beginPath();
ctx.arc(77,135,40,acDegToRad(-40),acDegToRad(180),true);
ctx.stroke();
ctx.restore();
ctx.fillStyle = "rgb(0,160,212)";
ctx.save();
ctx.fillRect(162,20,8,300);
ctx.beginPath();
ctx.arc(225,80,35,acDegToRad(0),acDegToRad(360));
ctx.fill();
ctx.beginPath();
ctx.moveTo(170,90);
ctx.lineTo(230,140);
ctx.lineTo(170,210);
ctx.fill();
ctx.lineWidth = 25;
ctx.lineCap = "round";
ctx.strokeStyle = "rgb(0,160,212)";
ctx.lineJoin = "round";
ctx.beginPath();
ctx.moveTo(222,150);
ctx.lineTo(230,190);
ctx.lineTo(270,220);
ctx.stroke();
ctx.beginPath();
ctx.moveTo(170, 200);
ctx.lineTo(250, 260);
ctx.lineTo(170,320);
ctx.clip();
ctx.beginPath();
ctx.moveTo(160,210);
ctx.lineTo(195,260);
ctx.lineTo(160,290);
ctx.stroke();
ctx.restore();
})()
This member has not yet provided a Biography. Assume it's interesting and varied, and probably something to do with programming.


 General
  News
News  Suggestion
  Question
  Bug
Bug  Answer
  Joke
Joke  Praise
  Rant
Rant  Admin
Admin 


 . The best part i like about canvas is that it can be manipulated so easily with JavaScript without even worrying about DOM further it being stateless makes it more efficient drawing surface.