Introduction
In
this article I will tell you how to create your own snippets using Visual Studio 2010.
Background
Sometimes
you have your own code and it is used in many projects and used in each and
every file. Instead of copying and pasting this code you can create your own
snippets in Visual Studio 2010. That will save you time by avoiding to having to rewrite blocks of
code
For example, in MVVM, you have to implement the
iNotifyPropertyChanged notifier and this method is used in many properties.
Using the code
Part 1: Creating a Snippet File
There are three types of snippets available:
- Expansion
- Surrounds With
- Refactoring
In this article I am creating expansion type of
snippet for Property block with MVVM functionality that is iNotifyPropertyChanged. IntelliSense
code snippets are created in an XML file.
Step 1: First create an XML file in Visual Studio 2010 and save file as
PropMVVM.snippet.
="1.0"="utf-8"
<CodeSnippets xmlns="http://schemas.microsoft.com/VisualStudio/2005/CodeSnippet">
The code snippet file starts with a CodeSnippets element which has
an xmlns attribute for
the snippet.
Step 2: Add the CodeSnippet section
="1.0"="utf-8"
<CodeSnippets xmlns="http://schemas.microsoft.com/VisualStudio/2005/CodeSnippet">
<CodeSnippet Format="1.0.0">
Step 3: Add Header section within the Code Snippet section.
<Header>
    <Title>PropMVVM </Title>
    <Shortcut>PropMVVM </Shortcut>
    <Description> This Code snippet for property with Raisepropertychanged event </Description>
    <Author>Sujeet Bhujbal</Author>
    <SnippetTypes>
    <SnippetType>Expansion</SnippetType>
    </SnippetTypes>
</Header>
This section has elements like Title, shortcut for IntelliSense and Description.
- Title: Title for Snippet
- Shortcut: when you type using Intelligence it will shows list of snippet
including which you have created with given shortcut.
- Description: Detailed description of snippet on Mouse Over
of you snippet.
- Author:
Author Name of snippet.
- Snippet Type: which type of snippet are
you going to create like Expansion (prop) or Surround with (try/catch).
Step 4: CreateDeclaration section and then add Literals or Objects within Declaration Section.
Literal elements are editable values that are inserted by user into snippet. In the below code I have created three Literals. The first Literal describes the Type of
the property or variable, I have set the default value to int (you can give any datatype including (double, bool ,string etc.). The second Literal element is for
the editable name of the property. The third Literal element has a field, the user can give any variable name that is used within the property Get/Set.
<Declarations>
   <Literal>
   <ID>type</ID>
          <ToolTip>Property Type</ToolTip>
          <Default>int</Default>
   </Literal>
   <Literal>
          <ID>property</ID>
          <ToolTip>Property Name</ToolTip>
          <Default>MyProperty</Default>
   </Literal>
  <Literal>
          <ID>field</ID>
          <ToolTip>The variable baking this property</ToolTip>
         <Default>MyVariable</Default>
   </Literal>
</Declaration>
Step 5: Code section describes the code for that snippets. In this snippet is added language is C#. Inside the Code element, add the C# code for the snippet.
<Code Language="CSharp">
<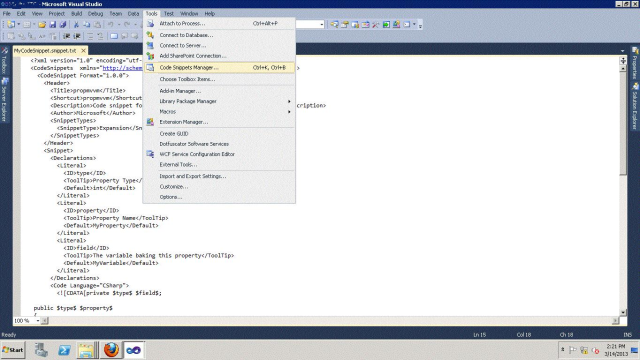
Step 2: It will show code snippet manager dialog box

Step 3: Select location for snippets and click on Finish button, your code snippet imported successfully.
Now you can use your snippet in development.
Step 4: Then press OK to save the snippet in VS 2010.
Create class file in your project. In that file start typing with your propmvvm, it will display list of IntelliSense code snippets including your snippetType propmvvm.
You will find the following
Then MVVM property snippet is added in your project successfully.
In this way you can create your own snippets and you can add to your Visual Studio 2010.
Happy Programming!!
Don’t forget to leave your feedback and comments below! If you have any query,
mail me to Sujeet.bhujbal@gmail.com.
Sujit Bhujbal is Senior Software Engineer having over 12 + years of Experience in .NET core , C#, Angular , SQL Server and has worked on various platforms. He worked during various phases of SDLC such as Requirements and Analysis, Design and Construction, development, maintenance, Testing, UAT.
He is
Microsoft Certified Technology Specialist (MCTS) in Asp.net /WCF Applications. He worked at various levels and currently working as a Senior Software Engineer.
His core areas of skill are Web application development using WPF,WCF , C#.Net, ASP.Net 3.5, WCF, SQL Server 2008, CSS, Java script Web design using HTML, AJAX and Crystal Reports
He is proficient in developing applications using SilverLight irrespective of the language, with sound knowledge of Microsoft Expression Blend and exposure to other Microsoft Expression studio tools.
Microsoft Certified Technology Specialist (MCTS): Web Applications Development with Microsoft .NET Framework 4
Microsoft Certified Technology Specialist (MCTS): Accessing Data with Microsoft .NET Framework 4
Microsoft Certified Technology Specialist (MCTS): Windows Communication Foundation Development with Microsoft .NET Framework 4
------------------------------------------------------------------------
Blog: Visit Sujit Bhujbal
CodeProject:- Sujit Bhujbal codeproject
DotNetHeaven:- DotNetHeaven
CsharpCorner:-CsharpCorner
Linkedin :-Linkedin
Stack-Exchange: <a href="http://stackexchange.com/users/469811/sujit-bhu


 General
  News
News  Suggestion
  Question
  Bug
Bug  Answer
  Joke
Joke  Praise
  Rant
Rant  Admin
Admin 


