Introduction
In this article, I would create an add-in to toggle the case of selected text. It explains both options of accessing the functionality from the Tools menu or the context menu.
History
I was really fantasized by the Add-Ins which are available on the net for Visual Studio .NET. I have been using VSPropertyGenerator for a long time and as a programmer I was always curious to know how it worked. I searched on the internet and was able to find the information but in a scattered way. So, it took me a while to write my own Add-In. To help others, I would explain step by step how to create an Add-In.
Note: Visual Studio provides the namespaces Microsoft.Office.Core, Extensibility and EnvDTE to access the DTE of Visual Studio.
Solution
Open Visual Studio .NET and create a new project. In the New Project window, select “Other projects-> Extensibility projects”, and select template as “Visual Studio .NET AddIns”.
Give a name, say “ChangeCaseAddIn”.

Press OK. Select the items in wizard as shown below:
Select Options -> “Tools” to display it in menu:
Click Next and press OK. You would have two projects names: “ChangeCaseAddIn” and “ChangeCaseAddInSetup”.
Now, open the connect.cs class in the ChangeCaseAddIn project. In the OnConnection method, add the following code:
if(connectMode == Extensibility.ext_ConnectMode.ext_cm_Startup)
{
object []contextGUIDS = new object[] { };
Commands commands = applicationObject.Commands;
_CommandBars commandBars = applicationObject.CommandBars;
try
{
CommandBar commandBar = (CommandBar)commandBars["Code Window"];
Command command = commands.AddNamedCommand(addInInstance, "ToggleCase",
"Toggle Case", "Changes selected text case", true, 59, ref contextGUIDS,
(int)vsCommandStatus.vsCommandStatusSupported+
(int)vsCommandStatus.vsCommandStatusEnabled);
CommandBarControl commandBarControl = command.AddControl(commandBar, 1);
}
catch(System.Exception )
{
}
This code helps to add the toggle case in the “Tools” menu or in the context menu.
Modify QueryStatus method to:
if(commandName == "ChangeCaseAddIn.Connect.ToggleCase")
{
  status = (vsCommandStatus)vsCommandStatus.vsCommandStatusSupported |
          vsCommandStatus.vsCommandStatusEnabled;
}
To display the menu item: change EXEC method to toggle the selected text case.
TextDocument doc =
applicationObject.ActiveDocument.Object("TextDocument") as TextDocument;
string text = doc.Selection.Text;
if(commandName == "ChangeCaseAddIn.Connect.ToggleCase")
{
if(text == text.ToLower(System.Globalization.CultureInfo.CurrentCulture))
doc.Selection.Text =
text.ToUpper(System.Globalization.CultureInfo.CurrentCulture);
else
doc.Selection.Text =
text.ToLower(System.Globalization.CultureInfo.CurrentCulture);
break;
}
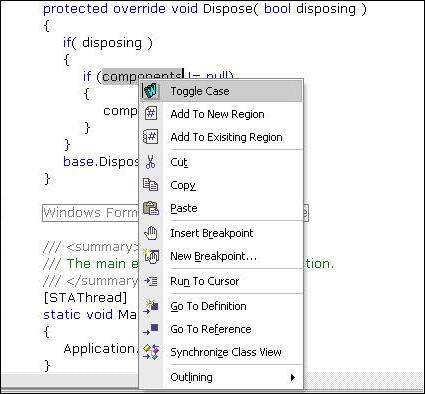
When you build and create a setup for this application, you can only see a new option called “ToggleCase” in the context menu and without any image.
To display an image against it, you need to assign a bitmap to the add-in using a resource file. To do so, add a new project to this solution for displaying the icon\BMP against the menu item. Add a new project, select “Win32 project”:
Right click on “Resource File” folder in this project and select “Add New Item”. Add a new resource file to this folder:
Now, double click on the resource file added to the Open Resource view. In Resource view, right click on the resource file and add a bitmap using “Add Resource” option. Select the BMP file and change the property “ID” from IDB_BITMAP1 to 1 and language as US English.
Now, open the connect.cs class in the ChangeCaseAddIn project. In OnConnection method, modify the following code:
Command command = commands.AddNamedCommand(addInInstance, "ToggleCase",
  "Toggle Case", "Changes selected text case", false, 1, ref contextGUIDS,
  (int)vsCommandStatus.vsCommandStatusSupported +
  (int)vsCommandStatus.vsCommandStatusEnabled);
Note we changed “true” to “false” and 59 to 1 in the AddNamedCommand method to display the bitmap created above.
Create setup again. Right click on the ChangeCaseAddInSetup project and select “File View”. Right click on the application folder and create a new folder named “1033” (for English language). Right click application folder again and select “Add Project Output”. On the dialog box, select “ChangeCaseAddIn” primary output.
Right click on the newly created folder “1033” and select primary project output of “ChangeCaseAddInUI”.
Right click on the ChangeCaseAddInSetup project again and select “Registry”. Add to a new string values to the “AddIn” key for handling bitmap displaying.
- SatelliteDLLName: Add the VC++ DLL name and path.
- SatelliteDLLPath: Path to DLL (user [TARGETDIR]).
Rebuild the solution and install the application.
Open a new project and you would see “ToggleCase” in the context menu. You could now select any text and toggle the case (upper and lower) by clicking on this item.
Modifying “OnConnection” method of the Connect class in ChangeCaseAddIn project would display this item in the Tools menu rather than in the context menu.
Conclusion
This concludes the article to create an add-in for Visual Studio .NET. I tried to explain in detail as much I could. For any apprehensions, please drop a message.
This member has not yet provided a Biography. Assume it's interesting and varied, and probably something to do with programming.


 General
  News
News  Suggestion
  Question
  Bug
Bug  Answer
  Joke
Joke  Praise
  Rant
Rant  Admin
Admin 


