DotNetNuke, and who this article is for
DotNetNuke (DNN) is a portal
application written in ASP.NET - completely open-source, free, and intelligently
designed. Due to its modular design, skinning capability, third party support
and open code, it is in use in thousands of web sites. If you haven't had a
chance to check it out, I encourage you to do so.
That having been said, I want to make it clear that this article and tool are
not for the DNN novice, nor it is aimed at the end user or casual web designer.
The information provided here is for ASP.NET developers, particularly those who
have some experience in creating modules for DNN 2.x. It could also be used by
someone who is just getting started in DNN module development, however I
strongly suggest that you also use developer resources such as the DNN forums.
About PACT
As of the writing of this article, DNN is at v3.0.5 (Beta 2). Several
"breaking changes" were made from the previous versions of DNN, and some new
features were added as well. As a result, developers are finding that they need
to retool their current modules in order to be compatible with DNN 3.x, and to
take advantage of the new capabilities, such as using resource files to populate
their control text, and the new provider methods for accessing resources (for
example, the FreeTextBox control). As well, DNN 3.x has been redesigned so that
everything is a Private Assembly (PA). However, simply adding a new project to
the solution won't properly add your module to DNN (more on this later). The
core team has not yet released the DNN 3.x developers guide, which makes getting
started in 3.x module development difficult.
I wrote PACT in order to assist developers in creating a new modules for DNN
3.x. Since DNN is in Beta, I can't insure that this tool will continue to work.
Since it is open source however, it should be easy to update as needed.
What PACT Will Do:
- Create the Module .ascx and .ascx.vb
- Create the EditModule .ascx and ascx.vb
- Create the ModuleInfo.vb
- Create the ModuleController.vb
- Create the DataProvider.vb
- Create the SQLDataProvider.vb
- Create the neccessary projects and AssemblyInfo.vb's for the module and
Providers
- Create the App_LocalResources folder and .resx files
- Custom tailor all of the above with your Namespace and Module name
- Add the required entries to the DotNetNuke .sln and BuildSolution
What PACT Will Not Do:
- Create the Installation Folder, .dnn file and .zip file in order to
distribute your custom PA
- Register the new module with the database
- Create the SQL scripts, tables, datat and stored procedures
- Add any content or controls to the new module
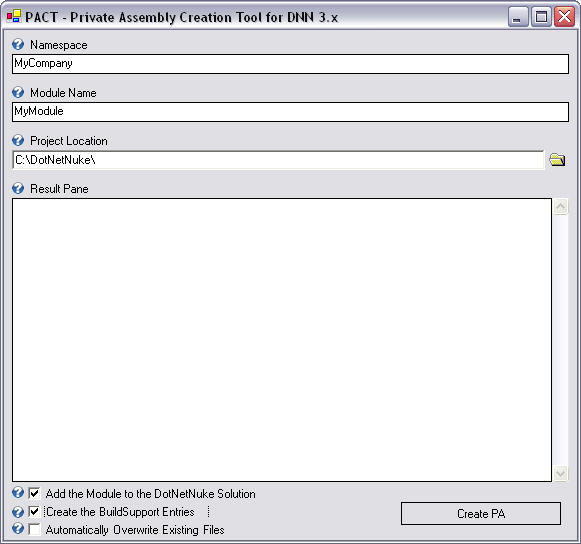
Using PACT
PACT is easy to use. Simply run the executable, and enter the Namespace you
wish to use, the name of the module you are creating, and the path to your DNN
project. Both the Namespace and Module name should be one word, with no spaces.
Underscores are allowed. PACT will base all of your namespaces and module
controls on that info. For example, if you entered "MyCompany" as the namespace,
and "MyModule" as the Module Name, then you'd see info like this in the module:
Namespace MyCompany.Modules.MyModule
...
Dim objMyModuleInfo as New MyModuleInfo
The project directory should always point to the ROOT of your project (i.e.
C:\DotNetNuke). PACT will automatically add the paths it need to build the
modules and access the files.
There are three checkboxes at the bottom of PACT. One checkbox is self
explanatory - if any of the files it is creating already exist, it will simply
overwrite them without stopping to ask you. The other two boxes give you the
option of creating the necessary entries in your \<DNN
Path>\DotNetNuke.sln file in order to add the new module to the solution, and
adding entries to the \<DNN
Path>\Solutions\DotNetNuke.All\BuildSupport\BuildSupport.vbproj file, which
will make cause your module's *.dll file to appear in the main \bin folder when
you compile the project.
Important Note: The options to add the new module entries
automatically will alter critical DNN core files. A backup of these files will
be created, but be careful nonetheless. You should make sure that the DNN
solution isn't open in VS.NET or another editor at the time. On my machine, this
process fails sometimes anyway. Follow the instructions below in order to make
these changes by hand.
Adding The New Module To The DNN Solution By Hand
Once PACT has created the new module and provider project files, you must add
the projects to the the DNN solution to compile them. The new projects will
exist at:
<DNN Path>\DesktopModules\<Module Name>\
<DNN
Path>\DesktopModules\<Module
Name>\Providers\DataProviders\SqlDataProvider\
In order to add the projects to the solution by hand in VS.NET, do the
following:
- Open the DotNetNuke.sln file
- From the menu, choose File | Add Project | Existing Project
- Browse to the project(s) above and add them
If you are not using VS.NET, then open the DotNetNuke.sln in a text editor,
and:
- Browse to the last Project Section, just before the Global Section
- Add two Project sections by copying a Project section, and then altering the
info as required.
Here is an example:
Project("{F184B08F-C81C-45F6-A57F-5ABD9991F28F}") = "MyCompany.MyModule",
         "DesktopModules\MyModule\MyCompany.MyModule.vbproj",
         "{9551FACC-33AB-430E-ACD6-B8FC147B0652}"
 ProjectSection(ProjectDependencies) = postProject
 EndProjectSection
 EndProject
 Project("{F184B08F-C81C-45F6-A57F-5ABD9991F28F}") =
  "MyCompany.MyModule.SqlDataProvider",
         "DesktopModules\MyModule\Providers\DataProviders\SqlDataProvider\
             MyCompany.MyModule.SqlDataProvider.vbproj",
         "{356A82E5-09D7-40EA-BBAA-3BE6F89C2B13}"
 ProjectSection(ProjectDependencies) = postProject
 EndProjectSection
 EndProject
Adding The New Module To The BuildSolution By Hand
Since all the modules and components of DNN are now created as individual
projects, a small problem arises. As you already know, when you compile a
project, the output will (by default) be directed to the projects \bin
directory. This is good - when you go to distribute your PA, you will want a
copy of the dll in the \bin. However, in order for the DNN website to use the
*.dll, it must be in the main DNN \bin folder. VS.NET does not allow you to
specify two output paths, and thus, a problem arises.
The core team gets around this limitation by creating a project called
BuildSupport. BuildSupport has no code of its own, and serves no purpose other
than to get the .dll files in the main \bin directory. It is an empty project,
with references to each module and component required by DNN, and its output is
set to the \bin folder. In order to be able to use your new module, you should
add a reference to your module in the BuildSupport project.
In order to add the projects to the BuildSolution by hand in VS.NET, do the
following:
- Open the \<DNN Path>\DotNetNuke.sln file
- In the Project Explorer, expand the BuildSupport project (typically the
first project in the list)
- Right-click on References, and select "Add reference"
- Click on the Projects Tab
- Select both the module project, and the module provider project
If you are not using VS.NET, then open the \<DNN
Path>\Solutions\DotNetNuke.All\BuildSupport\BuildSupport.vbproj in a text
editor, and:
Browse to the last Reference Section, just before the Imports section
Copy the previous Reference section and alter the info as required
Here is an example:
<Reference
Name = "MyCompany.Modules.MyModule"
AssemblyName = "MyCompany.Modules.MyModule"
HintPath = "..\..\..\DesktopModules\MyModule\bin\
    MyCompany.Modules.MyModule.dll"
/>
<Reference
Name = "MyCompany.Modules.MyModule.SqlDataProvider"
AssemblyName = "MyCompany.Modules.MyModule.SqlDataProvider"
HintPath = "..\..\..\DesktopModules\MyModule\Providers\
    DataProviders\SqlDataProvider
      \bin\MyCompany.Modules.MyModule.SqlDataProvider.dll"
/>
Adding The New Module To The DNN Portal
There are probably better guides on how to do this, but let me give you the
nutshell version of adding a custom module by hand.
- Open up your DNN website
- Login as Host
- From the menu, select Host | Module Definitions
- Select Add New Module Definition from the dropdown menu
- Add a module name and description, and click "Update"
- In the New Definition field, type a name (such as the name of your module)
and click "Add definition". (It should now appear in the definitions dropdown)
- Click "Add Control"
- Select your Module.ascx file in the Source dropdown
- Select "View" from the Type dropdown
- Click "Update"
- Click "Add Control" again
- This time, select your EditModule.ascx from the Source dropdown
- Select "Edit" from the Type Dropdown
- Type the word "Edit" in the Key field
- Put something in the Title field - I suggest you call it the module with the
word edit before (i.e. EditMyModule)
- Click "Update"
You should now be able to add the module to any DNN page as you would
normally.
About The New Module
What pact leaves you with is a workable shell that you can build your module
from. If you add the module to the website, you will see little more than a
label, and the option to add a new entry to the module (which doesn't really do
anything, since there is not database, data or stored procs to do anything yet).
If you examine the module code, you will see several 'TODO: entrys listed. These
are good places to start looking for what needs to be done. (If you are using
VS.NET, you can open up the task list at the bottom of the editor, right-click
and select Show|Comments, and it will locate all these for you.)
What you will need to do is:
- Add content to your module (labels, data controls, images - it's your
module!)
- If required, create tables, stored procs, and perhaps other providers
- Edit the resource files if you plan to use them
- And so on
It is far beyond the scope of this article to tell you how to build a module,
and how to use the Data Access Layer. The skeleton for this info is in the
modules, and can act as a template or guide for you to start building your own
module. Again, check the resources on the DNN website, and DNN forums from more
info on creating modules.
About App_LocalResources
Since there isn't much info about this topic yet, I figured I'd include this
information for your reference. In DNN 3.x, all the text for labels and such is
stored in resource files. This makes it possible for your website to
automatically provide information in the appropriate language for a given
visitor. The DNN beta has resources for English and German by default. I will
give you two examples of how to use this feature. These examples are already
built into the new module.
If you open up the Module.ascx file, you will see a label control, like
this:
<asp:Label id="Label1" runat="server">Label</asp:Label>
In the Module.ascx.vb file, in the Page_Load event, there is this line:
label1.Text = DotNetNuke.Services.Localization.Localization.GetString(
   "label1.text", Me.LocalResourceFile)
Here is what will happen - at runtime, the code will look in the
App_LocalResources folder for a resource file matching the name of the module,
in the format of ModuleName.ascx.resx. This is simply an XML file - most of the
information at the top you can ignore, as it won't change. But if you look
towrds the bottom of the file, you will see <data> sections. This is where
DNN will pull its resources from. In the case above, it will look for a data
section name value of label1.text, and then pull the value from that section and
apply it to the label. Here the data section as created by PACT.
<data name="AddContent.Action">
     <value>Add New MyModule</value>
</data>
<data name="ModuleHelp.Text">
 <value>The MyModule Module does this...
   description is in App_LocalResources.</value>
</data>
<data name="label1.text">
 <value>MyModule Data</value>
</data>
You'll notice that the label1.text value is "MyModule Data". When you run the
module in the website, that is the text that appears in the label. You should
also notice that the "Add New MyModule" text comes from here too, as does the
help info. This is a good example of how to use the resource file to populate
the text in your controls. PACT only creates one resource file for you. However,
if you look under the other modules, you will see more resource files. For
example, look in the App_LocalResources folder of the FAQs module. In addition
to the FAQs.ascx.resx, there is also an FAQs.ascx.de-DE.resx file. That is the
German resource file. Any users logging in who registered their country as
Germany will see the resources from that file instead.
As a second example, take a look at the EditModule.ascx file, which has this
code:
<%@ Register TagPrefix="dnn" TagName="Label"
  Src="~/controls/LabelControl.ascx" %>
 ...
 <td class="SubHead" width="125"><dnn:label id="plModuleNameValue"
   runat="server" controlname="ModuleNameValue" suffix=":"></dnn:label></td>
 <td>
 <asp:TextBox id="ModuleNameValue" cssclass="NormalTextBox" width="405"
   runat="server" />
 <asp:RequiredFieldValidator ID="valModuleNameValue"
   resourcekey="valModuleNameValue.ErrorMessage"
     ControlToValidate="ModuleNameValue"
 CssClass="NormalRed" Display="Dynamic"
   ErrorMessage="<br>A value is required" Runat="server" />
 </td>
This code takes a little more explanation. You'll notice that the TextBox
control listed here does not have a Label control next to it. However, when you
run the module and pull up the EditModule page, you'll see both a label, and a
picture of a question mark that offers some help on the field. Here is how this
this works.
The secret is the <dnn:label> control. First, you set the controlname
parameter the ID if the control that should get the label. In this case, I chose
the TextBox control. Then, set the ID of the <dnn:label> to a unique
value. The ID value can be anything, but it will need to match the <data>
tags in the EditModule.ascx.resx file in App_Localresources. Open up the
EditModule.ascx.resx file, and check the <data> sections:
<data name="plModuleNameValue.Text">
<value>ModuleName Value</value>
</data>
<data name="plModuleNameValue.Help">
<value>Enter a value for ModuleNameValue</value>
</data>
Note that there are two <data> sections here that refer to the
<dnn:label> - a text value, and a help value. The text value is the Text
that the label displays. The help value is the text that the help icon displays.
The <dnn:label> control gives all the edit screen a similar look and feel,
so you should use it whenever possible in edit modules.
Final Thoughts
Once again, I can't stress enough that you will still need to do quite a bit
of work before you have working module of any sort here. PACT only builds the
framework for you, and puts the right module and namespace in for you. You need
to do the rest.
You can learn more about module creation, and fast creation techniques by
using the excellent templates produced by DNNJungle. These
have not yet been updated for DNN 3.x, but to be honest, they will still work
for the most part with only minor alterations.
If you are creating parts for the Data Access Layer (DAL), Business layer or
stored procedures, then I suggest you use CodeSmith along with the templates produced by
Scott McCulloch.
If I Had Lawyers They Would Make Me Say This
Finally, understand that PACT is pretty much untested on any machine other
than mine (at this point in time). I expect bugs will crop up. I will try to fix
them as they appear, but you should still be careful. In essence, you are using
a poorly tested beta stage tool in order to create modules for a poorly tested
beta stage application. Use at your own risk. Backup your data before doing
anything. I guarantee nothing.
A Blatant Plug For My Other Free Tools
You'll notice that PACT works by using hundreds of StringBuilder lines. No, I
didn't code all this by hand. I wrote a small tool called File2SB that will take pretty much any text based file
and convert it into usable StringBuilder functions in either VB.NET or C#. Also,
it uses the excellent BrowseField
control, which saves a ton of coding and control placement for such a common
function.
Todd Davis has been working in web and application development for several years, using Silverlight, ASP.NET, VB.NET, C#, C++ and Javascript, as well as a great deal of work with SQL server and IIS.
He currently works for Virtual Radiologic in Eden Prairie, MN, however he is better known for his varied work in the open source community, especially the DotNetNuke project for which he provided several world-renowned training videos and modules. A huge advocate of open source and open knowledge sharing, everything on his website (www.SeaburyDesign.com) is always offered for free.
Whenever he is not actively coding at his laptop (a rarity to be sure), he can be found woodworking, walking with his wife and kids, or motoring along the back roads of MN on his Harley Davidson Fatboy.


 General
  News
News  Suggestion
  Question
  Bug
Bug  Answer
  Joke
Joke  Praise
  Rant
Rant  Admin
Admin 


