Introduction
Customizing Visual Studio .NET 2003 - sounds interesting. In this article, I am going to talk about how Visual Studio .NET 2003 can be customized to create custom projects and items as per our application's requirements.
Last year when I was working on a .NET project, I got an opportunity to develop something that was really interesting. In that project after we had designed the application framework, the functional development had to start. Since the application framework was going to standardize the functional pieces in the application, the idea of developing a code generator tool for generating code for each business function to reduce development effort and to minimize coding errors, came to our mind. Then, I started evaluating different options like writing custom tool, using enterprise templates etc. While analyzing that I came up with some interesting that I would like to share with you in this article. I am sure you will find this interesting and useful.
Background
I was evaluating different options like writing a custom tool to generate code and then plug that into Visual Studio as an add-in or using Visual Studio Enterprise Templates so that the developers could generate their function code based on standardized templates. But the problem with custom tool was that it had to be written from scratch and I didn't feel it was a very good approach for generating code. Similarly the problem with Enterprise Templates was that it didn't support various options to customize the template code and generate it for each function. While analyzing that I was thinking if there was a way to customize the "Add New Project" wizard (File->New->Project) so that the functional developers could create their projects of type "<custom> project" that was specific to our project rather than creating C# class library projects or C# Windows application projects. Then I came to know from one of my friends that "it is possible" but "how to do it" - that was not known to him. Then my research started on Microsoft Visual Studio .NET 2003 and finally I got something that was really interesting and later developers in my team found it very useful. So, in the next section, I am going to discuss step by step about how to customize Microsoft Visual Studio .NET 2003 as per our requirements so that you can see your custom project in the "New Project" dialog box rather than creating C# Windows application or class library projects.
Customizing Visual Studio .NET 2003 - step by step
Before describing the steps involved, let's decide on the classes/code that we want to put in our custom project. In this example, I am using a base C# form class which has a button called Show and in the Click event of that button a message box will be shown. So, let's create a project "ShubhoProject" of type "C# Windows Application" and after creating the project, please follow the steps described below:
- Change the default form class name from "
Form1" to "ShubhoForm".
- Change the
Text property of the form class to "ShubhoForm" and also change the class name in "ShubhoForm.cs" file to ShubhoForm and accordingly make changes everywhere in the ShubhoForm.cs file (for e.g. constructor, Application.Run( new ShubhoForm())).
- Put a button named "
btnShow" in the form and change the Text property of the button to "Show".
- Double click on the button to add the
onClick event handler in the form code.
- Add the following code in the event handler
btnShow_Click:
private void btnShow_Click(object sender, System.EventArgs e)
{
    MessageBox.Show("Message generated in template form");
}
- Now save the project and close it.
Now let's have a look at the Visual Studio .NET installation folder structure in our local machine. The files and folders in the installation folder play a very important role in customizing Visual Studio .NET. Let's browse through the VC# folder in the Visual Studio installation folder. Generally the folder path is:
C:\Program Files\Microsoft Visual Studio .NET 2003\VC#
But it may change in your machine based on the installation path. The folder structure of the above path is shown below:
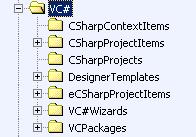
There are many folders under VC# but here I will talk about only two folders i.e. VC#Wizards, CSharpProjects.
- Go to VC#Wizards folder. This is where all the C# project wizards are stored. Copy the CSharpEXEWiz folder (used for Windows application project) and paste it under VC#Wizards folder. When you paste the copied folder it will be created as "Copy of CSharpEXEWiz".
- Rename the "Copy of CSharpEXEWiz" folder to "ShubhoProjectWiz".
- Inside the ShubhoProjectWiz folder, you will see two folders:
- Scripts
- Templates
- Go to \Templates\1033 folder and inside this folder you will see four files Templates.inf, file1.cs, assemblyinfo.cs, app.ico. File1.cs is the C# file that contains the C# Windows form template code that Visual Studio uses to generate sample Win Form class for us when we create a C# Windows application project.
- Since we have created our own template Win Form in the previous step, let's delete file1.cs from this folder and copy the ShubhoForm.cs file that we have created in the previous step, from our working folder to this folder.
- Now open the Templates.inf file. This information file generally contains the list of template files that will be used when the project is created. Open this file and replace file name file1.cs with ShubhoForm.cs.
- If you remember correctly, in the ShubhoForm.cs file we have used the class name as
ShubhoForm and the namespace name as ShubhoProject.
- Now we need to make both the namespace and class names dynamic so that the Visual Studio project wizard can create the form based on the name entered by the developer in the "Add Project" dialog box.
- Open the ShubhoForm.cs file.
- Replace the namespace name
ShubhoProject with "[!output SAFE_NAMESPACE_NAME]".
- Replace the class name
ShubhoForm with "[!output SAFE_CLASS_NAME]" everywhere in the file. While replacing the namespace and class names please do not use double quotes.
- Save and close ShubhoForm.cs
- For your information, parameters like "
[!output SAFE_NAMESPACE_NAME]" and "[!output SAFE_CLASS_NAME]" are used internally by Visual Studio wizard generator to replace these tags with the namespace name and class name entered by developers in the "Add Project" dialog box.
Now we have completed the creation of all files that are required for the custom project. The next step is to let Visual Studio .NET 2003 know about our custom project.
- Now open the CSharpProjects folder under VC# (C:\Program Files\Microsoft Visual Studio .NET 2003\VC#) folder.
- In this folder you will see many files like CSharpEXE.vsz, CSharpDLL.vsz etc. with file extensions ".vsz" (visual studio wizard file) and ".vsdir" (visual studio directory).
- Create a new text file in this folder and rename that text file as ShubhoProject.vsz (instead of creating a text file, you can also copy and paste .vsz file in this folder and rename it as ShubhoProject.vsz).
- Open the ShubhoProject.vsz file and add the following text to the file:
VSWIZARD 7.0
Wizard=VsWizard.VsWizardEngine.7.1
Param="WIZARD_NAME = ShubhoProjectWiz"
Param="WIZARD_UI = FALSE"
Param="PROJECT_TYPE = CSPROJ"
WIZARD_NAME is the name of the wizard project that we have created in the previous steps (#1 to 14).
- Save and close the ShubhoProject.vsz file.
- In the same folder (VC#\CSharpProjects) you will find a CSharp.vsdir file. This file contains the list of projects that are shown in the right side panel of the "Add Project" dialog box for "Visual C# projects".
- Create a text file in this folder and rename the file as ShubhoProject.vsdir.
- Copy the first entry from the CSharp.vsdir file (
CSharpEXE.vsz|{FAE04EC1-301F-11d3-BF4B-00C04F79EFBC}|#2318|10|#2319|{FAE04EC1-301F-11d3-BF4B-00C04F79EFBC}|4554| |WindowsApplication) and paste it in the ShubhoProject.vsdir file. Please note that each parameter is separated by a pipe character ("|").
- Then in the ShubhoProject.vsdir file, replace different parameters as described below.
- Replace the CSharpEXE.vsz file with .vsz file that we have created in the previous step # 3 (i.e. ShubhoProject.vsz).
- The third parameter is used to display the project name in the Add Project dialog box. Replace this parameter #2318 with "Shubho Win Project".
- The fourth parameter is used for logical numbering of each entry in the file. Change it to 01 (it can be any number).
- The fifth parameter is used to display the description of the project on the status bar in the Add Project dialog box. Let's change it to "Shubho Windows Application Project contains ShubhoForm".
- The last parameter is used to display the default folder name in the Add Project dialog box. Let's change it to ShubhoProject.
- Save and close the file.
Now we have completed all the changes that are required to be done to the Visual Studio installation folder. So now it's time to see the output of the changes that we have made to the Visual Studio .NET installation folder.
- Run Visual Studio .NET 2003.
- Select New->Project menu option from the File menu.
- The "Add Project" dialog box should be displayed as shown below:

- Let's have a look at the encircled text. See how the text entered in the ShubhoProject.vsdir file is displayed in the Add Project dialog box.
- Enter the project name and location. Click OK. The project should be created along with a Win Form class file named "ShubhoForm.cs".
- Open the ShubhoForm.cs file and check the namespace and class names. It should show the correct names as expected.
- Run the project. Click on Show button. The message box will be displayed as shown below:
Conclusion
Isn't this interesting? Now you know how to customize the Visual Studio .NET IDE to add a custom project to "Add New Project" dialog box. Similarly, you can explore further and try to add custom Win Form, control and class files to Visual Studio .NET so that it can be added to your project through the "Add new Item" menu option. I am planning to cover this in my next article. But till then you can try exploring different options.
Although the above example is done for Visual Studio .NET 2003, the same approach can also be used to customize 2005 beta version.
Shubho brings in 12+ years of technology experience in leading and architecting large scale applications on Web, RIA, SOA, Enterprise, Client-Server based architecture.
He has the expertise in diversified technologies such as .NET(1.1 to 4.0 with C#), ASP.NET, WCF, WPF, WF, LINQ, Silverlight, MOSS, Java+JSP+JSF, Hibernate, C/C++/VC++, VB, RDBMSs such as Oracle, DB2, SQL Server, MySQL and many open source technologies such as extJS, GWT, YUI, jQuery, Pentaho, Jasper, Joomla etc.
He is the recipient of "Most Valuable Player", “Best Project”, “Technical Expert”, "Project Excellence Award", “Best Pre-sales Team” awards by Infosys.
He is a MCPD (Enterprise Applications) and BrainBench C# certified professional.
Checkout his blog @ http://shubhamohanty.blogspot.com/


 General
  News
News  Suggestion
  Question
  Bug
Bug  Answer
  Joke
Joke  Praise
  Rant
Rant  Admin
Admin 


 . This is my vsdir file: